20 Creative Air Plant Display Ideas (With Real Images)
I absolutely love how air plants can make any space feel fresh and creative. Since they don’t need soil, you can pop them into just about any container or structure you like.
It’s honestly pretty easy to come up with unique displays that reflect your own style and still keep the plants happy.
Here, I’ll share some simple and fun ways to display air plants around your home. You’ll find ideas using natural materials, modern shapes, and even a few playful ones that fit just about any room.
Every display gives you a new way to enjoy these low-maintenance plants—they’re honestly a joy to have around.
Please note: Simplify Plants is reader-supported. As an Amazon Associate, I earn from qualifying purchases made by our readers with no extra cost added to you all! Some links in the post are affiliate links and I get a commission from purchases made through links in the post.
1) Driftwood Branch Rail with Spiral Holders

I really like using driftwood because it brings a rustic, natural vibe to my space. Each piece has its own character, so every display turns out a bit different.
The soft, weathered wood just pairs perfectly with the green of air plants. I attach a rail or rod to the wall and hang driftwood branches from it using twine or thin wire.
This setup lets me adjust or move the branches whenever I want to change things up. To hold the plants, I twist spiral holders from thin metal wire—super simple.
The spirals cradle each air plant without needing glue or soil. I can slide them along the branches until the spacing feels just right.
Having the plants up off surfaces means they get plenty of air. Watering couldn’t be easier—I just pop the holders off, soak the plants, and put them back once they’re dry.
This driftwood branch rail works over a desk, in a hallway, or near a sunny window. It turns a plain wall into a little vertical garden that feels both calm and creative.
2) Hanging Glass Vessel Terrarium with Branch
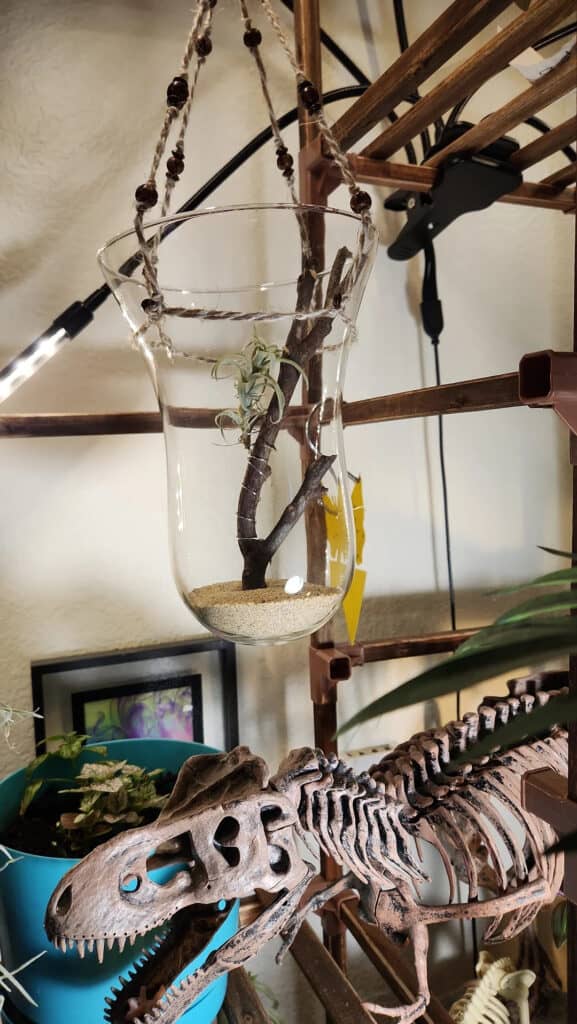
There’s something magical about a hanging glass vessel—it makes an air plant look like it’s just floating. The clear glass lets light pour in, keeping everything bright and open.
I usually hang the vessel from a natural branch to add some warmth and texture. Driftwood or a smooth tree branch works well since they’re light and easy to hang.
I attach the branch to the ceiling with strong hooks or fishing line, then hang the glass vessel at different heights for a layered effect. Mixing up the heights keeps things interesting and helps each plant stand out.
Sometimes I’ll toss in a bit of moss or small stones to keep the vessel steady. These extras look natural and don’t trap too much moisture, so the air plant stays healthy.
Bright, indirect light is best, and a gentle mist a few times a week keeps them happy. This setup fits nicely in a corner or by a window.
It draws your eye without stealing shelf space. I just love how it brings a little bit of nature indoors in a modern, clean way.
3) Tiered Metal Stand Turned Air Plant Tower

I’m always looking for new ways to show off my air plants, and a tiered metal stand makes a great vertical base. I grabbed one meant for cupcakes, but honestly, it works better for plants.
The open design lets light reach every level. Each tier gives me room to mix different sizes and shapes of air plants.
I put the bigger ones on the bottom for balance, and the smaller ones go near the top. This layout helps the tower look full but not crowded.
I’ll often add small pebbles or moss around the base of each plant to keep them steady and add some texture. The metal stand makes it easy to move the whole thing when I need to water or adjust the light.
Sometimes I wrap fairy lights around the frame. The soft glow at night really highlights the plants and gives the tower a cozy look.
This setup works on a table, shelf, or even a kitchen counter. It saves space while letting me see my plants from every side. The tiered design really turns just a few air plants into a living tower—kind of fun, honestly.
4) Statement Wall Driftwood Air Plant Installation
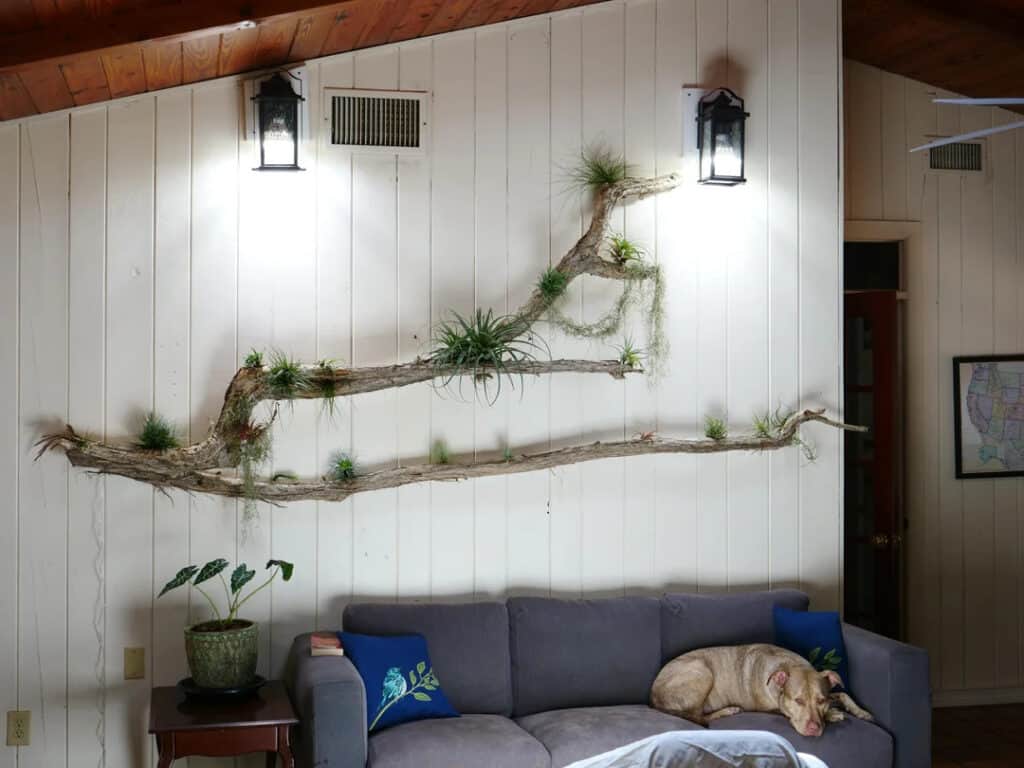
There’s just something about driftwood that adds a rustic, natural feel to a wall. When I use it as a base for air plants, it transforms a boring wall into an organic display.
The texture of the wood and the green leaves work together so well. I pick out a piece of driftwood with cool lines or knots, then attach small air plants using wire, fishing line, or glue dots—nothing that’ll hurt the plants.
I make sure the plants have room to breathe and enough light. Sometimes I hang a single long branch horizontally, other times I group smaller pieces for a layered effect.
Spacing and symmetry really change how clean the display feels. For an extra touch, I’ll add LED accent lights or small wall hooks to create depth.
The lights bring out the driftwood’s texture and make the green pop. This setup works in living rooms, hallways, or even bathrooms if there’s enough airflow.
Air plants just need a quick soak or mist each week, so it’s easy to keep up with. The result? A low-maintenance wall feature that feels fresh and a bit unique every day.
5) Organic Driftwood Cluster Arrangement
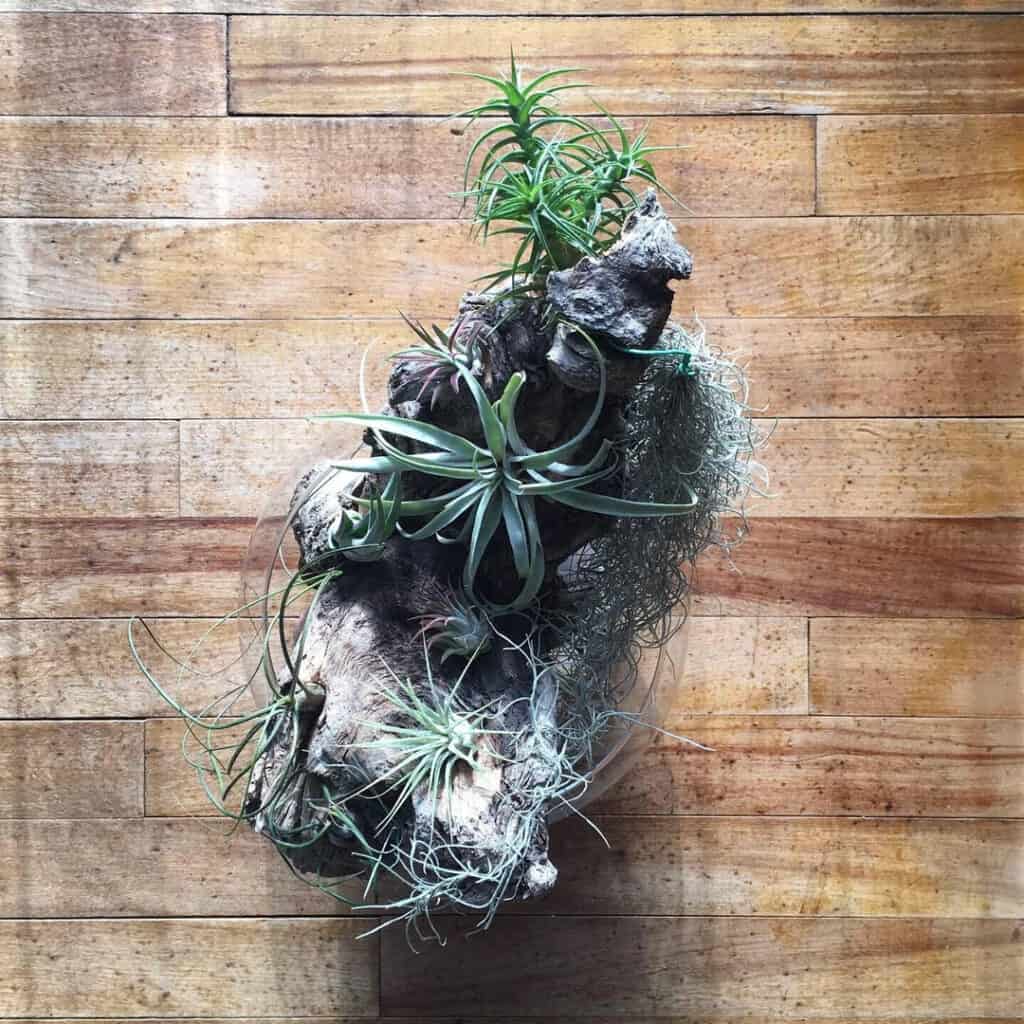
I really enjoy using driftwood for a natural, earthy display. The wood’s shape and texture make every arrangement look a little different—honestly, it’s like bringing a piece of the beach home.
I pick out driftwood pieces with interesting curves or holes, then cluster a few together so the arrangement feels balanced. The air plants fit snugly without glue, so I can change things up later.
Grouping several air plants on one driftwood piece adds depth and variety. I mix different sizes and types for contrast, and the soft green against the weathered wood just pops.
I usually put the cluster on a shelf, coffee table, or windowsill where it gets nice, bright (but indirect) light. This works well in small spaces since it doesn’t need a pot or soil.
To keep the plants healthy, I mist them a few times a week or give them a quick soak. After watering, I shake off any extra moisture so they don’t stay wet.
This simple care keeps the display looking fresh. I love how the driftwood cluster arrangement blends rustic and modern styles—it’s an easy, organic way to show off air plants.
6) Framed Wire Air Plant Gallery

I get a kick out of turning a basic frame into a living wall display for my air plants. It’s easy to make and brings a clean, modern look to any room.
I grab an old picture frame, ditch the glass, and stretch wire or metal mesh across the back. Then I gently tuck the air plants’ bases into the wire—no glue or soil needed.
I like to mix up the sizes and shapes for variety and texture. This works well on a wall, shelf, or even hanging in front of a window, since the plants get plenty of light.
The open design helps them dry quickly after misting. Sometimes I’ll paint the frame to match my decor, or just leave it natural for a rustic look.
It’s a fun way to show off air plants like art and keep care super simple.
7) Quirky Wall Art Planter (Air Plant “Bouquet Thrower”)

I can’t help but smile at this one—a “Bouquet Thrower” wall planter always gets comments. It’s inspired by that famous street art where someone’s tossing flowers, but here I swapped the flowers for bright air plants.
I mount a stencil-style print on the wall, then add a little holder where the “bouquet” goes. The holder keeps the air plants in place and lets them breathe, turning regular wall art into a living piece of decor.
This works best with colorful air plants like Tillandsia ionantha or T. xerographica. Their shapes and colors make the “bouquet” pop.
I mist them once or twice a week to keep things fresh. What I love most is how this display adds personality without eating up shelf space.
It’s easy to update—just swap out the plants or change up the background art. A small project, but it really makes a statement.
8) Macramé Wall Hanger with Air Plant Pockets

I’m a big fan of how a macramé wall hanger brings texture and warmth to a room. The woven design feels natural and gives me a creative way to show off air plants—no shelves or pots needed.
I look for a hanger with small pockets or loops that’ll hold each air plant securely. This keeps the plants visible and lets them breathe.
I usually hang it where it’ll get plenty of bright, indirect light. Sometimes I use cotton or jute cord for a soft, earthy vibe—the neutral color makes the green really stand out.
Adding beads or extra knots gives it a bit more style. Watering’s easy: I just take the plants out, mist or soak them, and put them back after they dry.
It keeps my wall art fresh and living. A macramé wall hanger fits in a bedroom, hallway, or office and turns a blank wall into a little living display that feels calm and natural.
9) Branchy Vertical Jungle with Mixed Epiphytes

I just love how a branchy vertical jungle can turn a boring wall into something alive and eye-catching. I usually hunt for sturdy branches with lots of little offshoots, giving every plant its own spot to stretch out. The natural twists and curves make the whole thing look balanced and lush, almost like it grew there by accident.
I go for mixed epiphytes—think air plants, orchids, and maybe a few tiny ferns. The mix of leaf shapes and colors keeps things interesting, and I like the way their textures play off each other. Clear fishing line or soft wire usually does the trick for attaching them, so it almost looks like they’re floating.
I mist the plants a few times a week to keep them happy. Bright, indirect light is a must, so I find a wall that gets plenty of it. Good airflow really helps too; otherwise, things get a bit too soggy.
Sometimes, I fill in empty spots with bark or a bit of moss. It gives the whole thing a more wild, natural vibe. The result? A lush vertical garden that’s lively but not a pain to take care of.
This setup is perfect for living rooms or right by a window. It grabs attention without hogging the floor. I get a kick out of watching the plants shift and grow—suddenly, the display feels new all over again.
10) Broken Pot / Fairy Garden Air Plant Scene

Turning a broken pot into something fun always feels like a small victory. The cracks and missing bits give it personality, and honestly, it’s the perfect base for a mini fairy garden.
I start by tossing in small stones or moss to create some texture. Then I wedge a few air plants into the cracks—those odd shapes just fit so well in the uneven spaces.
To make it look like a tiny world, I’ll add a little bench, some mini figurines, or maybe a winding path. These quirky details really make the whole thing pop.
Soft lighting is my go-to, or I’ll just put it near a sunny window. A quick mist every few days keeps the air plants perky without drowning them.
This setup works anywhere—indoors or even out on a patio table. It’s small, easy to move, and people always notice it. There’s just something cheerful about turning something broken into a creative display.
11) Chicken-Wire Air Plant Frame (Rustic Style)

Chicken wire is surprisingly perfect for a rustic air plant setup. It’s cheap, easy, and brings that farmhouse vibe into the room. I love how you can move plants around whenever you feel like mixing it up.
I stretch chicken wire across an old wooden frame or picture frame. The rough wood and metal wire just work together, and I always double-check the wire’s tight enough to hold a bunch of plants.
I tuck my air plants right into the wire openings—no glue, no soil, nothing fancy. Just slide the base through the gaps, and they stay put. That way, I can pull them out for watering or cleaning without any hassle.
I usually hang the frame by a window for that bright, indirect light. It instantly turns a plain wall into something living and interesting. Sometimes I’ll add a bit of driftwood or a few pebbles to make it feel more personal.
This works in kitchens, entryways, even patios. It’s a quick way to bring some natural texture and color into the space without using up shelves or counters.
12) Geometric Metal Wall Pods

I’m a big fan of geometric metal wall pods—they turn a blank wall into a modern plant zone. Clean lines, simple shapes, and they’re just right for air plants. They really shine in small spaces since they don’t hog the shelves or counters.
I usually hang a few together for balance. Mixing different shapes and sizes keeps things lively, and the metal frames set off the green of the plants nicely.
These pods fit anywhere, honestly. I’ve put them in my living room, kitchen, and office. They hold the air plants snugly, but I can still pop them out when it’s time to water.
Sometimes I go for brass or black finishes for a sleek look, but white or gold works if I want something softer. The metal catches the light and really makes the plants stand out.
Grouping three or five pods together just feels right—odd numbers always look more natural to me. I give each pod a little breathing room so nothing feels cramped.
If I’m bored with the setup, I just swap out the plants or shuffle the pods around. It’s such a low-effort way to change up my décor without buying new stuff.
These wall pods keep my air plants looking neat and modern. They’re easy to hang, simple to care for, and people always notice them.
13) Tiny Desk Critter Planter

I never get tired of having a tiny desk critter planter on my workspace. It’s cute, small, and brings a little nature to my desk without crowding it. The animal shapes always make me smile, especially on long workdays.
I usually go for a mini ceramic animal—maybe a llama, cat, or even a dinosaur. Each one holds a little air plant, which fits perfectly and keeps things tidy. No soil, no mess, just a fun pop of green.
Friends and coworkers always notice these planters. I get asked about them a lot, and honestly, you can find them online or at craft markets pretty easily.
I keep care simple: mist the air plant once or twice a week and make sure it gets some indirect sunlight. That’s really all it takes to keep them happy.
Every few months, I like to swap out the critters for a fresh look. It keeps my desk fun and gives me a little boost during the day.
A tiny desk critter planter adds personality and a bit of life to any workspace. It’s cheerful, easy to care for, and honestly, who doesn’t want a little green friend nearby?
14) Moss Art Panel with Driftwood Accent

There’s just something about a moss art panel that makes a wall feel alive. The soft greens are calming, and when I add a piece of driftwood, the whole thing gets this rustic, organic vibe.
I start with a simple wooden frame or shadow box, then layer in preserved moss in different greens for some depth. The driftwood accent always ends up stealing the show against that soft moss background.
I like to tuck a few small air plants into the moss or around the driftwood. They don’t need soil, so they stay put, and a light mist once or twice a week keeps them healthy.
This wall art fits anywhere—a living room, hallway, or home office all work. It doesn’t eat up table space and adds a little bit of the outdoors inside. I usually hang mine where it’ll catch some soft light, but never direct sun.
Making a moss panel is actually pretty relaxing. I can play around with the driftwood and moss until it feels right. No two pieces ever turn out the same, so every one is unique and personal.
15) Star-Shaped Hanging Ornaments

I’m always looking for new ways to show off my air plants, and star-shaped ornaments are just the thing. They add a playful, modern touch to any room. That geometric shape keeps things interesting without taking up much space.
I hang them near windows so the stars catch the light and make the plants look extra fresh. Air plants seem to love this setup—they get plenty of air and just the right amount of light.
You can find these ornaments in metal, wood, or ceramic. I like mixing a few gold stars with some natural wood ones for a look that’s simple but still stands out.
Clear fishing line or thin wire works best for hanging. It makes the stars look like they’re just floating there, and I can easily adjust the height for each plant.
Once a week, I take the plants down, give them a soak, and let them dry before popping them back in. It keeps things healthy and neat.
If I’m feeling festive, I’ll wrap small LED lights around the stars. The glow at night is subtle but cozy—just enough to make the space feel inviting.
These star ornaments work in living rooms, bedrooms, or even offices. No soil means no mess, and I can move them around whenever I want a new look.
16) Floating Window Frames with Air Plants

Floating window frames with air plants just look magical, honestly. The open design lets light stream through, and the whole thing feels clean and almost weightless. It’s a clever way to bring in greenery without sacrificing shelf or counter space.
I pick lightweight wooden or metal frames that fit the room’s vibe. Then I run some thin fishing line or clear wire across the frame to support the air plants. The effect? The plants just seem to hover, and it really adds a calm, airy mood to any window.
Natural light is perfect for air plants, so hanging them by a bright window helps them thrive. I make sure they don’t get scorched by direct sun, though. A quick mist a few times a week does the trick for keeping them happy.
Sometimes I hang multiple frames at different heights for a layered look. It draws the eye up and adds a bit of drama. As the sunlight shifts, the plants cast these soft, moving shadows that change all day.
This setup is great for kitchens, bathrooms, or tiny apartments. I can move the frames or rearrange them whenever I want a fresh look. It turns a plain window into a living piece of art—no soil or heavy pots needed.
17) Rotating / Tower Air Plant Stand

I’m a big fan of a rotating or tower air plant stand because it lets me show off several plants at once. The vertical setup saves space and draws your eyes up—pretty handy if you’re short on room or just want something cool on your desk.
I just spin the stand to change the view and make sure each plant gets its share of light. My air plants seem happier when I don’t have to shuffle them around individually.
Tower stands come in metal, wood, or acrylic, so I can pick one that fits my style. I usually go for a clean, simple frame—keeps the focus right where I want it: on the plants.
Mixing different sizes and shapes of air plants definitely makes things more interesting. Sometimes I’ll toss in a few decorative stones or shells for some texture on each level.
When the mood strikes, I just rotate the stand or swap out a plant or two. It’s a quick refresh—no fuss, no mess.
18) Mini Hanging Shelf for One Special Plant

There’s something charming about a mini hanging shelf that turns a single air plant into a little focal point. Sometimes I just want to highlight one favorite, not a whole group, and the simple design really puts the spotlight on the plant.
I usually grab a small wooden board and string it up with twine or thin rope. It looks great by a window—bright, indirect light is perfect—and since it barely takes up any space, it fits anywhere.
Every now and then, I’ll add a tiny accent like a pebble or a little ceramic figure. I keep it minimal so the plant stands out.
This setup makes watering and cleaning a breeze. I just take the shelf down, give the plant a quick soak, and hang it back up. It’s easy, tidy, and adds a nice pop of green wherever I want.
19) Cubby-Style Wall Grid for Air Plants

I really enjoy how a cubby-style wall grid keeps my air plants organized and easy to admire. Each little cubby gives every plant its own spot, so the wall stays tidy and visually interesting. It’s a fun way to show off all those different shapes and colors.
I usually use a metal or wooden grid that hangs flat on the wall. The open design lets air move freely, which is great for the plants. Rearranging them is no big deal—I can just swap things around whenever I feel like it.
To keep things lively, I mix different sizes of air plants in the cubbies. Some get a big one, others hold a couple of smaller guys. That way it looks balanced but never boring.
Sometimes I’ll toss in small pebbles, shells, or moss for a bit of texture. These little details make the display pop, but the plants still steal the show.
A cubby-style grid fits nicely in living rooms, offices, or entryways, and doesn’t hog table space. It turns a plain wall into a living feature—easy to care for, too.
20) Glasshouse Terrarium for Humidity Lovers

I can’t get enough of a glasshouse terrarium for air plants that like things a bit moist. The clear walls hold in humidity but still let in tons of light. It’s like having a tiny greenhouse on my desk or shelf.
I usually put a few Tillandsias inside with some stones or moss. The glass keeps the air moist, so I don’t have to mist them constantly. It’s a pretty easy way to keep humidity-loving plants happy.
Ventilation matters, though. I always leave the lid cracked open or pick a design with holes to keep mold away. A little airflow keeps things fresh.
I set my terrarium near a bright window but steer clear of direct sunlight. Too much heat dries out the air or, worse, scorches the leaves. Filtered light seems to work best for steady growth.
I’ll add some decorative bits—shells, pebbles, whatever I have around—to make it feel personal. Since air plants don’t need soil, I can change the layout anytime. It’s honestly fun, low-maintenance, and looks great in any room.
Choosing the Right Air Plants
I try to pick air plants that fit my space, lighting, and how much care I’m willing to give. I also keep an eye on how each one grows and what it really needs.
Popular Varieties for Displays
I usually start with Tillandsia ionantha—it’s small, colorful, and super easy to keep alive. When it blooms, it turns bright red or pink, which is always a nice surprise.
Tillandsia xerographica is another top pick for me. Those wide, curly leaves look amazing in hanging displays or glass globes. It’s got that superstar vibe, so I use it as a centerpiece.
For something softer, I’ll grab Tillandsia caput-medusae. Its twisted leaves give displays a playful shape. Tillandsia bulbosa is fun too—it grows in wild curves and does well in humid spots like bathrooms.
Tips for Healthy Growth
I keep my air plants happy by giving them bright, indirect light and soaking them in water for about 20–30 minutes once a week. After soaking, I shake off the extra water and let them dry upside down so they don’t rot.
If the air feels dry, I’ll mist them lightly between soakings. Good airflow keeps them fresh, so I avoid sealing them up in closed containers.
Every few weeks, I add a bromeliad or air plant fertilizer to their soak. It keeps the leaves strong and encourages them to bloom.
If I see brown or dry tips, I just trim them off with clean scissors. Makes them look tidy and helps them stay healthy.
Caring for Displayed Air Plants
I try to give my air plants the right light, water, and airflow. I also like to switch up my displays now and then so everything stays fresh and lively.
Watering and Light Requirements
I usually water my air plants two to three times a week, depending on how dry my place feels. If it’s extra dry, I’ll mist them more. Once a week or so, I soak them in a bowl of water for 20–30 minutes.
After soaking, I shake off the extra water and let them dry upside down on a towel. That keeps water from pooling at the base and causing rot.
I keep them near a bright window with indirect sunlight. Direct sun can burn their leaves, but too little light just makes them look dull. Filtered light or a fluorescent lamp is my backup if there’s not enough natural light.
If I see the leaves curling or fading, it’s usually a sign they need more moisture or a better spot.
Maintaining Vibrant Displays
I like to rotate my air plants every couple of weeks so each one gets even light. This helps them grow straight and keeps their colors nice.
To keep dust off, I’ll rinse or gently brush the leaves about once a month. Clean leaves soak up water and light better.
I check for dead or brown leaves and snip them off with small scissors. It keeps everything looking neat and encourages new growth.
If I use shells or glass containers for decoration, I make sure there’s airflow around the plants. They really need circulation to stay healthy.
Sometimes I’ll add a drop of bromeliad or orchid fertilizer to their soak once a month. It’s just enough to give them a boost without overdoing it.
Frequently Asked Questions
I’m always looking for easy, creative ways to show off my air plants. From driftwood displays to hanging glass terrariums, every setup adds personality and keeps care simple.
What are some creative ways to display air plants in my home?
I like using driftwood branches or metal stands for a natural vibe. A driftwood branch rail with spiral holders gives a clean, modern look that fits almost any space.
Can you suggest any unique containers for showcasing air plants?
I often go for hanging glass vessels or ceramic bowls. The glass vessel terrarium with a branch looks really elegant and lets light hit every part of the plant.
How do I create a wall display with air plants?
I attach air plants to driftwood or wire grids using clear fishing line or plant-safe glue. A statement wall driftwood installation makes a great focal point and doesn’t take up shelf space.
What are some low-maintenance air plant display ideas for beginners?
I’d recommend simple clusters on driftwood or small bowls with pebbles. These are easy to care for and make watering a breeze.
Could you recommend air plant display ideas that work well in small spaces?
I use tiered stands or mini wall mounts to save space. A tiered metal stand turned air plant tower adds height without cluttering up a table.
What are some tips for creating a hanging air plant display?
I usually hang plants from ceiling hooks or window frames with clear string or wire. Honestly, it’s pretty simple, but I always check that they get bright, indirect light.
Good airflow is key, so I try not to crowd them. If you notice the leaves looking a bit sad, maybe move them closer to a window or give them a little more space.
Note: Some Images Are Sourced From Reddit For Inspiration.
Note: Some images in the articles are sourced from Reddit and Other Platforms For Reference Purpose.