8 Signs That Your Rubber Plant Is Dying (With Pictures)
Have you ever wondered how to tell if your rubber plant is not doing well? In this article, we will talk about eight signs that may indicate your rubber plant is dying. Whether you’re a plant enthusiast or just starting, learning these signs will help you take good care of your rubber plant.
Signs of a dying Rubber plant are discolored leaves, defoliation, wilting, blights, spots, stunted growth, or damaged and smelly roots. These signs could signify numerous issues. Finding the correct problem from these signs is essential to revive the plant.
Checking the Rubber plant daily helps you quickly catch the early symptoms and solve the issue.
Please read this article until the end as we explore the signs of dying Rubber plants, the problems, and easy solutions.
Please note: Simplify Plants is reader-supported. As an Amazon Associate, I earn from qualifying purchases made by our readers with no extra cost added to you all! Some links in the post are affiliate links and I get a commission from purchases made through links in the post.
Signs your Rubber plant is dying
Most people are unaware of how to save a dying Rubber plant because they don’t know what is killing their plant.
The plant shows a few signs of stress, but primarily, beginners don’t understand these signs.
I get a lot of messages from my readers where they keep asking me about the signs of a dying Rubber plant and the reasons so that they can solve the issue and save the plant.
So today, I will highlight the prevalent signs that indicate that your Rubber plant is dying:
1. Rubber plant leaves are yellowing/browning and dying

One of the most common signs that indicate a weak Rubber plant is the lush green leaves turning yellow or brown.
Over time, these leaves will entirely become yellow or brown and then fall off the plant.
If you don’t take immediate action, all the leaves will lose color, fall off, and the plant will die.
There are several reasons behind yellow or brown leaves. But the most common reasons are:
- Incorrect watering
- Poor soil drainage
- Lack of nutrients or over-fertilization
- Low humidity
- Repotting shock
Once you discover the reason, you can solve the issue and save your plant from dying.
However, repotting shock is not an issue, and your plant won’t die; it’s normal.
It happens due to a sudden change in the plant environment.
Once it settles down, everything will be back to normal.
2. Rubber plant leaves are wilting and dying

Rubber plant wilting is a common sign of lack of moisture.
It can happen for various reasons, like underwatering, poor retention quality of the soil, and low humidity.
The leaves wilt, lose color, dry out, and fall off in these cases.
Slowly, the plant will die.
It can also happen due to overwatering and poor-drained soil.
When water stays in the soil for too long, the roots suffocate, and the plant fails to receive moisture and nutrients.
Therefore, it will show signs of a lack of moisture.
Another issue is over-fertilization, where salts from fertilizers accumulate in the soil and burn the roots, hindering moisture and nutrient transfer.
You need to check and solve each issue and find out which was causing the wilting.
3. The Rubber plant leaves are drying and falling off, and the plant is dying

Abscission is a normal process in all plants’ life cycles, and Rubber plants are no exception.
During fall and winter, the plant experiences changes in light levels.
Winter is a dormant season for the Rubber plants.
As the temperature starts reducing in the fall, the plant will slowly lose its leaves in response to the temperature and light change.
It may seem like the plant is dying, but it isn’t. As the weather warms up, the plant will again have new growth and start thriving.
Another natural process is old age.
The old leaves will lose color, dry over time, and fall off.
But don’t worry; the plant will grow new leaves again.
Except for these two, a few more issues lead to leaf loss.
For example, when you practice improper watering, use poor soil quality, or over-fertilize, the roots get affected and fail to transfer the nutrients and moisture to the other plant parts.
The leaves turn yellow and fall off.
Again, when you repot the plant, the plant gets shocked due to the sudden change, and it loses leaves out of shock.
It is called transplant shock.
Since there are multiple reasons, you must find out the actual cause and solve it to stop defoliation.
4. Rubber plant leaves have blights, and the plant is dying

Leaf blights indicate bacterial and fungal infections and immediate action is needed to save the plant.
Unfortunately, you can’t save your plant from some incurable diseases like Xanthomonas leaf spot or Southern blight.
But other diseases, like leaf spot, anthracnose, Alternaria blights, or fusarium wilt, can be controlled.
You’ll notice brown spots with a yellow halo or only brown spots with a black hole at the center.
Pests can also carry some diseases.
In such conditions, you must control the pests and keep your plant strong to prevent these diseases.
Don’t worry. We have shared the steps to deal with these issues.
So, keep reading.
Remember that you can’t eliminate these diseases entirely.
You can suppress and stop them from reoccurrence.
They’ll return if conditions are made favorable.
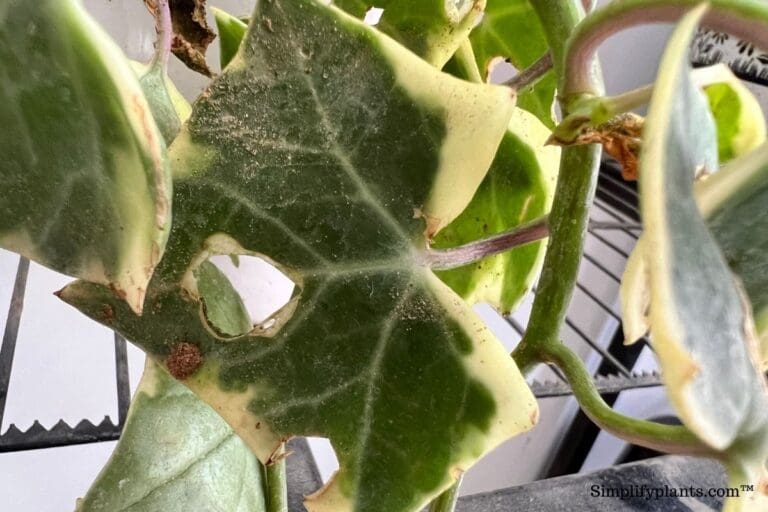
5. Rubber plant leaves have white or brown marks or spots

White or brown spots could mean several issues, for example:
- Edema
- Sunburns
- Cold drafts
- Pests and fungal diseases
In edema, the leaves create blisters because of water pressure that burst and create white or brown spots.
When the plant is exposed to direct sunlight for too long, the sunlight burns the leaves, further making brown scorch marks on the leaves, especially at the tips and edges.
Pests and diseases can also create brown or white spots.
These signs slowly spread to the entire plant, including the leaves and stems. At this time, the plant may be dying.
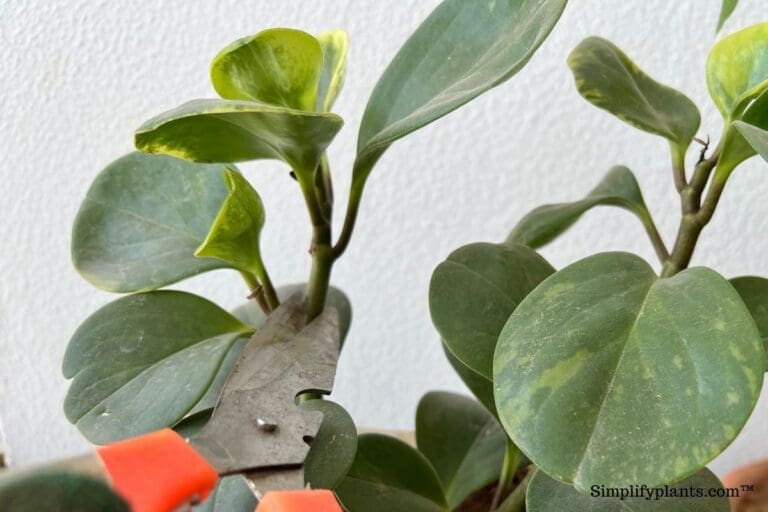
6. The Rubber plant is becoming leggy

Leggy growth results from three things:
- Low light
- Excessive feeding
- Lack of pruning.
In low light conditions, the plant will keep growing towards the sunlight for the light source and become leggy over time.
In over-fertilization, excessive nitrogen can make the plant tall and leggy faster.
Rubber plants can grow around 50-100 feet outside but reach 8-10 feet indoors.
Pruning keeps them compact and ideal for indoor plants.
But the lack of pruning makes them extremely tall and leggy.
When your plant grows leggy, you need to find out which of these reasons are making your plant leggy and solve it.
Leggy growth doesn’t necessarily kill the plant.
But, excessive leggy growth makes the plant bend and break from the center. At this point, it might die.
7. Rubber plants have stopped growing

Stunted or no growth is expected during the Rubber plant’s winter dormancy.
They rest and preserve energy to thrive again in the spring and summer.
In this case, there is no need to worry.
But if the plant has stunted growth in the active months, that is something to worry about.
Common reasons could be:
- Incorrect watering
- Poor soil quality with improper pH levels
- Lack of nutrients or over-fertilization
- Low light conditions.
Sometimes, it is just a repotting shock.
Your plant is not dying; it’s just shocked due to the sudden change.
There is no solution for this.
Once the plant adjusts to the new environment after repotting, it will grow normally.
Find out which one causes stunted growth and fix the issue.
8. The Rubber plant base is becoming smelly with brown stems and roots

One reason is root rot from excessive moisture levels in the soil.
Excessive moisture cuts off oxygen and suffocates the roots.
It further develops fungi that decay the roots and cause root rot.
In root rot, the plant’s base and the roots start decaying and release a horrible smell.
Once the roots get destroyed, the plant will die.
To avoid this, you need to stop overwatering and use well-drained soil.
Rubber plant care tips

Providing the Rubber plant with the correct requirements and care tips can keep it from getting stressed and dying.
Caring for the Rubber plants is very easy.
Here are the requirements and care tips you need to follow:
- Provide the plant with 6-8 hours of bright indirect sunlight.
- Water the plant weekly only when the top few inches have dried. Reduce the frequency in winter.
- Use well-drained soil that drains excess water while holding the required moisture. The soil pH must be around 5.5 to 7. An ideal soil mix is equal parts of peat moss, pine bark, and coarse sand or perlite.
- Fertilize the plant every 2-4 weeks with a balanced liquid fertilizer throughout the spring and summer. Stop it in winter.
- Repot the plant every 1-2 years with a new soil mix. The pot should be 1-2 inches bigger than the old one and must have drainage holes.
- Avoid cold drafts and maintain warm temperatures between 65-85°F.
- Let the humidity be around 50-60%, neither more nor less.
- Prune the plant regularly to maintain its shape and avoid leggy growth.
- Check out for pests and diseases and take immediate action. To prevent infestation, you can spray neem oil every 15 days.
- Clean the leaves 1-2 times per month to maintain their glossiness. Avoid leaf-shine products. Normal water will do the job.
- With these simple care tips, your Rubber plant will thrive year-round.
Final thoughts
If your Rubber plant is dying, identify the signs of the dying plant, find the reasons, and take immediate action to solve the issue and save your plant from dying. Common signs of dying are excessive discolored leaves, wilting, leggy growth and leaning, blights, white and brown marks, leaves falling off, stunted growth, and mushy stems and roots.
The common reasons are improper watering, inadequate sunlight, lack of nutrients, over-fertilization, cold drafts, poor soil quality, or pests and diseases. Different signs could indicate different meanings.
Find out which signs indicate what issue and solve as needed. Follow the care tips correctly, watch for any infestation or stress, and take immediate action for early detection and troubleshooting.
Will the Rubber plant leaves grow back after falling off?
Usually, the leaves of the plant will grow back with proper treatment. However, severe diseases may hinder leaf regrowth or delay the process. It depends on the damage level and how you have cared for it.
How long do the Rubber plants live?
Generally, the plants can live over 10 years. If your plant is dying after 10-12 years, it’s normal. But before that, it indicates an issue, and you must identify and fix it.
Reference: Rubber plant Wikipedia
Note: Some images in the articles are sourced from Reddit and Other Platforms For Reference Purpose.


Can this plant be put on the porch outside in the summer
Yes, you can put your rubber plant outside on the porch in summer! Just be sure to place it in a spot with bright, indirect light—avoid harsh direct sun, which can scorch the leaves. Gradually acclimate it to outdoor conditions, and bring it back inside before temperatures drop in the fall.