How To Propagate Spider Plant? (3 Ways: Step-By-Step Guide)
Scientifically known as Chlorophytum Comosum, spider plants are popular indoor house plants. These plants are native to the Southern African or tropical African belt and can be propagated in multiple ways. So if you are trying to learn how you can propagate your spider plant, then you have landed in the right place.
Spider plants can be propagated in many ways. You can snip the baby plant from the mother plant and repot the cutting into water or soil. Apart from these methods, you can also use a small pot and plant the spider pups into the soil. Once the baby plant starts to root, you can clip it separate from the mother plant.
In this guide, we will learn all about these methods of propagating the spider plants. These plants produce small flowers from the buds. The seeds of these plants are also used for propagation.
One can choose to leave the small babies on the mother plant, and the mother plant grows to become fuller. However, it is a wise idea to use babies and form new plants. Propagating the Spider Plants is slightly different than the typical indoor house plants.
Let us get into the guide, and we will check out the procedure for the propagation of your beautiful Spider Plants. Happy Propagating!

Please note: Simplify Plants is reader-supported. As an Amazon Associate, I earn from qualifying purchases made by our readers with no extra cost added to you all! Some links in the post are affiliate links and I get a commission from purchases made through links in the post.
When to propagate spider plant?
The best time for the propagation is during the late spring and summer season. This is the growing season for most of the indoor plants and perfect for propagation and repotting.
It is generally during the summer season when the spider plants produce the spider babies, and one of the keys to growing more babies is the plant’s health.
How is spider plant propagated?
The spider plants are propagated from the spider pups. These are the small plant buds hanging around the foliage. I know that it sounds funny, but these pups will help you grow the spider plants.
Before we get into propagation, you need to understand that these plants love bright light. Bright indirect light is the most crucial requirement of the spider plants, especially if you want to propagate them successfully.

You need to keep these plants six to eight feet away from a south-facing window for ideal lighting conditions.
If we increase the amount of light to 12 hours of light per day, the spider plant increases the production of the spider babies or pups for propagation.
If the spider plant gets less light, there will be lesser variegation on the plants and lesser babies, as we discussed earlier. We need to make sure that the plant is pruned for better growth of the spider plants.
Never try to propagate an unhealthy plant, as we know this from my earlier guides. Revive the plant to its health, and the propagation technique will be smooth.
Also read: How much light do spider plant need?
Things required for propagation

Before we begin propagating our spider plant, let us list all the items required during the propagation process. Once we list out, I will also talk about their uses.
- A pair of clean scissors/pruners/scissors
- Disinfectant or rubbing alcohol
- Cotton balls
- Paper Clips
- Water that will be required during the procedure
- A container or a vial to pot the spider babies or pups
- Garden soil (standard potting soil)
- Some pots for the propagation
- Cocopeat, pumice, and compost
Now, we have the list of items that are required for the process. I want to throw some light on the usage of some of the listed items, and for the rest, we will see it in the propagation process.
As we have kept a simple golden rule for pruning and propagation, so let us review that first.
The first three items on the list should be common for all the pruning and the propagation process. The items were a pair of clippers/scissors/pruners, disinfectants, and cotton balls.
You might ask why the disinfectant? The simple answer to this question is that we do not want any disease to be transferred from the mother plant to our new plants or from any other plant to the mother plant.
To avoid the chances of transferring diseases, we first clean apply the disinfectant on the cotton balls and clean the pruners with the rubbing alcohol.
The process of disinfecting pruners avoids the probability of the disease contagion on the plants and makes our life happier. If there are diseases, it will create a whole lot of issues.
Let us get into the technique of propagation from the spider pups.
How do you propagate a spider plant?
For the propagation process, the Spider plant can be propagated in three ways:
- Water Propagation
- Soil Propagation
- Propagation without clipping
We will now look at each propagation technique individually.
Propagate spider plant in water

Each spider babies or pups are produced from another stem that is elongated on the mother plant. For the process of propagation, we will need these spider pups.
The stem looks wheatish in color and is tiny. These are very thin stems growing all over the plant.
The more the pups, the greater number of plants we will get. We need to separate the spider pups from the mother plant.
Also, the spider plants are prone to aphids and scale insects, and hence we always clean the pruners while pruning or while propagating.
Firstly, to start the process, the golden rule of propagation is the disinfecting of the pruners. Clean your pruners with rubbing alcohol to avoid any disease spread.
When we take a closer look at the spider plant, we will see spiderlings all around the plant. We will need to locate the spiderlings and ensure that the spiderlings have developed enough roots or at least small root buds.
Not all the spiderlings that the spider plant produces develop to be a fuller plant, so we take multiple spiderlings for the process.
The chances of successfully propagating the spider pups into the water first and then potting it in the soil are generally higher than potting the spiderlings directly into the soil.
While cutting, I suggest taking the entire stem for this process. This is because when we put the spiderlings into the water, these stem helps to keep the root underwater and not the whole spider pup.

If the entire spider pup is kept underwater, then the pups will rot.
So, make the cut and separate the spider pups. What we need is a container that is filled with water.
We can opt for two different methods here. Either we can keep the spiderlings separate in a different container or small vials, or what we can do is keep a bigger container filled with water and keep the spiderlings together.
The most important part of the process is to check how deep should the spider pup be immersed. Generally, we keep the node underwater and not the pups.
While checking the pups, we see that there are small roots or small root buds on the pups. The pups should be immersed in the water right underneath the node.
Next comes the placement of the plant. The spider plant loves bright indirect sunlight, and hence we will keep it away from the sun for about ten days to a fortnight.
After a fortnight, we will see that the pups have developed white-colored roots and the pups are now ready to be repotted into the soil.
The type of soil that is suggested for the spider plant’s potting is regular potting soil, which has good aeration.
Aeration can be developed using perlite or pumice, and we can also add compost to the mixture. The mixture should be 50% potting soil, 25% perlite, and 25% compost.
This mixture will help the soil absorb the required nutrients for the plant and create good drainage for the soil.
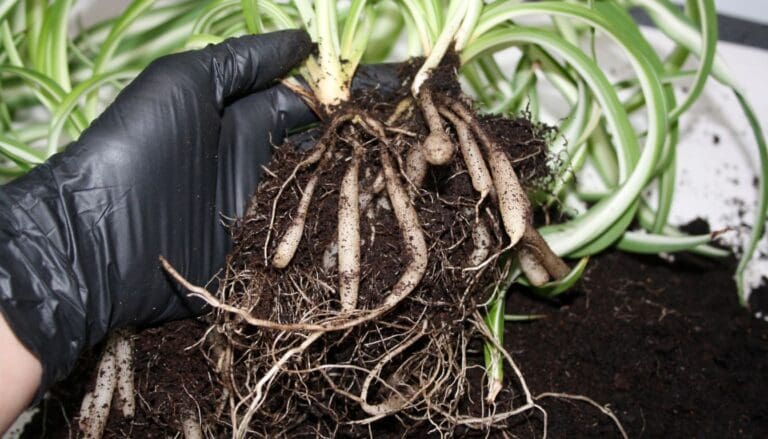
The spider plant roots develop really quickly. And once developed, the roots become very tuberous and thick.
Take a standard pot, fill it up with the soil mixture, and gently add the spider pups to the pot. Now, if we want, we can put each pup in a different pot or on the same pot; that’s entirely your decision.
Once the pups are potted in the pot, we will water up the pot and make sure that the water is drained from the drainage holes.
Allow the plant to sit on the excess water for a while, so the roots get the desired amount of water that they need.
For about a couple of weeks, make sure to keep the soil moist because the roots have to acclimate from water to soil.
After about two weeks, we may water the plant in normal condition. The placement of the plant is crucial for healthier growth.
Keep the pot in bright indirect sunlight and maintain the right amount of humidity. The spider plant loves humidity so misting the spider plant is very important.
With this, we conclude the water propagation of a spider plant. Now let us check out other methods as well.
Propagate spider plant in soil

It is your choice whether you want to grow the spider plant pups in water first and then repot the developed roots into the soil, or we can directly repot the pups in the soil.
For propagating the pups in the soil, we will first cut the pups the same way we had done for the water propagation, that is, by removing each pup from the stem.
It is your choice whether you want each pup in a single pot or on different pots.

Then, we take a pot, fill it with a mixture of 50% regular potting soil, 25% perlite or pumice, and 25% compost. Make a small hole in between and gently place the pups underneath the soil.
The roots will be developed from the spider pups and ensure that the node is inserted well underneath the soil.
Next comes the watering of the plant. The pot should have a well-developed drainage system so that the excess water is removed after the watering.
The spider plant loves to be rootbound, and hence we need perfect watering for the plant. Remember the technique of feeling the soil before watering the plant.
When we water the spider plant, allow the plant to sit on excess water for a while and then remove the excess water. This way, the roots will absorb the right amount of water.
Place the pot in indirect bright sunlight and maintain the humidity. The spider plant loves humidity, so consider misting the plant.

About 2-3 weeks, we will see that the plants have developed roots of about 1-2 inches in size. As mentioned earlier, these plants love to be rootbound, and the roots go rootbound easily.
Once the plant has grown bigger, and the roots have developed up to 4-5 inches long, we will need to repot the plant to a pot of a bigger size.
Once it’s about a month and a half, and with a perfect watering and placement, the plant will be ready to be transferred to a bigger sized pot or the garden area.
By repotting the plant to a bigger size pot, we allow the roots to form better, and it keeps the plant healthier.
Also read: Soil requirements of spider plant
Propagate spider plant without cutting
When we have enough space to develop the plants, there is another approach to developing spider plants naturally. For this cycle, all we need is a few pots and some paper clips.
We need not make a cut for this cycle and simply select two stems for the process.
Take two pots that are loaded up with a mixture of soil 50%, compost 25%, and perlite or pumice 25%. We should also water the pot after adding the mixture to the pot.
Keep the pots directly close to the plant and ensure that one of the stems goes over the pots and contacts the soil. Do likewise with two unique stems with the pups for both the pots.
We should be certain that the node from the plant gets in contact with the wet soil. We can utilize paper clips.
By utilizing typical paper clips, we can nail down the stem with the spider pups to the soil, so the node interacts with the soil.
By doing this, the plant will trigger the pups to begin to deliver roots from the node. Nail it down from various regions and do likewise with the other pot.
Ensure that you water the pots and keep the soil damp. Inevitably, we will see the development of roots from the node of the spider pups.
After around 2-3 weeks, we will see roots of around 1-2 inches.
When we see the development of the roots, we can remove the pups from the mother plant using a pruner or scissors. We needn’t bother with the mother plant now.
This cycle is the characteristic method of propagating the spider plants.
The main thing required is the space and to ensure that we have roots before disconnecting from the mother plant.
All the best for propagating your spider plant successfully. Please inform us as to whether there are any inquiries.
Related questions
Should I cut the babies off my spider plant?
Yes, you can clip the spider plant pup using a scissor. It is not recommended to clip it when they are really young. However, you can prune them once they grow a little big and propagate your spider plant by repotting the pruned baby plants.
How long does it take for a spider plant to propagate?
After you plant the spider plant cuttings into the soil or water, you can expect them to root within 7-10 days. However, not all cutting is likely to propagate successfully. Thus, if you just have a handful of them, don’t expect growth from all of them.
Note: Some images in the articles are sourced from Reddit and Other Platforms For Reference Purpose.