How To Propagate Monstera Plant? (Soil+Water Propagation)
The Swiss Cheese Plant, also known as the Monstera deliciosa, is a straightforward plant grown from cuttings. We keep these plants for the fenestrations that are available on the leaves. If allowed to grow, the monstera plants can proliferate quickly, and we need to prune them to keep them a bit smaller. The cutting can be used for propagation. But how can we propagate a monstera plant? Let’s find out!
Propagating a monstera plant involves clipping the leaves stem below the rooting node. You can plant this clipping in soil and water. Make sure the stem has a healthy leaf and at least one node for successful propagation. Once the plant develops healthy roots, you can transplant the monstera into the soil.
Has your monstera deliciosa gone to be a monster? It is the perfect time to prune the plant while making new plants with the cuttings.
In this guide, we will learn about how we can propagate the monstera plant and the inevitable mistakes that we should avoid while propagating. Let us check out the direction. Happy propagating!
Please note: Simplify Plants is reader-supported. As an Amazon Associate, I earn from qualifying purchases made by our readers with no extra cost added to you all! Some links in the post are affiliate links and I get a commission from purchases made through links in the post.
When to propagate your monstera plant?
As said in the earlier guide, never propagate an unhealthy plant. When you know that the plant you are about to propagate seems droopy, looks sad, or leaves have brown edges, or wilting leaves, never propagate it.
We know that it is the only way to revive the plant. However, the propagated plant might survive for a while but might not grow successfully.
Always try to revive the plant first, and if we are totally out of options, keep propagation as your last resort.
Another point to consider before the propagation is the time of the year. We might try and propagate the plant around the winters.
However, during the winters, plants experience slower growth; hence, propagating during the winters might fail.
The best season for propagating indoor plants is from mid-spring to late summer. That is the time when the plant experiences better growth.
Remember, patience is the key to propagation. Never do things in a jiffy.
Some of the cuttings that we have taken might not experience good growth or might be dormant. One needs to give the plant some time to notice growth and keep nurturing the plant.
Let us check out the supplies that we need to propagate the monstera deliciosa.
Also Read: Why Is My Monstera Not Growing? (Causes+What To Do)
Supplies needed to propagate monstera plant
Before we begin the propagation, we need to keep a few things handy with us. To name a few, I will first list the items and talk about their use.
- A pair of clean scissors/pruners/clippers
- Disinfectant or rubbing alcohol
- Cotton balls
- Water that will be required during the process
- A jar to keep the cutting
- A mixture of soil and pumice
- A pot for the propagation
So let us first understand the use of the items.
Disinfectants are the most important before we prune any plant. The reason for this is that if the plant has any mealybugs or spider mites on it, then we do not want any sort of disease or insects getting transferred to the new plant.
Hence, we will keep the cleaning of the scissors as the golden rule for propagation. That will help us remove the chances of any bugs getting transferred to our new plant.
Now, for the rest of the items, we will understand the use of each as we proceed. So, let us move right ahead for the propagation process.
How to Propagate?
For the process of propagation, the Monstera deliciosa can be propagated by two of the following ways:
- Water Propagation
- Soil Propagation
Let us see what happens when we follow each of the processes individually.
How to propagate monstera in water?
Pick a clean spot for the procedure as things might get messy while following the propagation process.
Follow the golden rule of propagation. You are right. We will begin with the cleaning of the pruners with the disinfectant. Using a clean scissor is a significant step for propagation.
If the pruner is not cleaned, we might end up with an additional fungus and bacteria problem, and we do not want that. Cleaning will eliminate the possibility.
Now, let us understand the propagation method step-by-step:
1) Preparing for propagation
Before we begin cutting the Monstera deliciosa, we will need to make sure of certain things.
First of all, it is important to look that we have at least one node at the bottom of the cutting.
Now, you might wonder, what is a node? So, the node is where we see the growth of the new leaves. The stem continues, and then we have a new leaf.
When we have cut, we will need to check that at least one node is underwater. So, things to note here are one leaf left and one node at the bottom, which will be immersed in water.
Sometime, we will see that the plant has an air root, which is a positive sign. This will help develop the roots faster. However, the air root is secondary; what we need is a node.
When there is an air root, the air root will transform into a water root. There will be small roots that will emerge from the air roots. The air root increases the success rate for the propagation.
No air roots don’t mean that there is a problem. We do not need the air roots; what we need is a node.
2) Clipping at the right spot

While cutting, we should keep a small portion of the stem in hand, which means that the cut should not be as close to the node.
At least move down about 1- 2 inches from the node to have a piece of stem with us.
Proceed with the cut. Be gentle during the process. Now, we have our cutting. This will help us create a new plant.
It could be that the cutting we made has one or two leaves along with the air roots, stem, and a node.
If we want, we could remove both the leaves and just keep the branch. However, for a higher success rate, we should keep at least one of the leaves.
Sometimes, what we do after cutting, is that we keep the cutting out in the air to dry out, but it is seen that the chances of success increase if the cutting is directly inserted in the water right after the cut.
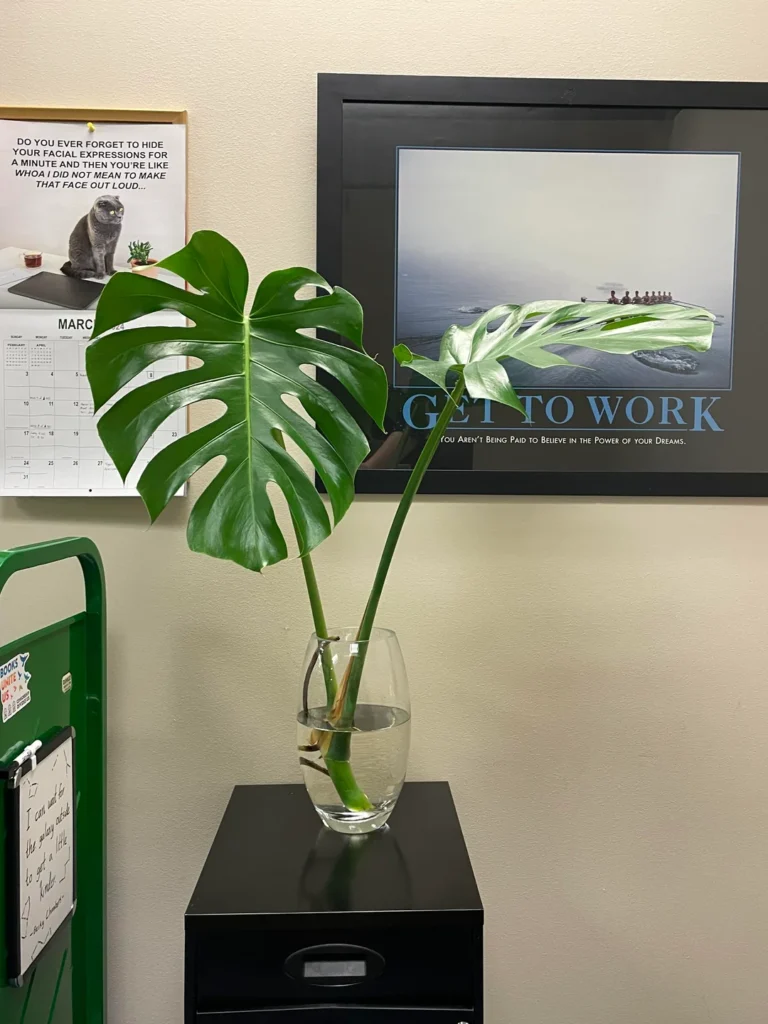
3) Submerge the clipping right into the jar of water
Now, we will use the jar and fill it with water. The pot’s size directly depends on the size of the monstera plant and the size of the cutting that we had made.
Choose a jar accordingly and fill it with tap water. If the water in your area has too much chlorine in it, consider boiling the water and let it cool down.
Once the water is filled and the jar ready, we will immerse the cutting in the water.
We need to confirm that the node should be underwater because it is from the node that we will see the roots’ growth. The node needs to be underwater at all times.
An important point to note for the care of the cutting is the changing of water. We need to consider changing the water at least once a week.
It won’t be a problem if we forget to change the water for about two weeks. However, that might develop algae in the water. We do not want that.
Plants suck up nutrients from the water, and the more the water is changed, the more are the chances of success. We can also change the water daily.
4) Move the plant to a bright spot
Next comes the placement of the plant. The monstera deliciosa loves bright indirect sunlight.
So, consider keeping the jar near the window where it gets the indirect bright light and change the water.
Patience is the key to success. We will see the roots starting to grow from the node. If in case there is an air root, then we will also see roots forming on the air roots.
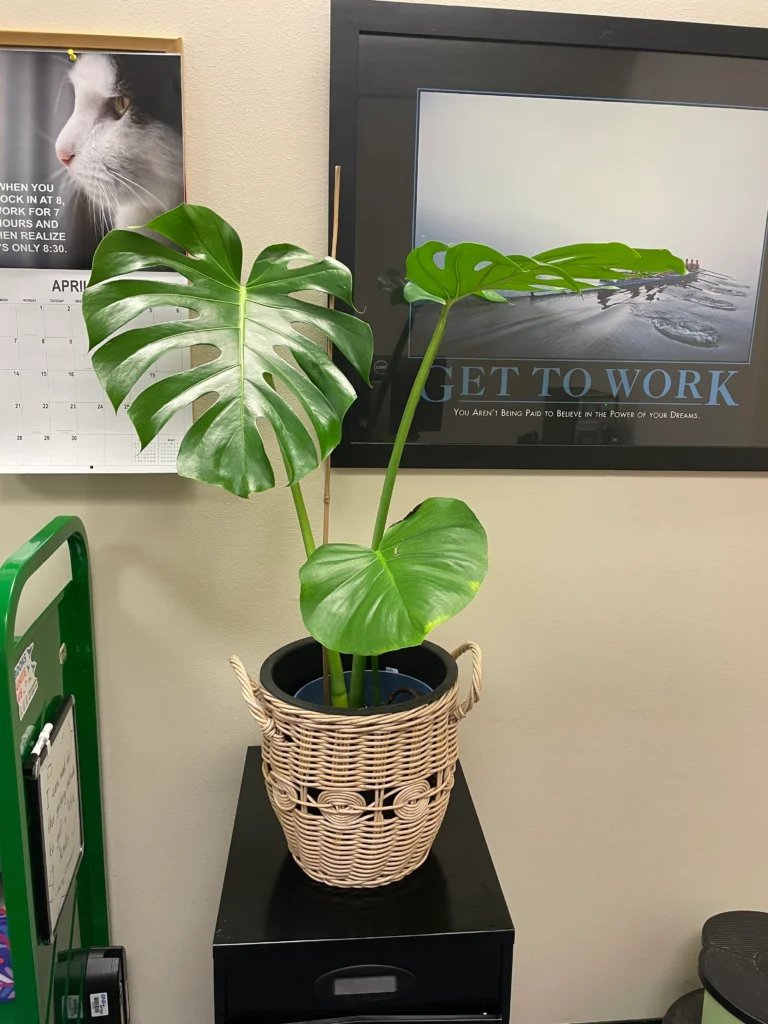
5) Repot the plant in the soil as roots develop

We should not repot the plant unless the roots are at least 2 inches long or 5 centimeters long. We can also leave it to grow up to 4 inches long before we make the transition of repotting the plant from water to soil.
Once we see that the roots are of the desired length, it is time for the repot. For this, we will take a pot, fill it with a mixture of soil and pumice or soil or perlite.
We add the mixture because the soil needs to be moist for at least four to eight weeks, and the combination will help create the aeration for the soil.
Remove the cutting from the water jar.
Check the color of the root, whether it is white and crispy or black and mushy. If there is no root rot, the cutting should be transferred.
6) Provide appropriate care to the plant
Keep watering the pot regularly, but check the soil first. If it is moist on the top, then we could water after a day or two. This is because the root needs to develop the transition from being water roots to soil roots.
The key to thriving the plant here is to check the watering. Never overwater the plant. The soil cannot be too wet because the roots are delicate and might develop root rot.
After about eight weeks, we will water the monstera plant generally as we do for any indoor plant.
We will learn more about the repot of the monstera deliciosa in the soil propagation process.
How to propagate monstera in soil?
We can directly pot the cutting into the soil to propagate the monstera deliciosa instead of keeping it in water first. So, let’s get right into the steps of soil propagation of monstera deliciosa:
1) Clipping the stem at the right spot
Remember, the process of cutting remains the same as described in water propagation. Clean your scissors, choose the stem, make the cut with the node.
Here the stem where the node is will be immersed directly into the soil. The node is where we will develop our roots.
The type of soil that is required for the propagation of the Monstera deliciosa is aerated soil. We can achieve the aeration by the addition of pumice or perlite to the soil. The soil needs to be moist at all times.
2) Plant the clipping into the soil.
Take a pot, fill it with the mixture of soil and pumice or soil and perlite, and water the pot. Ensure that the pot has a proper drainage system as the excess water needs to be drained out of the pot.
The size of the pot depends on the size of the cutting that we have made. The larger the cutting, the larger should be the size of the pot.
If the pot is too small compared to the cutting size, the developed roots might form a crust and might harm the roots.
This means that we will need to continuously repot the plant as the root system grows so that we do not encounter any issues with the soil taking up too much water.
Also Read: What Soil Is Good For Monstera? (Soil requirements+Best Mix)
3) Place the plant at a bright spot away from direct sunlight
The next step is the placement of the pot. We will keep the plant in a suitable place where it gets indirect bright sunlight because the leaves will die in direct sunlight.
Direct sunlight might absorb the water, and the water will be evaporated so that the plant will find it challenging to consume the right amount of nutrients.
4) Mist the plant regularly to keep the humidity level high
This plant also requires a lot of humidity. Hence make sure to spray the plant with mist water regularly.
Also Read: Do Monstera Like To Be Misted? (Monstera Humidity Requirement+Tips)
5) Provide appropriate care to the plant
Once again, patience is the key. We can opt for any of the processes being soil or water propagation. Both the process works out pretty well as the monsteras are very easy to grow and propagate.
In the case of water propagation, the roots need to develop into water roots and then thrive for the transition into soil roots.
However, in soil propagation, there is no transition from water roots; hence the plant will develop soil roots directly.
So, get your pruners ready and make your monstera a bit happy and healthy.
Pruning helps the plant grow better and bushier. It also makes the plant more comfortable.
Let us know if there are any queries.
FAQ:
Can you propagate a Monstera leaf?
Yes, Monsters can easily be propagated through the stem cutting of a leaf. Make sure the stem has at least one node for successful propagation.
Where can I cut monstera for propagation?
It is crucial to clip the stem below the aerial roots or leaves node to propagate a monstera successfully. Clip the stem at an angle so that the plant can absorb more water from the stem.
How long does it take to propagate Monstera?
It may take anywhere between 2-3 weeks for the initial rooting in your monstera plant. However, you cannot repot the plant yet. You may need to wait for another 3-4 weeks before repotting. Thus, your plant can take around 3 months to the complete propagation process.
Can I propagate Monstera without node?
No, you cannot propagate a monstera without a node. Node retains the blueprint for future growth, so if your plant doesn’t have a node then it might not be feasible to propagate it successfully.
Note: Some images in the articles are sourced from Reddit and Other Platforms For Reference Purpose.