How To Prune Croton Plant? (When+Step-by-Step Guide)
Crotons are beautiful tropical plants that require pruning as a part of their care routine. Pruning the croton can help you achieve bushy growth.
Crotons are easy to grow but can become leggy and uneven without pruning. So, let’s understand how to prune the croton.
You can follow these steps to prune your croton plant.
- Check the plant and identify the overgrowth, damaged, or leggy parts you would like to prune.
- Use a sterilized pruner to prune one-third of your croton.
- Prune the stems right above a leaf node.
- Discard all the damaged and diseased parts.
- Place the croton in a well-lit spot and provide water.
- Fertilize the plant if necessary.
Always use sharp pruners to make clean cuts on the plant.
In this article, I will explain the pruning process of a Croton plant along with the best time to prune it.

Please note: Simplify Plants is reader-supported. As an Amazon Associate, I earn from qualifying purchases made by our readers with no extra cost added to you all! Some links in the post are affiliate links and I get a commission from purchases made through links in the post.
Signs that show your croton needs pruning
Crotons are one of those plants that highly benefit from pruning.
Although most plants prefer to be pruned to a certain extent, you can prune Crotons aggressively.
Now, let’s look at all the signs your croton tells you it needs pruning.
Legginess
Crotons are tropical houseplants that grow tall and bushy.
It is not unusual for the croton to get leggy as it is fertilized chiefly with high nitrogen fertilizer.
Nitrogen is responsible for boosting the growth of plants, so an excess of it can force growth in the croton, making it leggy.
When you notice long stems with few leaves, you must prune such leggy growth to promote healthier growth.
Also read: Why Is My Croton Leggy? (Possible Causes+How To Fix)
Dead leaves and stems
Every leaf or stem that any plant produces dies at the end of its life cycle.
So, if you come across such dead parts on your croton, you must prune them.
This will allow croton to focus its energy on new growth.
Also read: Why Are My Croton Leaves Drying? (Possible Problems+Solution)
Overgrowth
If your croton has grown bushy and uneven, it means that the plant requires pruning.
Pruning helps to remove the crowded and uneven growth and gives the plant a balanced and even look.
Since crotons can grow tall and wide, pruning will help you control their growth and match it to your preference.
Diseased or decaying parts
Houseplants undergo different situations that bring stress to the plant.
Fungal or bacterial diseases such as leaf spot or root rot make different parts of the plant decay.
If you overwatered your croton or didn’t provide sufficient light, the plant might develop root rot where the roots start decaying.
In cases like these, you must prune the decaying roots or the diseased leaves or stems to avoid spreading the infections and reduce the stress from the plant.
Using disinfected pruners is essential before and after you prune such parts.
Pest infestation
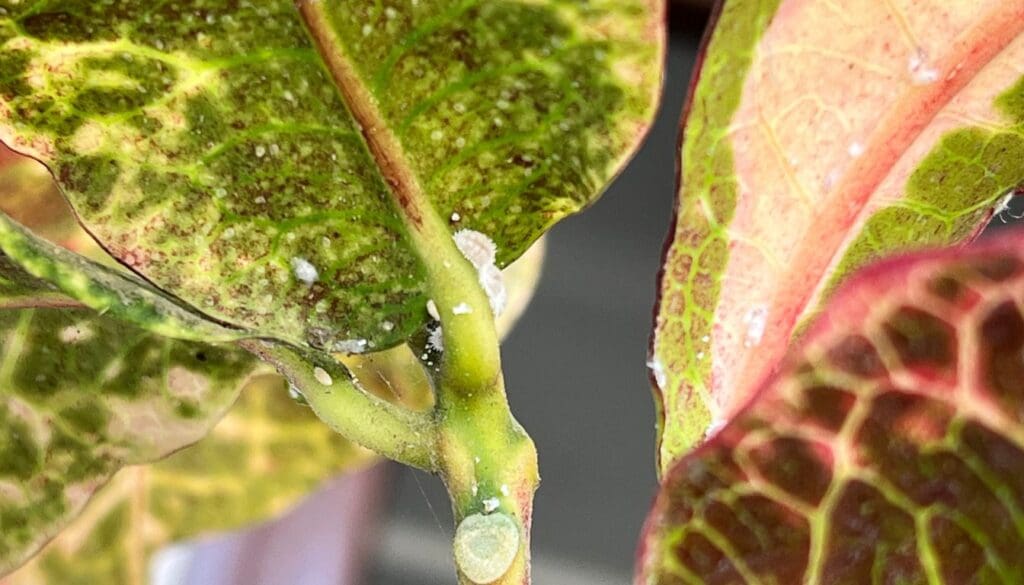
Unfavorable conditions cause fungal or bacterial diseases and invite pests on your croton.
If your croton has pests, you must inspect the plant, find heavily infested areas, and prune them.
Again, don’t forget to use sterilized pruners or scissors to avoid spreading the pests.
You must spray a neem oil solution on your croton after pruning and discarding the heavily infested parts of the plant.
Also read: How Do I Get Rid Of Bugs In My Croton Plant? (Common Bugs+Fix)
What is the best time to prune a Croton?
Unlike many other plants, there is no ideal time for pruning crotons.
This means you can prune croton any time of the year.
However, you must avoid pruning it if the weather conditions are too cold as that can stress the plant.
Although crotons don’t go dormant in winter, it is better not to prune during this time as the conditions are unsuitable for the plant.
The best time to prune the croton is when it is actively growing, as pruning will help it grow faster and get over the pruning stress quicker.
Early spring is the best time to prune your croton.
The conditions remain warm and ideal for the growth of these tropical perennials.
Supplies needed to prune a Croton
Before you start pruning your croton, collect some supplies so you don’t have to go about searching for them.
- Pruners: First on the list is a sharp pair of pruners or scissors to help you make clean cuts on the croton.
- Gloves: Crotons are toxic. If the sap comes in touch with your skin, it can cause skin rashes, known as dermatitis disease. So, using gloves is a must.
- Disinfectant: Sterilizing the pruners will keep your croton and other houseplants safe. So, you must always use a disinfectant to sterilize the pruners before and after pruning.
- Pot and potting mix: If you plan to propagate the healthy parts you prune, keep a pot and potting mix that you can use for propagation. You can switch this with a glass jar and water if you opt for water propagation.
What are the different types of pruning?
Before you start pruning your Croton, you must understand the reason behind the pruning.
Let’s understand the different types of pruning.
Pruning to encourage growth: Crotons are one of those plants that can grow more if you prune them.
If your croton is not showing much growth, you can prove it aggressively to encourage faster and bushier growth.
Pruning to shape the Croton: The Croton might lose its shape in the process of growing.
But you can detect the areas that make the plant look out of shape and prune them.
This will help to bring the plant back in shape.
Prune to remove dead and damaged leaves and stems: The dead and damaged leaves and stems waste the plant’s energy until falling off.
So, you can prune them to save your croton’s energy and redirect it towards new growth.
Pruning to propagate: If you want more Croton plants in the house or gift them to your dear ones, you can propagate the plant.
For propagating, you must find healthy stems and prune them.
You can try this even when you are trying to control overgrowth.
You can use the healthy stems you pruned for propagation to get new plants.
How to prune croton plants?

Now that you know the best time to prune and the supplies you need for pruning let’s discuss how to prune the croton.
Step 1: Identify the areas that require pruning
First of all, you must observe your Croton and figure out the areas that require pruning.
Don’t start pruning without inspecting the plant, as you might end up pruning unnecessary parts.
Look out for dead, diseased, leggy, and overgrown parts that need pruning.
Step 2: Mentally mark the areas you want to prune
After observing your croton thoroughly, you must find out the areas where you will prune the plant.
For example, if your Croton has decaying roots, you must take the plant out of the pot and prune the unhealthy roots.
Step 3: Prepare for pruning.
Since Croton is a toxic plant, prepare by wearing gloves so that the sap doesn’t come in touch with your skin during pruning.
Also, disinfect the pruners that you will use.
Step 4: Prune the dead and damaged parts of the plant
I already mentioned that you must use clean and sharp pruners to prune your croton.
If you notice dead leaves, you can pinch those off or cut them.
If there are damaged parts, prune right before the damage has occurred to not spread to the entire plant.
Step 5: Pruning the stems
When there are leggy stems on your croton, prune them at different lengths to give a natural look to your croton.
For example, you can cut the whole stem in some stems and cut them at half-length for some other stems.
However, if you intend to propagate, you must cut before a leaf node.
If your croton is not growing, prune aggressively.
The plant will show growth even after having no stems or leaves left on it.
Step 6: Dispose of the unhealthy parts.
After pruning dead and diseased parts of your croton, dispose of them well so that no other houseplants get affected.
Step 7: Use the healthy cuttings for propagation
You might have pruned many healthy stems that you can use for propagation instead of throwing.
Store these cuttings and propagate them later in water or soil.
How to propagate a Croton from a pruned stem?

I have mentioned propagation a few times already.
So, let me give you a brief idea of how you can propagate the croton plant from a pruned stem.
You can propagate the stem in both water and soil.
Choose the one that seems more convenient to you.
For soil propagation, take a small pot and fill it with a mix of sand and peat moss.
Insert the cutting in the soil after applying some rooting hormone at the end.
You can skip the rooting hormone as it is optional.
Now, water the soil to make sure it is moist and cover it with a plastic bag to trap the moisture.
You can open the plastic bag after 5-7 days and check the soil.
Mist the soil if it seems dry, and cover with the plastic bag again.
Keep the pot in a well-lit area with 6-8 hours of bright indirect light.
You should see roots appearing after 4-5 weeks.
Wait for the roots to grow longer, and you can shift the new croton to a bigger pot.
Keep the croton cutting in a glass jar filled with water for water propagation.
Keep the jar in a bright spot with sufficient indirect sunlight.
The best thing about water propagation is that you can witness the root growth if you are propagating in a jar of water and don’t need to water the cutting.
The roots should appear within 5-6 weeks.
Wait for some more time and let the roots grow before shifting the croton to a pot with soil.
Also read: How To Propagate Croton Plant? (A Step-by-Step Guide)
Aftercare of croton post pruning

After pruning the croton, you must provide proper care by giving it the ideal growing conditions.
This will reduce any stress the plant might be undergoing and help it grow back faster.
| Factor | Care tips |
|---|---|
| Light | Provide at least 6-8 hours of full sun or bright indirect sunlight to the croton. Avoid placing it under intense sunlight or low light. Use artificial lights if the natural light source is insufficient for the plant. |
| Water | Water the croton whenever the top inches of the soil go dry. Don’t water your croton if the soil feels moist, and also, avoid keeping the plant thirsty for too long. Get a moisture meter to determine the moisture level of the soil. |
| Soil | Crotons prefer moist soil that doesn’t retain excess moisture. You can use a combination of peat moss and compost. |
| Fertilizer | Crotons are heavy feeders. So, you can fertilize them once a month during their growing months. Use a liquid fertilizer with an NPK 3:1:2. |
| Temperature | Crotons enjoy warm temperatures, so try to maintain temperatures between 65-80°F. Protect your croton from low temperatures, frost, and cold drafts during winter. |
| Humidity | Another critical factor is humidity, as crotons require high humidity levels. The best way to increase the humidity is with a humidifier. |
| Repotting | The best time to repot croton is during summer or early spring as it reduces the repotting stress. Avoid repotting the croton too frequently and repot only when required. |
Final words
I hope this article has made pruning the croton easier for you. Pruning a croton plant is not as daunting as it seems.
But you must keep these in mind:
- Find out the purpose behind the pruning.
- Use sterilized and sharp pruners to make clean cuts on the plant.
- Wear gloves to protect your skin from toxic plants like crotons.
- Prune during early spring if not urgent.
- Give the plant ideal growing conditions to encourage growth after pruning.
Don’t skip pruning your croton, as that can make it leggy and uneven. Pruning is an essential part of the plant care routine, so you must not avoid it.
Reference: Sciencedirect, Wikipedia, Wikipedia, Britannica, CABI, Academia, University of South Florida, The University of Georgia.
Note: Some images in the articles are sourced from Reddit and Other Platforms For Reference Purpose.