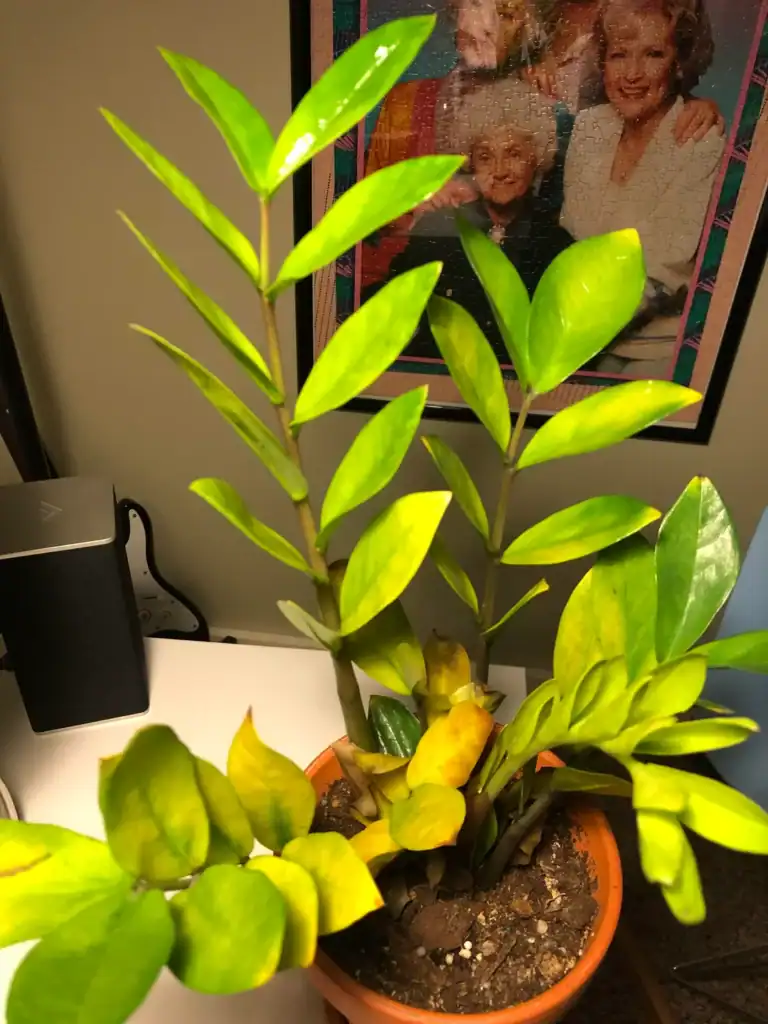
11 Reasons Why Your ZZ Plant Leaves Are Turning Yellow and How to Fix Them Fast
ZZ plants have a reputation for being nearly indestructible, but even these guys can hit a rough patch. If you’re staring at yellow leaves, you’re probably wondering what’s up—and how to turn things around.
Yellow leaves on ZZ plants usually mean there’s a problem with watering, light, drainage, or sometimes pests and disease.
The upside? Most of these issues are totally fixable once you know what you’re dealing with. Honestly, I’ve watched plenty of sad-looking ZZ plants make a comeback after their owners figured out the cause.
Let’s dig into the most common reasons your ZZ plant might be going yellow.
We’ll look at watering slip-ups, lighting drama, nutrient gaps, and even the normal aging process.
By the end, you’ll know what to check—and how to get your plant back on track.

Please note: Simplify Plants is reader-supported. As an Amazon Associate, I earn from qualifying purchases made by our readers with no extra cost added to you all! Some links in the post are affiliate links and I get a commission from purchases made through links in the post.
Understanding ZZ Plant Yellow Leaves
Yellow leaves on your ZZ plant are like little clues about what’s really going on. Learning to read those signs helps me spot trouble early and keep my plant happy.
Recognizing Signs of Stress
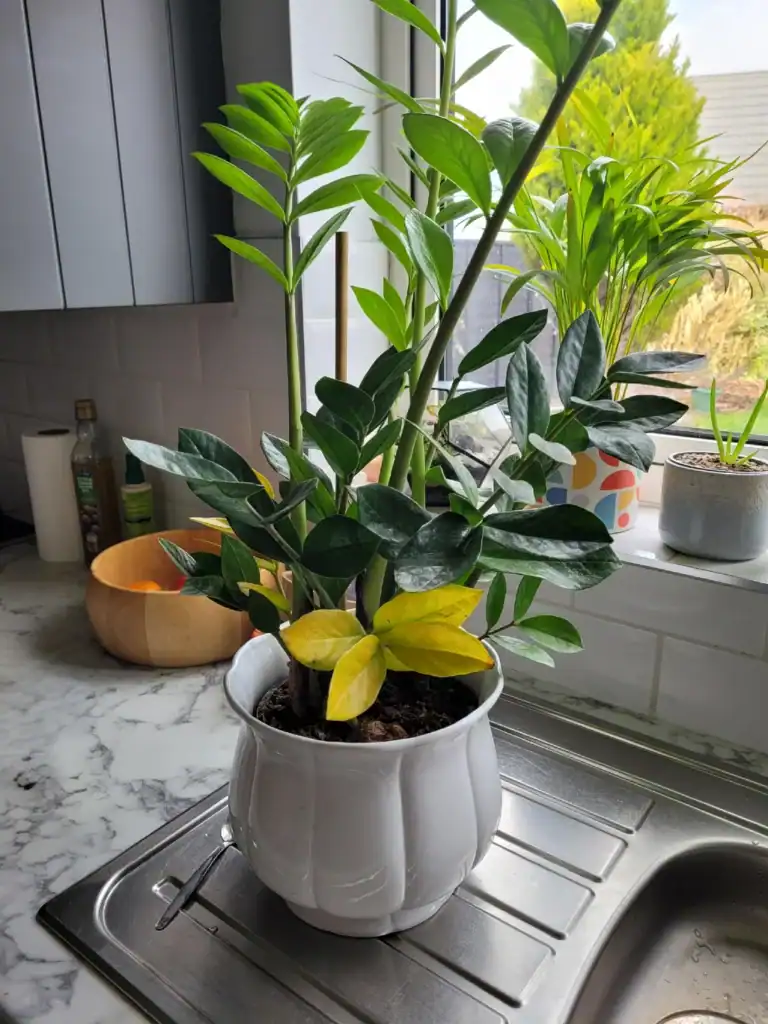
When my ZZ plant is stressed, yellow leaves are usually the first thing I notice. The yellowing often starts at the tips or edges before it spreads out across the leaf.
Stressed leaves can feel a bit softer or droopier than usual. I’ve found it’s helpful to check if the yellowing is hitting new growth or just the older leaves—because that tells me something different each time.
Quick Tip: Give those yellow leaves a gentle poke—mushy or wet means overwatering, but crispy ones? That’s usually underwatering or too much sun.
If I see a bunch of yellow leaves show up at once, I know it’s time to act fast. A single yellow leaf now and then doesn’t freak me out as much.
How Yellowing Differs From Natural Aging
ZZ plants naturally drop their oldest leaves as they get bigger, and that’s nothing to stress about. These older leaves turn yellow slowly, usually starting at the bottom.
Natural aging only hits a leaf or two at a time, and it’s a slow process—weeks, not days. The rest of the plant stays green and perky.
Quick Tip: If just the lowest, oldest leaves are yellowing and the new growth looks good, I just leave it alone.
Stress-related yellowing is a different story—it can hit several leaves all at once or even newer growth. It spreads faster and sometimes comes with extra issues like brown spots or wilting.
The Impact on Overall Plant Health
Yellow leaves end up draining energy from my ZZ plant since it tries to rescue them. The plant shifts resources away from healthy growth to keep those leaves going.
If I ignore yellow leaves, things usually get worse and the problem spreads. What starts as a couple of yellow leaves can eventually mess with the whole root system if I don’t fix it.
Quick Tip: Once a leaf is more than halfway yellow, I just snip it off—gives the plant a chance to focus on healthy growth.
The nice thing is, ZZ plants can bounce back once I sort out what’s wrong. Fresh shoots usually pop up from the rhizomes when things improve.
Overwatering Issues
Getting too generous with the watering can is probably the number one reason ZZ leaves turn yellow. Roots end up sitting in soggy soil, can’t breathe, and start to rot.
Symptoms of Overwatering
Yellow leaves that feel mushy or soft are a big warning sign. I usually spot the lower leaves turning yellow first, and sometimes there are dark brown or black patches near the base.
The stems might feel squishy if you give them a gentle squeeze. If I pick up the pot and it feels heavy, that’s usually a sign it’s waterlogged.
Sometimes there’s even water pooling on top of the soil instead of soaking in. If the dirt smells sour or rotten, that’s a clue the roots are in trouble.
Quick Tip: Stick your finger about two inches into the soil—if it’s still damp, hold off on watering.
Proper Watering Techniques
I let the soil dry out completely before watering again. For most homes, that’s every 2-3 weeks, but it really depends on your conditions.
These plants store water in thick rhizomes, so they can handle drought way better than being soaked.
I always check the soil with my finger first. If the top couple inches are dry, it’s safe to water. During winter, I water even less since the plant slows down.
When it’s time to water, I drench the soil until water runs out the bottom, then let it drain all the way—never leave the pot sitting in a puddle.
Quick Tip: In the colder months or low light, once a month is usually plenty.
Recovery Tips for Waterlogged ZZ Plants
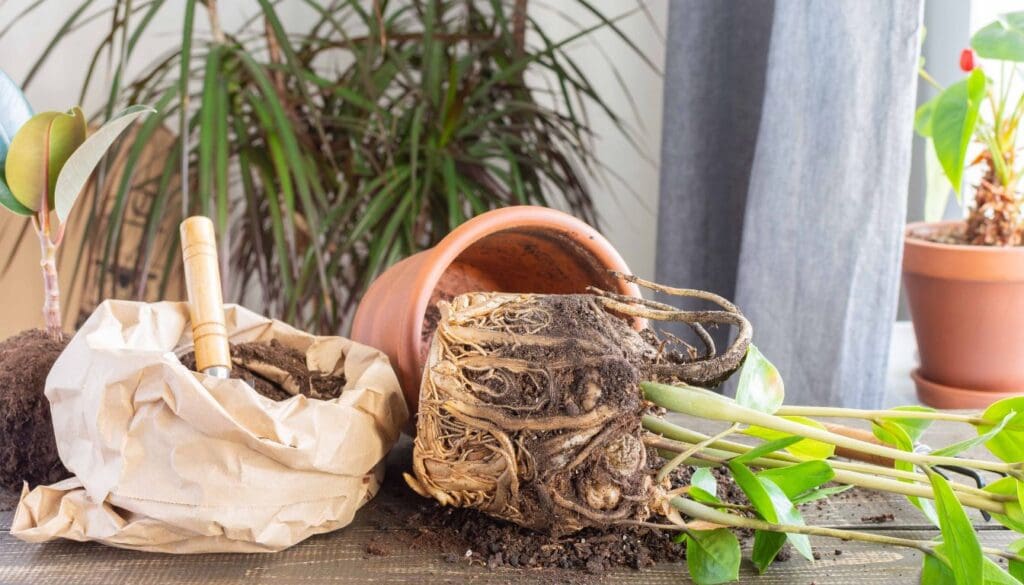
If I see yellowing from too much water, I stop watering right away. I’ll pull the plant out to check the roots for rot.
Healthy roots look white or tan. If they’re black, mushy, or smell bad, I trim them off with clean scissors. Then I let the healthy roots air dry for a few hours.
After that, I repot in fresh, dry, well-draining soil—cactus or succulent mix is perfect. I skip watering for at least a week to let the roots settle.
Yellow leaves won’t turn green again, so I remove them to help the plant focus on new growth.
Quick Tip: If you don’t have cactus soil, just add perlite to regular potting mix to help it drain faster.
Underwatering and Drought Stress

Even though ZZ plants store water in their rhizomes, they can’t go forever without a drink. If I forget about mine too long, the leaves start yellowing as the plant uses up its reserves.
Spotting Signs of Dehydration
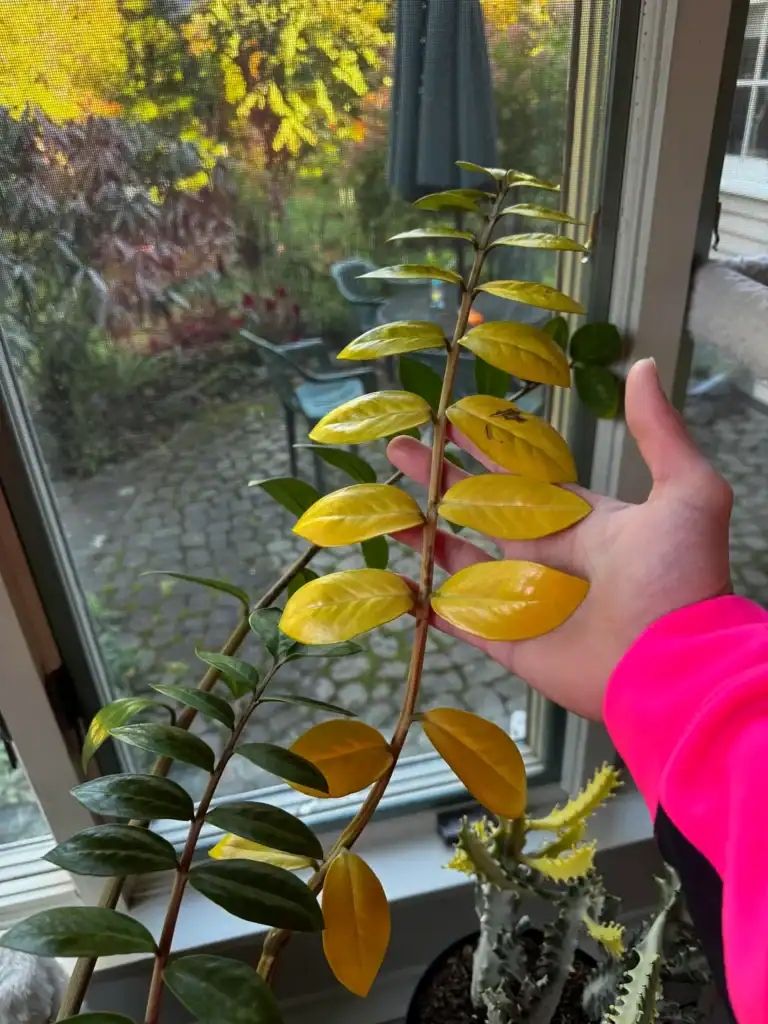
The first thing I usually notice is the leaves lose their shine and start looking kind of dull. They might feel thinner or papery instead of firm and glossy.
Yellowing from underwatering tends to start at the tips and edges. If I don’t catch it, the whole leaf can turn yellow and eventually drop. The soil even pulls away from the sides of the pot when it’s too dry—hard to miss.
If I’m really concerned, I check the rhizomes. If they’re wrinkled or shriveled, the plant’s pretty thirsty and needs water ASAP.
Quick Tip: If the soil is bone dry two inches down, it’s time to water.
Best Watering Schedules
In spring and summer, I water every 2-3 weeks when my ZZ is growing. When it cools off, I stretch it to once a month or even longer since the plant isn’t as thirsty.
But honestly, I just check the soil instead of sticking to a strict schedule. Once the top 2-3 inches are dry, I water thoroughly until it drains out the bottom.
Room temperature matters, too. A plant in a warm, sunny spot dries out faster than one tucked in a cool corner. Low humidity speeds things up as well.
Quick Tip: Water even less in winter—your ZZ is basically snoozing and doesn’t want soggy roots.
Poor Drainage Problems
If water hangs around too long in the pot, roots can’t breathe and start to rot, which leads to yellow leaves. The right pot and soil really make a difference.
Choosing the Right Pot and Soil
I always use pots with drainage holes for my ZZ plants. No holes? Water just pools at the bottom, and that’s a recipe for disaster.
Terra cotta pots are my favorite because they let extra moisture escape through the sides. Plastic works, too, as long as there’s a decent-sized hole underneath.
Regular potting soil is too dense, so I go for a succulent or cactus mix. Sometimes I just mix in perlite or coarse sand—about two parts soil to one part drainage material.
Quick Tip: Skip pots with attached saucers you can’t remove—they trap water where you don’t want it.
The soil should feel gritty, not heavy or sticky. When you water, it should run through quickly, not just sit there.
How to Improve Drainage
If my ZZ is stuck in a pot with lousy drainage, I repot it. I gently pull the plant out and check for any black, mushy roots—that’s rot.
I add a layer of pebbles or broken pottery at the bottom of the new pot. It just helps water flow away from the roots.
Mixing in extra perlite or pumice helps if the soil feels too dense. I aim for about a third of the mix to be drainage material.
Quick Tip: Always dump out the saucer within 30 minutes after watering so your plant isn’t soaking in it.
If I can’t repot right away, I’ll at least tip the pot to let out extra water after watering. And I cut back on watering until I can fix the problem properly.
Light Conditions Affecting ZZ Plants

ZZ plants are pretty chill about light, but they do have their limits. Too much direct sun and you’ll see yellow, burned leaves. Too little light, and they start to look pale and sad.
Too Much Sunlight
Direct sunlight can wreck ZZ plant leaves fast. I’ve seen leaves get scorched in just a few hours on a sunny windowsill.
First, you’ll see brown, crispy patches where the sun hits hardest. Those spots turn yellow as the leaf tissue breaks down. Leave the plant there, and whole leaves can fade out to a washed-out yellow.
ZZ plants naturally grow under taller trees in Africa, so they’re used to filtered light—not blazing sun all day long.
Quick Tip: If your ZZ is near a south or west window, move it back a few feet or use a sheer curtain to soften the light.
Watch for yellowish-white patches on the side facing the window—that’s usually your first clue. I always double-check my plants when I move them, especially in summer.
Insufficient Light Exposure
Not enough light gives you a different kind of yellowing that starts from the bottom leaves up. The plant can’t make enough energy, so it lets go of its oldest leaves first.
These leaves turn a pale yellow-green and eventually drop, but you won’t see brown, crispy spots like with sunburn. New growth might look stretched and thin as the plant searches for more light.
ZZs can survive in low light, but they won’t really thrive. I try to give mine bright, indirect light most of the day.
Quick Tip: An east-facing window is perfect, or just put your ZZ a few feet from any window with steady, natural light.
If you’re stuck with dim rooms, a grow light can really help. Your plant will reward you with healthier, darker green leaves.
Nutrient Deficiencies

ZZ plants need certain nutrients to keep their leaves green and happy. If they’re missing nitrogen, iron, or magnesium, you’ll start to see yellowing as a warning sign.
Common Nutrient Lacks That Yellow Leaves
Nitrogen deficiency usually shows up as yellowing on the older, lower leaves first. The plant will actually move nitrogen from the older leaves to fuel new growth when it’s running low.
You might notice the yellow leaves look pale or a bit washed out, which is a dead giveaway.
Iron deficiency causes interveinal chlorosis—that’s when the leaf tissue turns yellow but the veins stay green. This creates a kind of striped or webbed look, and it’s most obvious on the newer leaves up top.
If your soil pH is too high, iron issues pop up more often than you’d expect.
Magnesium deficiency is similar to iron, but it hits the older leaves instead of the new ones. The yellowing tends to start at the leaf edges and creeps toward the center between the veins.
Quick Tip: Snap a photo of the yellow leaves so you can keep track of which ones are affected and how the pattern spreads.
Fertilizing Your ZZ Plant Correctly
I usually feed my ZZ plant with a balanced liquid fertilizer, diluted to half strength, once every two or three months during spring and summer. These plants are slow growers—they really don’t need much food at all, so honestly, less is better.
Skip fertilizing entirely in fall and winter, since growth slows way down. Overfeeding brings more headaches than underfeeding for ZZ plants, especially with salt buildup in the soil that can fry the roots.
Look for a fertilizer labeled 10-10-10 or 20-20-20 for balanced nutrition. Mix it with water as the package says, then cut that amount in half.
Water your plant with this mixture until it drains out the bottom—don’t let it sit in water, though.
If you’ve been a little heavy-handed with fertilizer, just flush the soil by running water through the pot for a few minutes to wash out the extra salts.
Temperature Extremes Impact
ZZ plants are happiest in stable temperatures between 65°F and 75°F. If they get hit with cold drafts or too much heat, the leaves start to yellow and, if things get bad, might fall off.
Damage from Cold Drafts
Cold air can really mess up a ZZ plant faster than most people think. I’ve seen plants sitting near air conditioning vents or drafty windows develop yellow leaves in just a couple weeks.
Remember, ZZ plants are tropical by nature—they just can’t handle temps below 45°F. When cold air sweeps over the leaves, it shocks the cells and throws off normal functions.
Windows in winter are sneaky troublemakers. Even if your room feels cozy, the spot right next to a window can be 10-15 degrees colder.
I always check for cold spots by holding my hand near where the plant sits during the chilliest part of the day.
Quick Tip: Move your ZZ plant at least three feet from exterior doors, AC units, and windows you open a lot.
Drafty spots also dry out soil unevenly. The combo of cold air and moisture stress makes yellow leaves show up faster than you’d think.
Heat Stress Factors
Too much heat is just as rough as cold. I see this most when ZZ plants are near heating vents, radiators, or in rooms that regularly get above 85°F.
High temps make the plant lose water through its leaves faster than the roots can keep up. The leaves yellow because, honestly, they’re just dehydrated on a cellular level.
Direct heat sources create nasty hot spots. A plant two feet from a baseboard heater lives in a different world than one across the room. Usually, the side facing the heat source yellows first.
Quick Tip: Keep your ZZ plant at least four feet away from heat sources, and give it a quarter turn every month so all sides get their fair share of light.
South and west-facing windows can be ovens in summer afternoons. If the pot feels hot to the touch, that’s your cue to move it somewhere cooler.
Transplant Shock and Root Disturbance
Moving your ZZ plant to a new pot can stress the roots and cause leaves to yellow while the plant settles in. The upside? With gentle hands and good timing, your plant can bounce back pretty quickly.
Identifying Transplant Stress
Yellowing leaves that show up a week or two after repotting usually point to transplant shock. I’ve noticed this is most common when roots get roughed up during the move or when the plant is adjusting to new soil conditions.
Look for these signs:
- Leaves turning yellow from the bottom up
- Wilting or drooping stems, even if you’re watering correctly
- Slower growth than usual
- Yellow spots popping up on otherwise healthy leaves
Usually, symptoms appear 1-3 weeks after repotting. Your ZZ plant might even drop a few leaves as it focuses on fixing root damage underground.
Most plants bounce back within 4-6 weeks if the roots weren’t too badly hurt. Go easy on watering during this time—stressed roots just can’t drink as much.
Minimizing Damage When Repotting
I always wait for spring or early summer to repot ZZ plants, since that’s when they’re actively growing and recover faster.
Pick a pot that’s just 1-2 inches wider than the old one. If you go too big, you risk overwatering because there’s more soil holding moisture than the roots can use.
Quick Tip: Water your ZZ plant 2-3 days before repotting. The root ball holds together better and roots are less likely to snap.
When it’s time to remove the plant, I gently squeeze the pot’s sides and tip it out instead of tugging on the stems. If the roots are stuck, a butter knife around the edge does the trick.
Handle the root ball with care and don’t pull apart tangled roots unless they’re circling badly. Use fresh, well-draining soil and avoid packing it down too tightly around the roots.
Pest Infestations
ZZ plants don’t get bug problems very often, but when pests do show up, they can sap the leaves and cause yellowing. Let’s talk about which pests to look for and how to deal with them without too much fuss.
Common Pests That Cause Yellowing
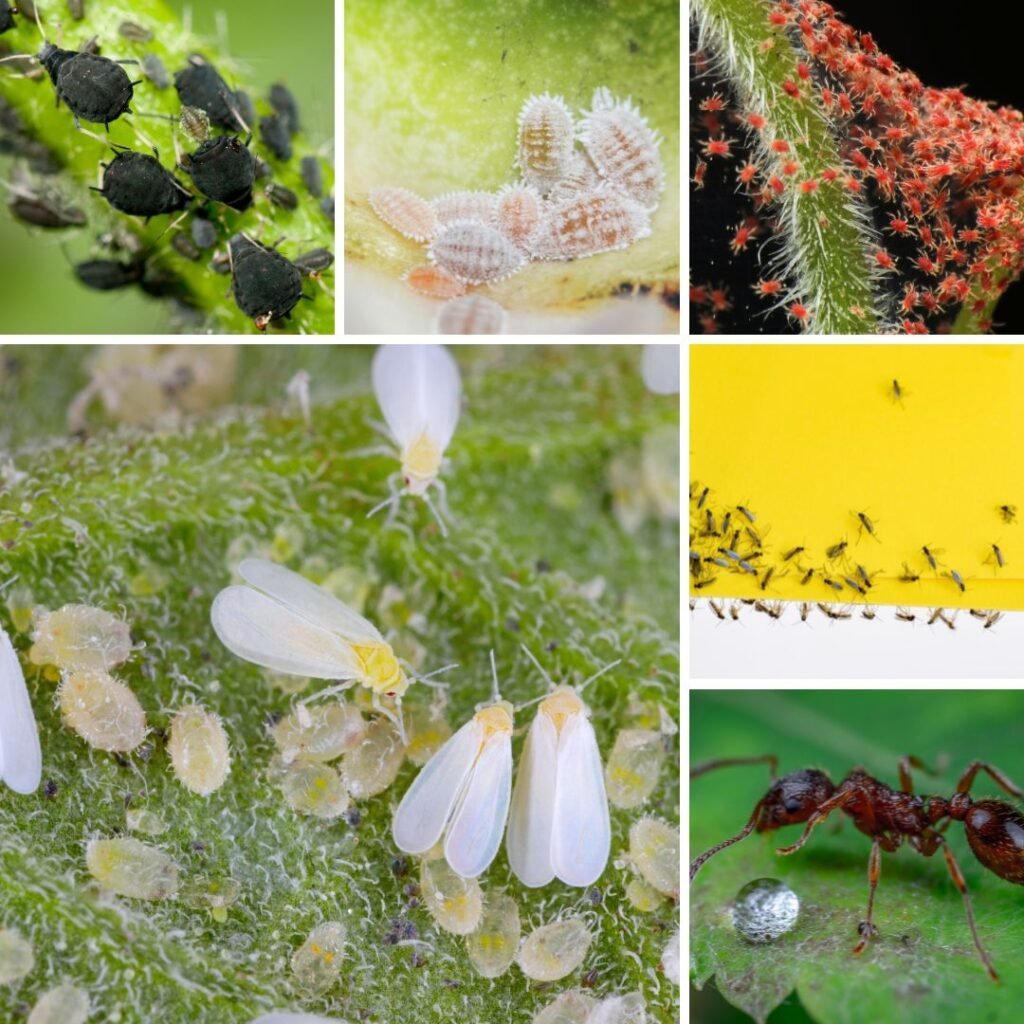
Spider mites are the sneakiest. These tiny bugs are tough to spot until you see fine webbing between leaves or stems. They suck the sap and cause yellow speckles on the leaves.
Mealybugs look like little white cotton balls stuck to your plant. They hide in leaf joints and along stems, feeding on the plant’s juices. The leaves yellow and eventually drop off.
Scale insects show up as small brown or tan bumps on stems and leaves. They’re actually insects with a protective shell, and they feed on sap too. If you notice sticky residue on the leaves or nearby surfaces, scale could be the problem.
Fungus gnats are those tiny black flies buzzing around the soil. The adults are annoying, but it’s the larvae feeding on roots that can stress the plant enough to cause yellowing.
Effective Pest Management
First off, isolate your ZZ plant from your other houseplants as soon as you spot a pest. These little guys spread fast, and you don’t want your whole collection in trouble.
For spider mites, spray the plant with water to knock them off, then wipe the leaves with a damp cloth. You can use insecticidal soap every few days until they’re gone. Quick Tip: Mist your ZZ now and then—spider mites hate humidity.
Mealybugs come off with a cotton swab dipped in rubbing alcohol. Dab each bug and wipe the area clean. Check again in a few days and repeat as needed. Their eggs can hatch later, so persistence pays off.
Scale needs the same alcohol treatment, but you might have to gently scrape them off with your fingernail or a soft toothbrush first. They’re stubborn because of that shell.
For fungus gnats, let the soil dry out completely between waterings. The larvae need moisture to survive. Yellow sticky traps near the pot help catch the adults.
Fungal and Bacterial Diseases
Fungi and bacteria can both cause yellow leaves on your ZZ plant, often starting with spots or weird patterns. Catching these problems early and tweaking your care routine can make a big difference.
Spotting Symptoms of Disease
Fungal infections usually show up as yellow or brown spots with darker edges. Sometimes the spots look water-soaked or even a little fuzzy when things get bad.
Bacterial diseases tend to make yellow patches that spread faster and might smell musty or rotten. I’ve noticed bacterial spots are usually more irregular in shape compared to fungal ones.
Don’t forget to check the base of your plant. Root rot from fungi like Pythium turns roots dark and mushy, which stops water from getting to the leaves. That makes the leaves yellow from the bottom up.
Quick Tip: Gently press the soil near the stem—if it feels soggy and smells off, root rot could be the culprit.
Prevention and Treatment Tips
Only water when the top 2-3 inches of soil are bone dry. Overwatering is like rolling out the red carpet for fungi and bacteria.
Make sure your pot has drainage holes and use well-draining soil. I like to mix regular potting soil with perlite or sand so extra water can get out fast.
If you spot infected leaves, snip them off with clean scissors right away. Wipe your tools with rubbing alcohol between cuts to keep things from spreading.
For fungal issues, grab a fungicide made for houseplants. Bacterial infections are trickier—removing affected parts and improving air flow around your plant helps keep things from getting worse.
Quick Tip: Give your plants some space so air can move between them, especially if you live somewhere humid or during the summer.
Natural Aging of ZZ Plant Leaves

Just like my hair’s starting to show a few grays, ZZ plants shed their older leaves as part of normal aging. The bottom leaves will naturally turn yellow and drop off as the plant pushes out new growth.
This is totally normal, so there’s no need to panic. I usually spot one or two lower leaves yellowing every few months on my own plant.
Quick Tip: If it’s just the oldest, lowest leaves turning yellow and the rest of the plant looks great, you’re probably seeing normal aging.
You’ll know it’s just aging when the yellowing is slow and stays at the bottom. The top leaves should look dark green and glossy, and you might even see new shoots popping up from the soil.
I just snip off the yellow leaves once they’re totally done. Use clean scissors and cut close to the base.
If yellowing spreads quickly to several leaves or starts hitting new growth, that’s a different issue—think watering problems or pests.
Chemical Sensitivities and Environmental Factors
ZZ plants can react badly to chemicals in tap water and cleaning sprays. These reactions show up as yellowing leaves, which can be pretty confusing if you’re not expecting it.
Sensitivity to Tap Water
I’ve learned that tap water isn’t always as harmless as it seems for ZZs. Chlorine, fluoride, and dissolved salts can build up in the soil and mess with the roots.
When roots can’t absorb nutrients right, leaves start yellowing from the bottom up. Sometimes you’ll see brown tips or edges before the whole leaf goes yellow.
Quick Tip: Let tap water sit out in an open container for 24 hours before watering to let chlorine evaporate.
If your tap water’s heavy on chemicals or you live somewhere with hard water, try switching to filtered or distilled water. I use filtered water for my ZZs and honestly, they seem happier after a few months.
Watch for white, crusty buildup on the soil surface. That’s salt from minerals in tap water, and it means your plant’s soaking up those chemicals every time you water.
Impact of Household Chemicals
Cleaning sprays, air fresheners, and even furniture polish can mess with your ZZ plant. The leaves actually soak up chemicals from the air, which messes with photosynthesis and leads to yellow leaves.
I keep my ZZ plants far from spots where I spray cleaners often. Even a little residue settling on the leaves is enough to cause trouble.
Quick Tip: Wipe ZZ leaves with a damp cloth once a month. It helps get rid of dust and any lingering chemicals.
Gas leaks, paint fumes, and smoke are also bad news for these plants. If you’ve just painted or used strong chemicals nearby, that might explain a sudden case of yellow leaves.
If you notice leaf discoloration after using household products, move your plant somewhere with good airflow. Honestly, a bit of fresh air helps them bounce back faster than you’d expect.
How to Revive Your ZZ Plant and Prevent Future Yellowing
Getting your ZZ plant healthy again means tweaking its environment and sticking to a care routine that works for you. These two steps are key for helping your plant recover and thrive.
Creating Ideal Growing Conditions
I always start with the basics: light, water, and soil. ZZ plants like bright, indirect light, but they’ll tolerate lower light if they have to.
Direct sun is a no-go—it burns the leaves. I keep mine a few feet from windows or behind a sheer curtain.
The soil matters more than most people realize. I use a well-draining mix with perlite or sand mixed in. Regular potting soil just holds too much water and can lead to root rot.
Quick Tip: If your pot doesn’t have drainage holes, don’t wait—repot into one that does.
Temperature should hang out between 65-75°F. I steer clear of putting my ZZ near heating vents, ACs, or drafty windows.
Cold drafts below 45°F? That’ll damage the plant in no time.
Humidity isn’t a big deal for ZZs. I don’t bother with humidifiers or misting. Room humidity around 40% is fine by them.
Check your pot size, too. If roots are circling the bottom or poking out the drainage holes, it’s time to size up. I repot every couple years, usually in spring.
Developing a Consistent Care Routine
I only water my ZZ when the soil is bone dry a couple inches down. Usually that’s every 2-3 weeks in summer, and maybe once a month in winter. I just stick my finger in to check.
When I do water, I pour until it drains out the bottom, then empty the saucer right away. No soggy roots allowed.
Quick Tip: Set a reminder on your phone to check your plant weekly. Out of sight, out of mind is real.
For fertilizer, I go with a diluted liquid one every 2-3 months in spring and summer. Half strength is plenty. I skip it in fall and winter since growth slows down so much.
I wipe the leaves with a damp cloth every few weeks. It helps the plant catch more light and lets me catch problems early.
Once a month, I check for pests under the leaves and along the stems. If fungus gnats show up from overwatering, yellow sticky traps usually do the trick.
Frequently Asked Questions
Yellow leaves on ZZ plants usually come from watering issues, not enough light, or sometimes a nutrient imbalance. Pests and other stressors can also make leaves turn yellow, but it’s usually something basic.
What causes the leaves on my ZZ plant to yellow?
Overwatering is the most common culprit I see. ZZs store water in their thick rhizomes, so they really don’t need much from you.
Poor drainage can make things worse—roots sitting in soggy soil can’t breathe and start to rot.
Too little light is another reason. ZZs will put up with low light, but they do need some brightness to stay happy.
And sometimes it’s just age. Older leaves naturally yellow and drop off as the plant grows new ones.
How do I know if I’m watering my ZZ plant too much or too little?
Stick your finger about two inches into the soil. If it feels damp, don’t water yet.
Overwatered ZZs have soft, mushy stems and yellow leaves that feel limp or a bit wet. The soil will stay soggy for days after you water.
If you’re underwatering, leaves turn yellow, then brown and crispy. The soil pulls away from the pot and feels bone dry.
Quick Tip: I wait until the soil is dry all the way through before watering, which is usually every 2-3 weeks.
Could lack of sunlight be the reason for yellow leaves on my ZZ plant?
Yeah, not enough light absolutely causes yellowing. ZZs need bright, indirect light to make the energy they need.
In really dim spots, they can’t make enough food through photosynthesis. The leaves get pale yellow and might grow smaller than usual.
North-facing windows or rooms far from windows probably won’t cut it. I’ve had the best luck putting my ZZ near an east or west-facing window.
What should I check for if my ZZ plant has yellow leaves?
Start with the soil—check moisture and drainage. Make sure water drains out the bottom when you water.
If you can, look at the roots. Healthy roots are white or tan; rotting ones are brown, black, or slimy.
Check how much light your plant’s getting. ZZs still need some brightness, even though they’re “low light” plants.
Give the leaves a close look for tiny bugs or sticky residue. Pests like spider mites and aphids can stress the plant and turn leaves yellow.
Are there any specific nutrients or fertilizers that prevent yellowing in ZZ plants?
ZZs don’t need much fertilizer, but they do need basic nutrients. I use a balanced liquid fertilizer at half strength every 2-3 months in spring and summer.
Nitrogen is important for keeping leaves green. If there’s not enough, older leaves yellow first as the plant moves nutrients to new growth.
Skip fertilizer in fall and winter when growth slows way down. Too much can burn roots and cause yellowing, so less is more here.
Quick Tip: I don’t fertilize for a couple months after repotting—fresh soil already has what the plant needs.
How can I tell if the yellowing leaves on my ZZ plant are due to a pest infestation?
Take a close look at the stems and the undersides of the leaves. Sometimes you’ll spot tiny bugs just hanging out there.
Spider mites might leave behind little webs, while aphids tend to cluster around fresh, new growth. Not the most pleasant sight, honestly.
Notice any sticky patches or a weird shiny film on the leaves? That’s probably honeydew, which is just a nice way of saying bug droppings from sap-sucking insects.
Pest damage usually shows up as yellow speckles or spots, and it’s a bit different than what you’d see from watering issues. The pattern can look pretty random or patchy, not uniform.
If you spot bugs, go ahead and gently wipe the leaves with a damp cloth. For a bigger problem, try spraying with insecticidal soap or neem oil—nothing too fancy, just enough to help your plant bounce back.
Note: Some images in the articles are sourced from Reddit and Other Platforms For Reference Purpose.


I used to be able to find good info from your content.