Top 10 Tips To Propagate Lavender Plants
I love growing lavender—it brings color, a lovely scent, and a sense of calm to my garden.
Propagating new plants from healthy cuttings saves money and lets me enjoy even more lavender around the yard.
Learning how to propagate lavender the right way just makes it easier to grow strong, thriving plants year after year. Honestly, it’s not as tricky as it sounds.
In this guide, I’ll walk you through the steps I use. From picking the best cuttings to caring for young plants, each bit builds confidence and sets you up for success.

Please note: Simplify Plants is reader-supported. As an Amazon Associate, I earn from qualifying purchases made by our readers with no extra cost added to you all! Some links in the post are affiliate links and I get a commission from purchases made through links in the post.
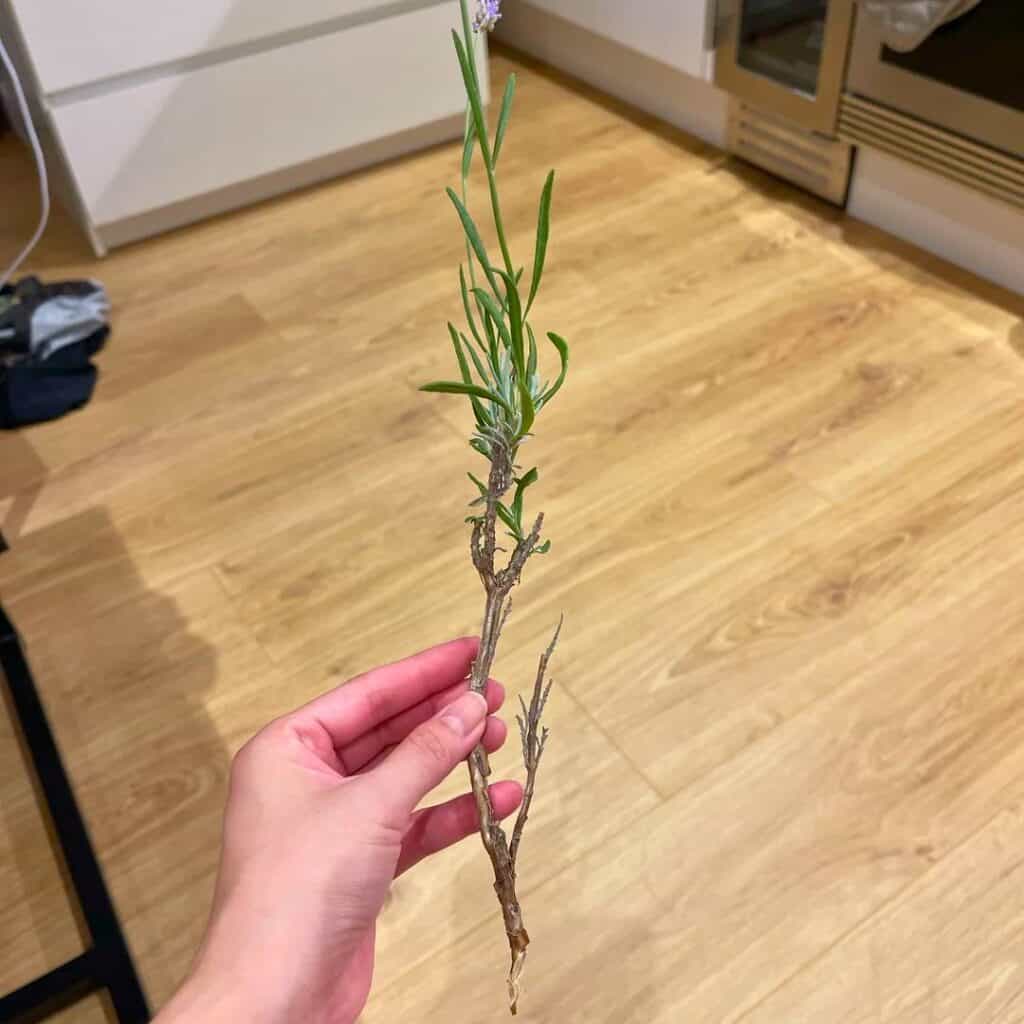
1) Choose semi-hardwood cuttings in late summer
I always start by picking semi-hardwood cuttings from my lavender plants in late summer. The stems are firm but still have some give—perfect for rooting.
Soft new growth wilts way too quickly, and old woody stems? They just don’t root as well. I look for healthy, non-flowering shoots about 4 to 6 inches long.
Flowering stems use up too much energy on blooms, so non-flowering ones have a better chance to thrive. I also make sure the parent plant is disease-free and well-watered before I snip anything.
A healthy mother plant gives me stronger cuttings. I cut just below a leaf node since roots usually pop out from there.
Late summer offers just the right warmth and light for rooting. The weather isn’t too extreme, and the plants are still active.
I remove the lower leaves, leaving just a few at the top. That way, the cutting focuses on roots instead of trying to keep a bunch of leaves alive.
Then I pop the stems into a clean container or straight into a pot with moist, well-draining soil. Picking the right cutting at the right time really saves me a lot of headaches.
With semi-hardwood cuttings in late summer, I see faster rooting and stronger plants—always ready for transplanting when spring rolls around.
2) Use sharp, clean pruning shears
Before taking lavender cuttings, I make sure my pruning shears are sharp and clean. Dull blades will crush the stems, and that just makes it harder for roots to grow.
Sharp shears give a smooth cut, helping the plant heal faster. I also clean my tools with rubbing alcohol or soapy water before and after use.
It’s a small thing, but it really helps prevent disease from spreading. When I cut, I go for a clean, angled cut just below a leaf node.
That way, I get a healthy cutting and the mother plant recovers more quickly. I avoid cutting too close to the base, since that can stress the plant.
I keep a cloth nearby to wipe the blades between cuts, especially if I’m working with several plants. It keeps things sanitary and my cuttings healthier.
Using sharp, clean shears just makes the whole process smoother. It’s a simple habit, but it pays off with stronger, healthier lavender plants.
3) Cut 3-4 inch stems just below a leaf node

I always pick healthy, non-flowering stems from my lavender. Morning is best, since the plant is well-hydrated and the stems are firm.
I use clean, sharp scissors or pruning shears for a precise cut—dull tools just make a mess. I measure about 3 to 4 inches from the tip and snip just below a leaf node.
After cutting, I remove the lower leaves from the bottom inch of the stem. This keeps the part going into the soil clean and helps prevent rot.
I leave a few leaves at the top so the cutting can still make energy. Sometimes I take several cuttings at once—why not? It’s quick and gives me extras to share.
Keeping each stem about the same length helps them root at a similar pace. I always pop the cuttings in water or moist soil right away so they don’t dry out.
If I get sidetracked, I keep them in a shaded spot until I’m ready. Cutting just below a leaf node is key—plant hormones gather there and help roots grow faster.
It’s a small detail, but it makes a difference. Being careful and precise with each cut sets up my lavender cuttings for success.
4) Remove lower leaves to prevent rot
Whenever I take lavender cuttings, I always remove the lower leaves before planting. It keeps the stem clean and lets it focus on growing roots.
I gently pinch or snip off the leaves from the bottom two inches of the cutting. Leaving leaves below the soil traps moisture, which can lead to rot or fungus.
Keeping the lower part of the stem bare allows for good airflow around the base. Healthy airflow helps prevent disease and keeps the cutting dry where it matters.
I’m careful not to tear the stem—just a clean cut or gentle pinch does the trick. After trimming, I check for any leaf bits stuck to the stem.
Even small pieces can decay and invite mold or bacteria into the soil. This little step really does make a difference.
Clean stems root faster and stay healthier, giving me strong new plants to enjoy.
5) Dip cuttings in rooting hormone powder
I always dip my lavender cuttings in rooting hormone before planting. It helps the stems grow roots faster and just boosts my success rate.
I moisten the cut end a bit so the powder sticks better. Then I gently tap the end into the rooting hormone—just enough to coat the bottom half inch.
Using too much powder can actually slow things down, so I shake off any extra. I like to use a small, clean container for the powder instead of dipping straight into the main jar.
That keeps the rest of the product clean. Once coated, I plant the cutting in moist, well-draining soil right away.
The hormone works best when the stem goes in soon after dipping. I press the soil gently around the base to keep it in place.
Cuttings treated with rooting hormone usually root more evenly and stay healthier. It’s a tiny step, but it gives the plants a strong start.
If I’m out of commercial rooting hormone, I’ll sometimes use a natural option like cinnamon powder. It’s not quite as effective, but it helps prevent rot and keeps things clean.
Keeping things simple and clean helps the lavender grow strong roots. I find this step saves me time since fewer cuttings fail.
6) Plant cuttings in a well-draining mix
I always make sure my lavender cuttings go into a well-draining soil mix. Lavender hates soggy feet—drainage is everything.
I usually mix equal parts perlite, coarse sand, and potting soil to keep the roots happy and prevent rot. I fill small pots or trays with this mix and press it down gently.
The surface should feel firm but not packed. Then I poke small holes for each cutting so the stems slide in easily without bending.
After placing the cuttings, I press the soil around the base to hold them upright. Lower leaves always stay above the surface—otherwise, they’ll rot.
I lightly mist the soil to keep it slightly moist but never soggy. I use pots with drainage holes to avoid water buildup.
If I’m using trays, I make sure any extra water drains out completely. Good airflow around the pots helps the soil dry evenly.
Sometimes, I cover the cuttings with a clear plastic dome or bag to hold humidity. I make sure it doesn’t touch the leaves.
Too much moisture can cause mold, so I lift the cover daily to let in fresh air. Keeping the soil mix light and airy helps the new roots grow faster.
When I see new growth, I know the cuttings are ready to move into bigger pots or out into the garden. Healthy roots always start with a well-draining mix.
7) Keep soil moist but not soggy
I always try to keep the soil slightly damp when propagating lavender. The cuttings need enough moisture to form roots, but too much water and they’ll rot.
I check the soil often to make sure I’m not overdoing it. Using my finger, I test the top inch—if it’s dry, I add a little water.
If it’s still damp, I just wait another day. Consistent moisture helps roots grow strong and healthy.
I prefer a spray bottle over pouring water. A light mist keeps the soil evenly moist without causing a flood.
This also helps prevent the cuttings from shifting around. Good drainage is just as important as moisture.
I always use a well-draining potting mix and containers with holes at the bottom. That way, extra water can escape and the roots aren’t sitting in soggy soil.
If I spot water pooling on top or collecting underneath, I know it’s time to adjust. Sometimes I add coarse sand or perlite to improve drainage.
I also pay attention to the room’s temperature and airflow. Warm, gentle air helps the soil dry at a steady pace.
Too much humidity can trap moisture and slow root growth. By watching the soil closely and watering carefully, I give my lavender cuttings the best shot at thriving.
It’s all about finding that perfect balance between moist and dry.
8) Place cuttings in bright, indirect light
I always make sure my lavender cuttings get bright, indirect light instead of direct sun. Too much sun dries them out before roots form, but too little slows everything down.
I usually set my cuttings near a sunny window with a thin curtain. The curtain softens the light but keeps things bright and warm.
If I notice the leaves turning pale or drooping, I’ll adjust the spot. Sometimes I move them a few feet away from the window or use a small grow light.
Consistent, gentle light is best for young lavender cuttings. I avoid dark corners and harsh midday sun—both can stress the plants.
Keeping the light even and indirect helps the cuttings focus on forming roots instead of battling heat or shade. When I use artificial light, I keep it on for about 12 to 14 hours a day.
That mimics natural daylight and supports healthy development. I also check that the light isn’t too close, since too much heat can harm tender stems.
Good lighting really does make a difference in how quickly lavender cuttings root and grow. By giving them steady, indirect brightness, I help them stay strong and ready for the next stage.
9) Maintain humidity with a plastic cover
I always try to keep my lavender cuttings moist but not soggy. To help them root, I’ll cover the tray or pot with a clear plastic bag or a dome.
This traps moisture and keeps the air around the cuttings humid, which is honestly pretty important.
I don’t seal the cover super tightly—a little airflow is key for avoiding mold or rot. Usually, I’ll poke a few holes in the plastic or just leave one corner open.
That cover acts like a mini greenhouse, keeping things warm and stable. Lavender roots seem to form best when they don’t dry out too fast.
I check inside the cover every day. If there’s a lot of condensation, I’ll lift the cover for a few minutes to let some moisture out.
Balanced humidity really helps the cuttings stay healthy, but it’s a bit of a balancing act.
Once I spot new growth, I start removing the cover for short periods each day. This way, the young plants can adjust to normal air before being left uncovered for good.
Honestly, using a plastic cover is such a simple trick, but it makes a big difference. It keeps the cuttings comfy and gives them a much better shot at rooting.
10) Avoid direct sunlight until roots form
When I’m starting new lavender cuttings, I make sure to keep them out of direct sunlight. Bright sun can dry out the stems before they ever get a chance to root.
Instead, I find a bright but shaded spot so they get light without the harsh heat.
I’ve noticed that indirect light helps the soil stay evenly moist. That gives the cuttings a stable environment to focus on root growth.
Too much sun too soon is just asking for wilted leaves and slow progress.
I like to set my cuttings near a window with filtered light or maybe under a light curtain. If I’m outside, I’ll use a shaded porch or a spot with only gentle morning sun.
That keeps the temperature steady and not too hot.
Once I see new roots forming, I start moving the plants into more sunlight, a little at a time. I spread this out over several days so they can adjust.
Gradually giving them more sun helps them toughen up without getting shocked.
It’s tempting to put lavender right in the sun since mature plants love it, but I have to remind myself—new cuttings are delicate. Protecting them from direct rays early on really gives them the best shot to thrive later.
Understanding Lavender Propagation
I’ve learned that growing new lavender plants from cuttings takes patience, the right environment, and a bit of attention to detail. Healthy parent plants, proper tools, and consistent care can make all the difference in how well the cuttings root and grow.
Common Challenges and Solutions
One problem I run into is cuttings failing to root. This usually happens when the stems are either too old or too young.
I always go for semi-hardwood cuttings—stems that feel firm but are still a bit bendy. They just seem to root more easily and hold up better against rot.
Overwatering is another classic issue. Lavender likes things on the dry side, so I let the soil dry out a bit between waterings.
Using a well-draining mix with sand or perlite really helps keep the roots happy.
Sometimes I’ll see fungal diseases pop up on the stems or leaves. I avoid this by trimming off the lower leaves, cleaning my tools, and making sure there’s good airflow.
When cuttings wilt quickly, I cut back on sunlight and use a clear cover to hold in humidity. A quick mist once a day keeps the leaves from drying out without soaking the soil.
Ideal Conditions for Rooting
I’ve found that temperature and light matter most. Lavender roots best in 65–75°F (18–24°C) with bright, indirect light.
Too much heat or harsh sunlight can dry out the cuttings before they get going.
I keep the cuttings in a well-ventilated area to help prevent mold. Sometimes I’ll use a little fan for some gentle airflow.
The soil mix should feel light and crumbly. I usually mix equal parts coarse sand, perlite, and peat moss.
This keeps moisture balanced and lets the roots breathe.
I test the moisture by touching the top of the soil. If it’s barely damp, I’ll mist lightly. If it’s wet, I just wait.
Using a rooting hormone on the base of each cutting really boosts my success rate. It speeds up root growth and cuts down on failures.
Caring for Young Lavender Plants
I keep my young lavender healthy by giving it just enough water, plenty of sunlight, and enough space to grow. These steps help the roots get strong and ready for life outdoors.
Watering and Light Requirements
I only water my lavender when the top inch of soil is dry. Too much water can cause root rot, so I make sure the pot drains well.
I always use a pot with holes and never let water sit in the saucer.
Young lavender needs at least 6 hours of direct sunlight a day. I put my plants by a sunny window or use grow lights if I’m indoors.
Without enough light, the stems get weak and floppy.
To help them adjust, I move the plants outside for a few hours each day once it’s warm enough. This process, called hardening off, helps them get used to sunlight and wind before transplanting.
Transplanting to the Garden
When the plants are about 3–4 inches tall and have a few sets of leaves, I start getting them ready for the garden.
I pick a sunny, well-drained spot with sandy or rocky soil. Heavy clay just holds too much water, so I’ll mix in sand or small gravel for better drainage.
I plant each lavender about 12–18 inches apart so they have room to spread.
After transplanting, I water lightly to settle the soil but never soak it.
During the first few weeks, I check the plants every day for stress—drooping or yellowing leaves. If I spot any issues, I tweak watering or give them a bit of shade until they perk up.
Frequently Asked Questions
I’ve noticed that timing, soil choice, and watering habits really matter for lavender cuttings. Paying attention to details like stem length, leaf removal, and rooting conditions helps me get stronger, healthier plants faster.
What’s the best time of year to propagate lavender?
I get the best results when I take semi-hardwood cuttings in late summer. The stems are firm but still flexible, which makes rooting easier.
Can you walk me through the step-by-step process of propagating lavender from cuttings?
I start by using sharp, clean pruning shears to cut 3–4 inch stems just below a leaf node. Then I remove the lower leaves to help prevent rot.
Next, I dip the cut end in rooting hormone powder and pop it in a small pot with well-draining soil. I keep the pot in a warm, bright spot, but out of direct sun.
What type of soil should I use for lavender propagation?
I go for a light, well-draining mix—sand, perlite, and a bit of potting soil. That way, the roots never stay too wet.
How often should I water lavender cuttings to ensure successful rooting?
I mist the soil lightly every few days so it stays just damp, never soggy. Too much water can rot the stems.
Are there any common mistakes to avoid when propagating lavender?
I try to avoid overwatering, using dull shears, or taking cuttings that are too soft or woody. I also make sure not to crowd too many cuttings in one pot.
How long does it take for lavender cuttings to root and become established?
Typically, it takes about 3 to 6 weeks for lavender cuttings to start growing roots.
When I spot some fresh growth, that’s my sign the cutting’s good to go—either into a bigger pot or straight into the garden.
Note: Some images in the articles are sourced from Reddit and Other Platforms For Reference Purpose.