How To Propagate English Ivy? (Soil+Water Propagation Guide)
English ivy is a lush, evergreen plant that can add a lot of greenery to your home or garden. If you own an English ivy, you might want to know how you can propagate and get more plants from it.
To propagate your English ivy:
- Choose a healthy cutting from an English ivy plant.
- Make a clean cut with sterilized pruners.
- Dip the cutting into the rooting hormone.
- Place the cutting in a water-filled container or a suitable potting mix. Keep the soil slightly damp.
- Once roots are long enough, transplant them into the soil.
In this article, I will explain English Ivy’s propagation and tips for successful propagation.

Please note: Simplify Plants is reader-supported. As an Amazon Associate, I earn from qualifying purchases made by our readers with no extra cost added to you all! Some links in the post are affiliate links and I get a commission from purchases made through links in the post.
Why should you propagate an English ivy plant?
Buying many English ivy plants can be expensive, so going for propagation will be beneficial.
Here are some reasons why you should propagate your English ivy:
- Propagation is the perfect way to get new plants without spending a penny.
- Propagation helps to utilize the healthy stems after pruning.
- Baby English ivy plants can be great gifts for your friends and family.
- If your ivy is sick and dying, propagate a healthy stem from the plant to give it a second chance.
What is the best time to propagate English ivy?
The right time to propagate an English ivy is spring and early summer.
English ivy is most active during this time and grows rapidly due to the abundance of humidity, warmth, and light.
Also, because English ivy’s growth reduces in winters due to the low light and temperatures, propagation might not be successful.
Is English Ivy hard to propagate?
English ivy propagation is not difficult at all.
It is one of the easiest plants to propagate.
You can propagate this plant by cutting its stems and growing them into new plants.
How to propagate English ivy?
English ivy plants have long trailing vines that are easy to cut and root, provided you do it correctly.
One vine can be cut into multiple parts and grown into new plants.
I will discuss two simple propagation methods and provide a complete guide on caring for your newly propagated English ivy.
Before beginning the propagation process, you must ensure that the plant is mature and disease free.
If your plant is healthy, the chances of successful propagation are higher.
Propagating from a sick and diseased plant has a higher chance of failure as the plant is not strong enough to handle the propagation pressure and fails to root itself.
Also, the newly propagated plant gets its internal features from the mother plant, so if it is a disease, the new plant will also be diseased and weak.
Can English ivy be grown from cuttings?
Propagating through cuttings is the easiest way to get new plants.
You propagate from a healthy stem cutting with some leaves and nodes.
Do not take a diseased and shriveled stem.
You can do it in 2 ways:
- Propagating in water
- Propagating in soil
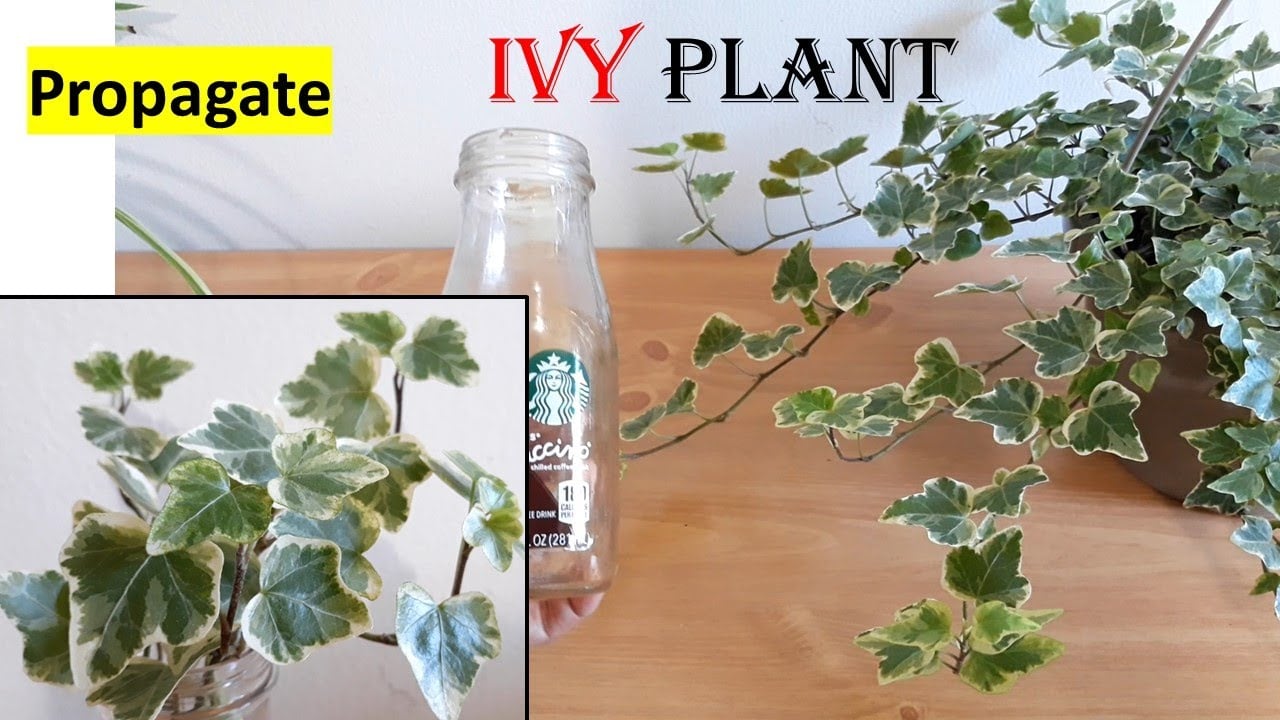
How to propagate English ivy in water?

Water propagation is a very simple process and has become extremely popular nowadays due to its ease and advantage of being able to monitor root growth.
Supplies required:
The equipment you would require for your water propagation are:
- A mature plant: You need a healthy mature plant free of pests or diseases.
- Pruners: You need a pair of sharp, clean pruners to prune the plant and get the cuttings. Do not use a blunt pruner, as that will make the cuts messy.
- Disinfectant: Use a disinfectant or rubbing alcohol to sterilize the pruner before and after use.
- Glass container: Though you can use other containers too, glass containers are most preferred because you can see the roots’ progress without disturbing the cutting.
- Fresh distilled or filtered water: Use only filtered or distilled water to grow your cuttings. Tap water contains minerals that are harmful to your sensitive cuttings.
- Rooting hormone: This is optional and can be used for easier rooting.
Now I will explain the steps you need to follow to carry on the water propagation:
Step 1: Inspect the plant.
Inspect the English Ivy properly to see any signs of diseases or bugs.
Mark in your mind which places you will get the cuts from.
Each cutting should be at least 6 inches tall and have leaf nodes and leaves on top.
Take multiple cuttings so that the chances of rooting are increased.
Step 2: Disinfect the pruner.
Take the pruners and disinfect them with rubbing alcohol before and after use.
You do not want the spread of germs from a contaminated pruner.
Step 3: Make a clean cut.

Get a clean cut on the market points.
Ensure the ends are not crushed.
Step 4: Dip in the rooting hormone.
This optional step helps root the cuttings faster and prevent fungal infestations.
Step 5: Fill up the glass container.
Fill up the container with filtered water.
Tap water has minerals like fluoride or chlorine that are harmful to sensitive cuttings, so only use filtered water to propagate the cutting.
Step 6: Put it in water
Remove the bottom leaves from the stem and put them in the container.
Make sure none of the leaves touch the water as that will lead to the growth of fungus in the water.
The growth nodes should be submerged in the water at all times.
Step 7: Post propagation care
Keep this container at a spot with moderate light and no direct sun exposure.
Keep an eye on the water’s color and health and change it whenever you notice any sign of dirt.
Ideally, you must change it every 3-4 days to keep the cuttings healthy.
If you get any rotting smell from the water, change it and clean the container.
If your procedure is correct, your cutting will start rooting in 4-6 weeks but do not transplant to soil then.
Wait for it to grow some more.
Step 8: Move to the soil.
Wait for at least two months to repot the cutting in soil.
Though you can grow your ivy in water, I recommend moving it to the soil.
Plants growing in water are bereft of a lot of nutrients.
As a result, their growth is slower and less healthy than the ones growing in soil.
So transplant it to the soil once the roots are mature and there is some foliage growth in the cuttings.
Post repotting, keep the plant at a spot with bright light and good ventilation.
How to propagate English ivy in soil?

Soil propagation is the oldest and the most common way to propagate English ivy plants.
Supplies required:
Before going ahead with the propagation process, let me tell you the supplies or tools you need for the activity so that you can keep everything ready before starting.
- A mature, healthy plant: You must first get a mature and healthy plant. Examine the plant thoroughly for signs of infection and diseases.
- Pruners: A sharp pair of pruners is essential for healthy, clean cutting.
- Sterilizer/disinfectant: You need a disinfectant to sterilize your pruning shears before using them.
- Potting mix: You must prepare all the ingredients to make a light, well-draining potting mix. Remember that newly potted cuttings cannot grow if the soil is too tight and heavy. For the roots to establish properly, the soil needs to be light, so there is airflow and moisture.
- Small pot: You need a small pot with a drainage hole at the bottom. Ideally, 4 inches pots are most commonly used for propagating baby English ivy plants.
- Chopstick: You need this to poke a hole in the soil where you can plant your cutting. However, this is an optional requirement, and you can also poke a hole with your finger or a pencil.
- Rooting hormone: Some growers use another optional tool, rooting hormone, to help faster root development and reduce the chances of any fungal infestation in the cuttings.
- Plastic bag: This is an optional step as well. Covering the cutting with a plastic bag helps trap the moisture in the cutting, which keeps it moist and hydrated, creating a humid greenhouse effect so rooting can easily occur.
Now I will discuss how you need to get and grow the cuttings.
Step 1: Prepare the potting mix for propagation.
The ideal potting soil for your English ivy must be loose, retain the required moisture and support well drainage.
Mix soil with sand and perlite to get an airy light soil mix.
Step 2: Examine the plant.
Now you must thoroughly examine your ivy and decide which part you would like to use for propagation.
Remember, you must use stems at least 4-6 inches tall with a few leaves attached.
It should have at least 3-4 growth nodes from where the new roots will emerge.
Ensure no fungus, pests, or spots on the chosen stems.
Use cuttings from younger stems that are lighter in color as they are fresh and easier to root.
Step 3: Sterilize your pruners.
Once you have chosen the parts you want to prune, sterilize your pruners by wiping a cotton pad dip in rubbing alcohol to eliminate any invisible bugs or germs on it to prevent the spread of pathogens.
Step 4: Take the cutting.
Now cut the chosen parts of the plant with the pruner.
Do not crush any cuttings.
Carefully snip the stems at the chosen points.
There must be some growth nodes in the cuttings, so cut below the growth nodes and keep a few leaves.
Once done, remove the lower leaves on the stem, so they do not stay inside the water.
Step 5: Put the cutting in the soil.
Dip the cuttings in rooting hormone so that roots are encouraged to grow healthier and faster.
Now take the small pot, mix the soil mix well and fill up the pot with a chopstick, dip a hole at the center of the soil and plant the cutting here.
No leaves should touch the soil as that can lead to fungus growth, so remove all the bottom leaves and keep them at the top of the cutting.
Step 6: Provide moisture.
Once done, water the soil slowly until you see it coming out of the drain hole.
The soil of the cutting should remain slightly moist at all times.
The cuttings find it easier to grow their roots in slightly moist soil, so do not let it fully dry.
Step 7: Post propagation care
Once you have watered, move the cutting to a spot in your home with good bright light but not direct sunlight.
The new cutting is extremely sensitive and fragile and cannot tolerate direct sunlight.
Also, indirect light will reduce the transpiration level reducing the moisture loss from the cuttings.
The cutting should have high humidity around, and the soil should be consistently moist so that the rooting works efficiently.
One interesting and effective way to keep the cutting moist and hydrated is by covering it with a plastic bag to give it a humid effect like a greenhouse.
Plastic locks in moisture from evaporating outside, keeping the inside humid which is ideal for the rooting to start.
But you must remove the plastic every 3-4 days to water the soil, air the cuttings, and cover it again.
If you do not want to do this, you should mist your cutting often but do this in the morning so that they do not stay wet for a long time.
If you follow the above steps correctly, your cuttings should begin rooting in a month, and the propagation will be successful.
Step 8: Repot the baby plants
If your propagation is successful, your cutting will start to show signs of rooting by 4-5 weeks.
However, do not immediately report your cutting in a bigger pot.
Wait about a month until the roots are bigger and stronger (about 2-3 inches long).
There should be some new growth in the top part of the cutting, and then repot the cutting to a bigger pot.
Repotting the cutting when the roots are too young makes it stressful for the cutting to grow in the new soil.
If the roots have matured a bit, they would easily adapt to the new environment after repotting.
While repotting, do not choose a pot that is too big for the cutting.
That would increase the chances of overwatering and root rotting.
Your new pot should not be more than 2 inches larger than the present pot.
Keep the newly repotted plant at a spot where it gets bright light and a few hours of morning sunlight but protect it from harsh sunlight.
Water only when the top 2 inches of the soil are dry and maintain humidity and temperature.
Tips for successful English ivy propagation

- Cover the cuttings with a plastic bag. Though an optional step, it helps the cuttings receive moisture which helps them root efficiently.
- Do not be in a rush to transplant the cutting into the soil, as that might ruin your propagation activity. Give the roots to grow enough and be at least 2-3 inches before moving them to the soil.
- Maintain the ideal temperature of 65-90°F for your ivy.
- Do not put the cutting under direct sunlight as it is too sensitive to be able to tolerate it. After repotting to the soil, gradually make it adapt to direct sunlight.
- Though the cuttings require moist soil, be careful not to keep the soil wet. Wet soil will rot the cuttings and grow fungus.
- Use a very light, airy well-draining soil to repot the cutting. An ideal ratio is 1 part soil, 1 part compost, 1 part sand, 1 part perlite, and a handful of crushed charcoal or pine bark.
- Maintain humidity around the plant by regular misting and using a humidifier.
- Do not fertilize right after repotting as the soil already contains compost. Wait for 3-4 months before resuming fertilization. Feed it with an NPK 20-20-20 fertilizer in the growing period.
Final words
English ivy is an easy plant to grow and propagate. Since buying them from the market can be quite expensive, propagating them will save you a lot of money and give you the satisfaction of watching your plant grow.
You can propagate your English ivy in water and soil by taking cuttings from a healthy and mature plant. For successful propagation, you must provide the ideal temperatures, humidity levels, sunlight, and care for all the other requirements.
Note: Some images in the articles are sourced from Reddit and Other Platforms For Reference Purpose.