Do Alocasia Like To Be Root Bound? (+When To Repot)
Alocasia is a tropical plant that has gained popularity as a houseplant due to its large green leaves. When grown as houseplants in pots, your Alocasia will get rootbound if you don’t repot it for too long.
Let’s find out if Alocasia likes being rootbound.
Alocasia enjoys being slightly rootbound, but keeping it rootbound for too long can cause various problems, such as roots coming out of the drainage holes, lack of soil, and stunted growth. It would be best if you repotted your Alocasia when it gives out the signs of being rootbound.
In this article, we will understand the rootbound condition of Alocasia plants, the signs, and how to fix the issue.

Please note: Simplify Plants is reader-supported. As an Amazon Associate, I earn from qualifying purchases made by our readers with no extra cost added to you all! Some links in the post are affiliate links and I get a commission from purchases made through links in the post.
Does Alocasia like to stay in a small pot?
Alocasia plants prefer to stay slightly rootbound because, in nature, they grow compactly, so keeping them in slightly root-bound conditions helps to mimic their native condition.
Staying in a small pot also encourages Alocasia to push out newer foliage growth, preventing root rot and the soil from staying soggy.
However, remember not to keep the plant in an extreme rootbound situation as that might result in diseases and affect the plant’s growth.
When the roots of any plant do not find enough space to spread, it affects their growth and health.
Why does Alocasia like to be rootbound?
Alocasia plants put a lot of energy into growing their roots, foliage, and flowers.
However, when the roots are slightly cramped in the pot, they cannot force out their roots that much, making them invest their energy in pushing out more flowers and foliage.
So, letting your Alocasia grow slightly rootbound results in a dense growth of the leaves and blooms.
Tropical plants like Alocasia do not like to be saturated in soggy soil.
They like loose, airy soil.
The compact roots of Alocasia help the soil stay loose and let it breathe, reducing the chances of root rot.
In nature, Alocasia grows on the tropical rainforest floor and the marshes of Australia and Southeast Asia.
They grow under the bigger trees in a slightly compact state.
By letting your Alocasia grow slightly rootbound, you are providing your plant the natural habitat it grows in, which is a trick to keep it happy and healthy.
How do I know if my Alocasia is rootbound?

Some plants prefer to stay compact in smaller pots, while some like to stretch out their roots.
When a plant gets too rootbound, it shows several signs of distress.
In the initial stages, plants like Alocasia enjoy the rootbound stage.
However, as the stage advances, it harms the plant’s growth.
Some of the signs of a rootbound Alocasia are:
- The first and foremost sign of a rootbound plant is that the plant’s roots start to come out of the drainage holes.
- When the roots don’t get enough space in the pot, they try to expand, and in search of space, they start coming out of the pot through the holes.
- Sometimes the expanding roots force the pots to crack, and in the case of plastic pots, they start to inflate because of the roots pushing the pot from inside.
- Another prominent feature of a rootbound plant is that the roots show on the soil’s surface. The roots in search of space push themselves out to the top of the surface.
- One sign of a rootbound plant is that it starts to get dehydrated frequently. When the roots get overcrowded, they don’t get enough water because it quickly comes out of the drainage hole. So the soil gets dry frequently in between watering. Also, due to the growth in the roots, the soil quantity decreases, which makes the water drain quickly. The soil gets washed away with water decreasing its quantity.
- The plant’s growth reduces once it reaches the root-bound stage.
- The leaves may turn droopy and yellow because the plant does not get sufficient space and nutrients from the soil. The plants get stressed, and the wilting leaf is a sign of that stress.
- Due to the rootbound situation, the fertilizer added to plants gets washed away quickly before getting absorbed.
Different stages of a rootbound Alocasia
There are different stages of a rootbound plant.
It isn’t easy to survive when the plant reaches the last stage.
Let us find out the different stages of a rootbound Alocasia.
| First stage | Second stage | Third stage |
|---|---|---|
| The roots start to grow large and get tangled. At this stage, the Alocasia pushes out a lot of new leaves and flowers. Due to the restricted root space, the plant invests its energy into foliage and flower growth. | This is a more advanced state where the roots start to grow aggressively in search of more space to spread. The roots start coming out of the drainage holes and show over the soil’s surface in this stage. At this stage, it is best to repot the Alocasia to prevent further damage to the plant. | This is the final stage of the rootbound plant. It isn’t easy to take the plant out of the pot at this stage. The roots get attached to the pot. The plant’s growth is stunted. The roots are suffocated with a lack of space. The plant does not absorb the water anymore and drains out quickly. |
When should I repot Alocasia?

Let your Alocasia grow undisturbed because it enjoys staying in a lightly rootbound position.
However, the moment you notice the advanced signs of being too cramped and its growth gets stunted, it is a clear sign that you should repot your plant immediately.
There are certain signs to watch out for, which give the signal that you must repot your rootbound Alocasia.
- The water drains out as soon as you start watering the plant.
- You notice roots coming out of the drainage holes or showing above the soil.
- The plant gets dehydrated since the water runs out of the drainage holes without getting absorbed by the soil.
- The roots get tangled and grow in a circular motion inside the pot.
- The roots start displacing the soil.
Should I keep my Alocasia rootbound?
Every plant gets rootbound after staying in one pot for a long time.
However, different plants react differently to a rootbound state.
Plants like Alocasia, Snake plant, Crotons, Boston Ferns, and Peace Lillies like to stay slightly rootbound.
You will see these plants flourishing more when they are rootbound because that pushes them to more foliage and blooms.
Many plant growers forcefully keep these plants in a slightly root-bound state to push more foliage and flowers.
But avoid keeping the plant rootbound for too long.
How to choose the correct pot for Alocasia?

Choosing the correct pot for your Alocasia is of vital importance.
The first and foremost factor in deciding is the material of the pot.
Clay pots are most preferred because it is porous, and the roots of Alocasia can breathe in them.
They are also the cheapest and most easily available.
You can keep your Alocasia in any pot material as long as you know how to care for it in that pot.
The next important part to keep in mind is the size of the pot.
If you plant your Alocasia in the wrong size pot, it can be harmful to your plant.
A pot that is too small for the plant will hamper the plant’s growth.
The roots will not get space to grow, which would be detrimental to the growth of the plant.
The water would also flow out of the drain hole without reaching the roots, and the soil will get dry frequently between watering if the pot size is too small.
The soil availability would also be less, resulting in a nutrient deficiency of the Alocasia.
Similarly, if the pot size is too big, there might be a chance of overwatering, root rot, and other diseases because the excess soil would take a lot of time to dry, and it would hold extra moisture, which can be harmful to the plant.
The new pot should be 1-2 inches bigger than the existing pot size.
This would be neither too big nor too small for the plant.
The next extremely important part is choosing a pot with drainage holes.
Often we find plant lovers using decorative pots for aesthetic purposes, which are harmful to your plant.
Such pots don’t have drainage holes.
The excess water has no access to drain out, and it stays in the pot, making the soil soggy and destroying the plant’s health, leading to disease, fungus, molds, root rot, and eventually death.
How to save a rootbound Alocasia?

When your Alocasia shows signs of a rootbound state, you must follow certain things to save your plant from dying.
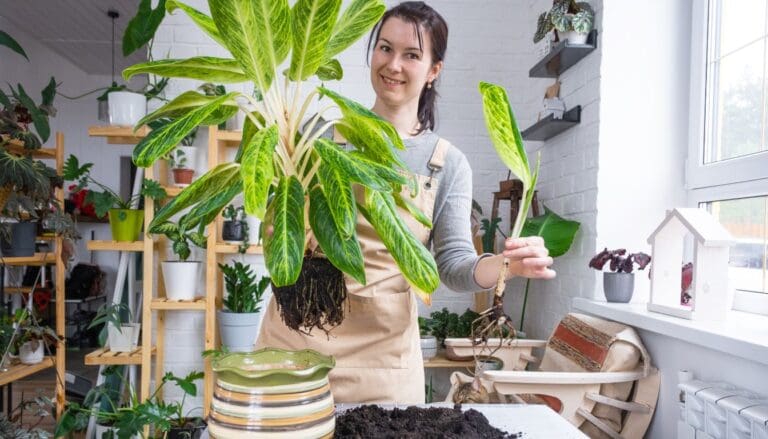
Repot the Alocasia
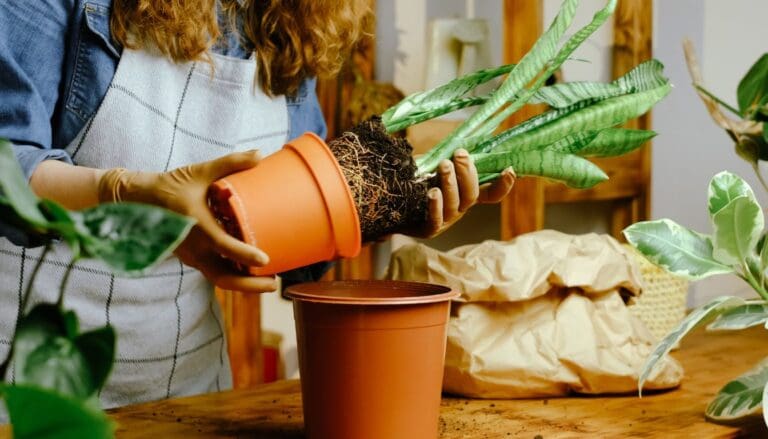
When you notice the roots coming out of the drainage holes and the surface of the soil, plan to repot your plant immediately in a pot that is no bigger than 2 inches.
- Begin by trimming the overgrown roots peeping out of the drainage hole.
- Turn the pot upside down to bring out the plant. If you see the plant roots have become rootbound and are stuck to the pot and it is not coming out, you have to pat the bottom or sides of the pot lightly, so the root ball comes off.
- Once the Alocasia is out of the pot, shake the plant root gently to make it easier for them to spread. Try loosening the roots and shaking the cramped roots.
- Examine the roots carefully. Are there any rotten or dead roots? If so, prune those roots carefully. Do not forget to sterilize the pruners before and after trimming the roots.
- Prepare a healthy potting mix that is light, well-drained, and rich in nutrients. For this, add fresh potting soil, perlite, coarse sand, and peat in equal amounts. This would make the soil light and rich in essential nutrients for the plant.
- Fill the soil midway into the pot. Now place the Alocasia gently on the soil and add more soil from the sides.
- Tap the pot gently from the sides to let the soil settle.
- Once you are done repotting the Alocasia, put it in a bright area that is well lit but not in direct sun. The direct sunray can burn your plant’s leaves because they are in a vulnerable position after repotting.
- Pour water to reduce the repotting stress and help the plant settle down in the new pot.
- Keep an eye on the plant, and do not disturb it over the next few days.
- Initially, after repotting, the plant would stay droopy and wilted because repotting gives a lot of stress to the plant. But after a few days, it should recover and flourish.
Prune the roots and reduce the plant’s size
If you don’t want to repot your Alocasia in a bigger pot due to issues like space crunch and want to keep it in the existing pot, another option to save your rootbound plant is pruning.
This is a method where you prune the excessive bigger roots of the plant to keep it in the existing pot.
This sounds like a risky job for beginners.
However, with practice, you get a hold of it.
Here is what you can do to prune your plant.
- Remove the plant from the pot carefully and examine the roots closely.
- Shake the roots a little to loosen them up.
- You have to carefully start trimming the large roots making sure not to go overboard. Trim the larger roots without hurting any.
- Now trim the dead and yellow leaves and branches.
- You can also prune some healthy parts to proportionate the foliage and roots. You can use healthy stems for propagating new plants.
- Add fresh potting mix to the old pot and plant your Alocasia back in it.
Divide your Alocasia
You can save your Alocasia by dividing it into two or more parts.
The only thing you must keep in mind is not to cause any damage as that will not allow the plants to survive.
After dividing, you can plant one part in the same pot while planting the others in different pots.
This way, you save your rootbound Alocasia and get new plants from it.
Propagate the healthy cuttings
While saving your rootbound Alocasia, you might be pruning healthy parts that you can use for propagation.
- Take one or more healthy branches with 3-4 leaves.
- Make a wound at the bottom of the stem to push out new growth from that spot.
- Get a small pot, add a light potting mix and plant the stems in it.
- Cover the pot with plastic to lock in the moisture that would accelerate its growth.
- Keep the pot in a bright spot and water frequently.
- Have patience and wait for new roots to pop out.
Final words
Although you can let your Alocasia remain rootbound for a while, you must not keep it rootbound for too long as it can restrict its functioning and growth.
You must repot your Alocasia as soon as you notice the signs of rootbound, such as roots coming out of the drainage holes.
If you don’t want to repot, you can prune the long roots, make them short, and repot in the same pot. Or, you can divide the plant into two or more parts. You can propagate healthy cuttings to get new plants.
Don’t keep the Alocasia rootbound for an extended period, as it can lead to the plant’s demise.

Reference: Science Direct, Propagation of Alocasia, The University of Arkansas Division of Agriculture, Alocasia sanderiana, Alocasia micholitziana.
Note: Some images in the articles are sourced from Reddit and Other Platforms For Reference Purpose.