8 Fall Propagation Projects for Beginners
I really enjoy watching my plants grow, especially when I get to start new ones myself.
Fall is such a good time to try out some simple plant propagation projects at home.
Learning a few easy methods lets me turn one plant into many and fill my space with more greenery.
With the right tips, honestly, I don’t need much experience to give it a go.
Please note: Simplify Plants is reader-supported. As an Amazon Associate, I earn from qualifying purchases made by our readers with no extra cost added to you all! Some links in the post are affiliate links and I get a commission from purchases made through links in the post.
1) Starting rose cuttings indoors

I like to start my rose cuttings indoors in the fall. It just gives them a better shot at growing roots.
Cooler weather outside tends to slow things down, but indoors, I can control the temperature and light. That really helps the cuttings get off to a strong start before winter hits.
First, I pick a healthy rose stem, maybe six inches long. The best cuttings come from this year’s growth.
I look for stems with at least two or three nodes—the little bumps where the leaves grow. Then, I remove the lower leaves and any flowers or buds.
This lets the cutting focus on making roots. I always cut the bottom at a slant so the stem can soak up more water.
I usually dip the bottom of the cutting in rooting hormone powder. It’s helpful, but honestly, not required—it just gives the cutting a bit of a boost. Sometimes I skip it if I don’t have any on hand.
For soil, I grab a small pot and fill it with seed-starting mix or peat moss. Regular garden soil just holds too much water and can rot the stem.
I poke a hole in the soil with a pencil, then gently stick the cutting in. After that, I water the soil until it’s moist but not soggy.
I cover the pot with a clear plastic bag—nothing fancy, just a sandwich bag works. The bag keeps humidity high, which helps the cutting root. I try to keep the plastic from touching the leaves.
The cutting goes in a warm spot with bright, indirect light. I check the soil often so it doesn’t dry out.
It’s important not to let the soil get too wet, or the stem might rot. After a few weeks, I give the stem a gentle tug. If there’s resistance, roots are starting to grow.
At that point, I slowly remove the plastic and let the plant get used to the air indoors. With a little patience, I’ll have new rose plants ready to go outside next spring.
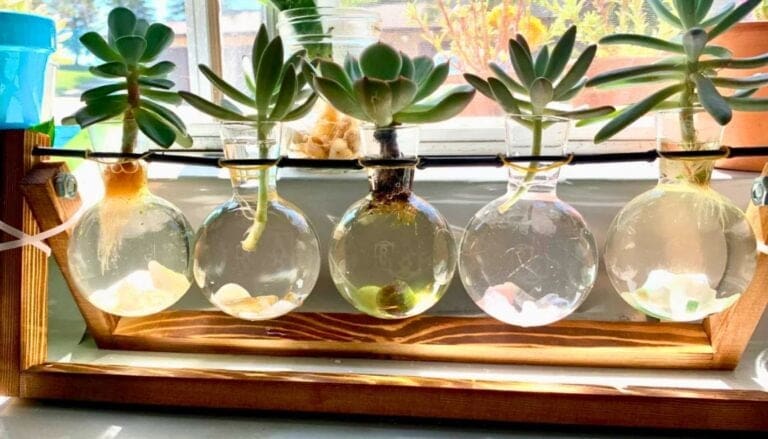
2) Propagating succulents from leaf cuttings

One of my favorite fall propagation projects is growing succulents from leaf cuttings. It’s easy, rewarding, and honestly, I don’t need any fancy tools.
I just need a healthy plant and a little patience. I start by gently twisting a leaf off the main stem.
A clean break is important so the new plant can grow well. I always pick leaves that look plump and healthy—not damaged or shriveled.
Once I have my leaf, I let it dry out for a day or two so the end can heal. That helps stop rot.
After the end is dry, I lay the leaf on top of some dry, well-draining soil. I don’t water it right away.
I wait until tiny roots or a baby plant show up at the end of the leaf, which usually takes a few weeks. When I spot roots, I mist the soil with water every few days.
Bright, indirect sunlight is best for these cuttings. Too much sun can burn them, but too little slows everything down.
I usually keep my cuttings near a sunny window. Over time, little rosettes form at the base of the leaf.
The original leaf shrivels as the new plant grows. At that point, I carefully remove the old leaf and keep caring for the baby succulent.
This works well with succulents like Echeveria and Jade Plant. It’s a cheap way to grow my collection and share with friends.
Honestly, it’s always fun to see which colors and shapes pop up as the new plants mature.
3) Rooting hydrangea cuttings in water

I find rooting hydrangea cuttings in water is easy and kind of fun. All I need is a healthy stem, a clean glass, and some water.
In early fall, I look for a hydrangea branch that isn’t flowering. I cut a 4-6 inch piece below a leaf node.
I remove the leaves on the lower half to keep them out of the water. This helps stop rot.
I fill a clear glass with room-temperature water and put the cutting in so just the bare stem sits in the water. The leaves stay dry.
I change the water every few days. That keeps bacteria away and helps the cutting stay healthy.
Roots usually start growing in about two to three weeks. Once the roots are a few inches long, I know it’s ready for planting.
I move the new plant to a pot with fresh soil. I love watching the roots form in the glass.
4) Taking fig tree hardwood cuttings

I love propagating fig trees in the fall. It’s simple and honestly kind of satisfying.
Fig cuttings are an easy way for beginners to grow new trees. Even if you’re new to this, you can totally pull it off.
First, I pick a healthy fig tree and look for branches that grew in the last year—these are called hardwood. I cut pieces about 8 to 10 inches long, making sure each one has a few buds.
I remove any leaves, then dip the bottom end in rooting hormone. This step helps the cutting grow roots more easily.
Next, I push the cuttings into a pot filled with moist potting mix or sand. I water the soil lightly to keep it damp but not soggy.
Keeping the soil slightly moist makes a big difference. I put my cuttings somewhere cool but not freezing, like a garage or porch.
It takes patience, but in a few months, roots will start to grow. I check the cuttings now and then to make sure the soil doesn’t dry out.
Once I spot new leaves or roots, I know the fig cutting is growing. In the spring, I move the rooted cuttings to a bigger pot or plant them outside.
Starting fig trees from hardwood cuttings is a low-cost way to add more fruit trees to my garden. It’s a nice project to try with family or friends in the fall.
5) Division of hosta plants

Dividing hostas in the fall is simple and a fun way to get more plants. I wait until the weather cools and the leaves start to turn yellow.
That’s the best time, since hostas are getting ready to rest for winter. First, I pick a healthy hosta that looks strong and has a lot of leaves.
I use a shovel to dig around the base, making sure to lift the whole root ball out of the ground. It’s important to dig wide so I don’t damage the roots.
After I get the plant out, I gently brush off extra dirt so I can see the roots better. I look for places where I can split the plant into sections.
Each new section should have a few leaves and some strong roots. I use a sharp knife or spade to cut the plant into pieces.
If the roots are really tangled, I shake them loose a bit. I make sure not to leave the roots out too long, so they don’t dry out.
Now I’m ready to plant the new sections. I dig holes a bit wider than the roots and space them out so there’s room to grow.
I put the divided hostas in and fill the holes with soil. Then I water each plant well to help the roots settle.
This method helps my hostas grow even better the next year. It also lets me fill empty spots in my garden or share extra plants with friends.
6) Layering raspberries

When I want more raspberry plants without much hassle, I use layering. It’s an easy way to grow new raspberry bushes using stems from an existing plant.
I find a healthy, flexible cane and bend it down to touch the ground. Then, I gently scratch the part that’ll touch the soil.
This helps roots form faster. Next, I bury that scratched spot a few inches deep and hold it down with a small rock or garden staple.
I leave the tip of the cane sticking out of the ground. It’s important to keep the soil moist around the buried part.
After a few weeks, I check for roots. When I see roots growing, I cut the new plant free from the main bush.
Now I have a brand new raspberry plant to move wherever I want in my garden! I like that this method doesn’t need any special tools.
Layering lets me multiply my berry patch with very little effort. It’s a fun way to get more fruit and share plants with friends.
I always try to layer raspberries in early fall. That way, the new roots have time to get strong before winter.
7) Starting grapevine cuttings

I find that starting grapevine cuttings in fall is a simple and honestly pretty rewarding project. Grapevines grow easily from short pieces of stem if I give them the right conditions.
First, I use healthy stems from a mature grapevine. I cut pieces about 8 to 12 inches long, making sure each has at least three buds.
I remove leaves from the bottom bud and dip the cut end in rooting hormone. This helps the cutting grow roots faster and stronger.
Next, I plant the cuttings in a pot with loose, moist soil. I make sure two buds are above the soil and one is buried.
It’s important to keep the soil damp, but not soggy. I place the pots in a cool spot that gets some light but not direct sun.
Over time, the cuttings start to root. I gently tug on them after a few weeks—if I feel resistance, roots are forming.
Covering the pots with plastic bags helps keep humidity high. That makes it easier for the cuttings to stay moist while they form roots.
I check the cuttings every few days and remove any moldy or dead pieces. New growth usually means my grapevine cutting is alive and doing well.
After a few months, I move my young plants outdoors in spring. With a bit of patience, I can grow my own grapevines from simple cuttings.
8) Propagating geraniums from stem cuttings

I honestly love propagating geraniums in the fall. It’s surprisingly easy and you barely need any fancy gear.
This method means more colorful plants to look forward to next spring. Who doesn’t want that?
First, I grab a healthy stem from my geranium, making sure it’s got a few leaves and is about 4 to 6 inches long. I snip just below a leaf node with clean scissors.
After the cut, I remove the lower leaves, leaving only a couple at the top. That way, the cutting focuses on roots instead of wasting energy on too many leaves.
I let the cutting sit out for maybe 30 minutes to dry a bit. It helps keep rot away once it’s in soil.
For planting, I use a small pot and fill it with fresh potting mix. I poke a hole, stick the cutting in, and gently press the soil around it.
Sometimes I dip the end in rooting hormone if I have it nearby. Not a must, but it helps.
I water the soil just enough so it’s moist, not soaked. Too much water and the cutting can rot—learned that the hard way.
The pot goes in a bright spot, but I keep it out of harsh direct sunlight.
Every few days, I check if the soil feels dry and add a bit of water if needed. In two to four weeks, I usually spot tiny new growth, which is always exciting.
Once roots and new leaves show up, I start treating them like regular plants. I might move them to a bigger pot or just keep them inside until spring.
Essential Tools and Materials for Fall Propagation
When I’m propagating in fall, I pay attention to the containers, the soil, and how I handle the cuttings. The right supplies really do make a difference.
Choosing the Right Containers
I like using clean, small pots or trays for new cuttings. Plastic pots are super handy because they’re light and easy to bring indoors if the weather turns cold.
Sometimes I reuse food containers—just make sure there are drainage holes punched in the bottom.
Terracotta pots look great and let the soil breathe, but they dry out fast. For tiny or delicate cuttings, plastic cell trays are a good option and don’t take up much space.
Here’s a quick table with some container options:
| Container Type | Benefits | Drawbacks |
|---|---|---|
| Plastic pots | Lightweight, cheap | Less breathable |
| Terracotta pots | Good airflow | Dry out quickly |
| Reused containers | Free, eco-friendly | Must add drainage |
I always wash containers with soap and water before using them. It’s worth the extra step to keep bacteria away from my new cuttings.
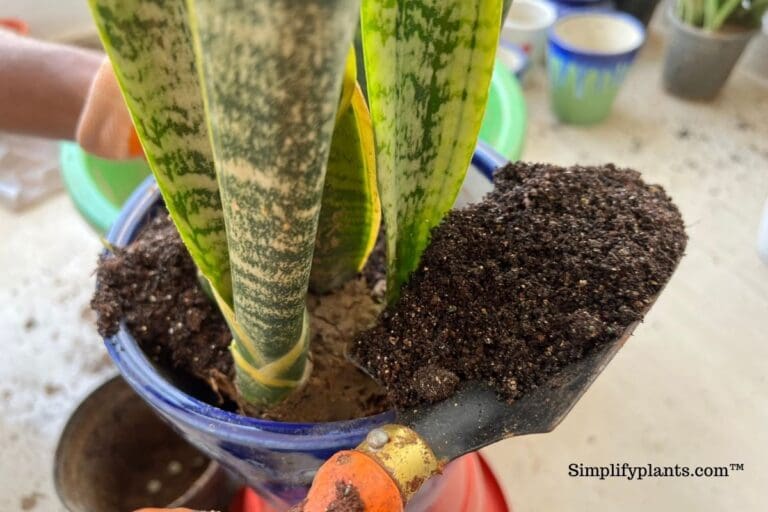
Selecting Suitable Soil Mixes
A well-draining soil mix is crucial for rooting. If the soil holds too much water, cuttings can rot. I usually grab a commercial seed starting mix or mix half potting soil with half perlite or sand.
Perlite and sand help keep things light and airy. For plants that like more moisture, like coleus, I’ll throw in a bit more peat moss. Woody cuttings prefer something gritty.
Here’s my go-to soil mix:
- 2 parts potting soil
- 1 part perlite
- 1 part coarse sand
I always dampen the mix before planting, so it sticks together but isn’t soggy.
Caring for Rooting Cuttings

Once my cuttings are in soil, consistency matters. I keep the soil moist but not drenched. A spray bottle is perfect for gentle watering.
Sometimes I cover the pot with a plastic bag to trap humidity, but I leave space for air to get in and keep mold away.
I place the cuttings in bright, indirect light—direct sun is a no-go since it can dry them out or scorch the leaves.
Every few days, I give the cuttings a gentle tug. If there’s some resistance, roots are on the way.
I try not to mess with new roots since they’re pretty fragile. As soon as I see enough roots, I move the little plants into bigger pots so they keep growing strong.
Common Challenges and How to Overcome Them
When I tackle fall propagation, I run into stuff like humidity issues, temperature swings, mold, and stubborn roots. Keeping an eye out for these challenges makes a huge difference.
Managing Humidity and Temperature
I’ve learned that keeping the right humidity and temperature is huge for new cuttings. Too wet and you’ll get rot, but too dry and roots just won’t happen.
A simple humidity dome or even a clear plastic bag keeps things moist. I’m not above using whatever’s handy.
I check the temperature daily. Most cuttings are happiest between 65°F and 75°F. If my house is chilly, I’ll put the cuttings near a sunny window or use a heat mat. If it’s too warm, I take off covers or move them to a cooler spot.
Tip List:
- Mist leaves with water once a day.
- Open covers a bit for fresh air.
- Skip direct afternoon sun—it gets way too hot.
A digital thermometer and hygrometer save me a lot of guesswork.
Preventing Rot and Mold
Rot and mold can ruin everything fast. I always use clean scissors and containers.
If I spot fuzzy white stuff or black spots, I trim them off right away.
I try not to overwater—damp, not soggy, is my motto. After watering, I make sure any extra drains out.
A sprinkle of cinnamon or activated charcoal on the soil helps, too. It’s a simple trick to stop fungus before it starts.
If things start to smell musty, I air out the area and maybe add a small fan. Good airflow is crucial for keeping mold in check.
Ensuring Healthy Root Development
Strong roots make strong plants. For me, patience is everything. I try not to check the cuttings too much since moving them can snap those delicate new roots.
If I have rooting hormone, I use it. It really seems to help roots grow faster.
Loose, fast-draining soil is a must so water doesn’t pool around the stems.
Quick checklist:
- Only water when the soil surface is dry
- Use clear cups to peek at root growth
- Move cuttings to bigger pots once roots fill the small container
This approach has given me way better results and healthier new plants.
Frequently Asked Questions
When I first started propagating my plants, I realized that picking the right method, plant, and resource really mattered. Following simple steps and sticking with trusted sources made things way easier for me.
What are some easy houseplants for beginners to propagate in water?
Pothos, philodendron, and spider plant are my top picks. They root super fast in water and you’ll see growth in just a couple weeks. Tradescantia and coleus are also forgiving if you’re just starting out.
How do I start propagating plants from cuttings?
I always use clean scissors or pruners to snip a healthy stem just below a leaf node. I remove the lower leaves, then pop the stem in water or soil (depending on the plant). I keep them warm with indirect light and check for roots after a week or two.
What are the important benefits of propagating plants?
Propagating my own plants means I can grow new plants for free and share them with friends. It saves money, adds more green to my space, and honestly, it feels pretty rewarding to learn a new skill.
Where can I find instructions for plant propagation for novices?
I search for guides from botanical gardens, plant care books, and gardening sites. YouTube videos with step-by-step help really make the process clearer for me. Social media groups are packed with helpful photos and beginner tips, too.
Can you recommend any resources for finding houseplant cuttings?
I usually find cuttings at local plant swaps or garden clubs, or by trading with friends. There are also online shops and communities where you can buy or trade healthy cuttings safely.
Which methods are best for propagating houseplants?
I usually go for water propagation with quick-rooting plants like pothos or spider plants. It just feels satisfying to watch those roots grow in a jar.
For succulents or some tropicals, I prefer soil or leaf cuttings instead. Each plant seems to have its own preference, honestly, so it’s a bit of trial and error sometimes.
Note: Some images in the articles are sourced from Reddit and Other Platforms For Reference Purpose.