What to Do with Dead ZZ Plant Stems?
ZZ plants have a reputation for being tough and pretty low-maintenance, but even these resilient guys can wind up with dead stems now and then.
When that happens, just snip the dead ZZ plant stems off at the base with clean, sharp scissors or pruning shears—it’s the best way to keep your plant healthy and looking good.
If you spot a yellowing or mushy stem, don’t freak out—it happens. It’s a normal part of plant care, honestly.
Dead stems aren’t coming back, so taking them off helps your ZZ plant focus on new growth. The process is easy, and it actually does your plant a favor.
You’ll learn how to spot dead stems, get rid of them safely, and maybe even avoid similar issues down the line.
This guide covers everything from figuring out which stems to remove, to how to toss them out properly.
Plus, there are some creative ideas for using those dead stems and tips for keeping your ZZ plant happy after a trim.
Please note: Simplify Plants is reader-supported. As an Amazon Associate, I earn from qualifying purchases made by our readers with no extra cost added to you all! Some links in the post are affiliate links and I get a commission from purchases made through links in the post.
Identifying Dead ZZ Plant Stems
Dead ZZ plant stems usually turn mushy and yellow or brown, while dormant stems stay green and firm. Most of the time, stem death comes from overwatering, root rot, or physical damage.
Visual Signs of Dead Stems
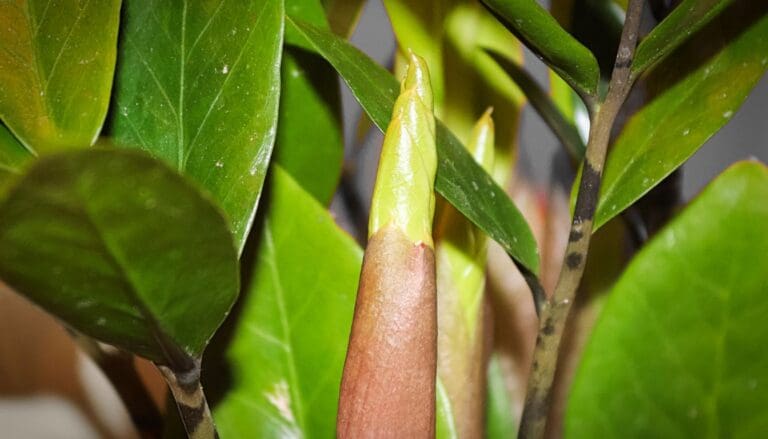
Dead ZZ stems don’t look anything like healthy ones. The first thing you’ll probably notice is a color shift from deep green to yellow, brown, or even black.
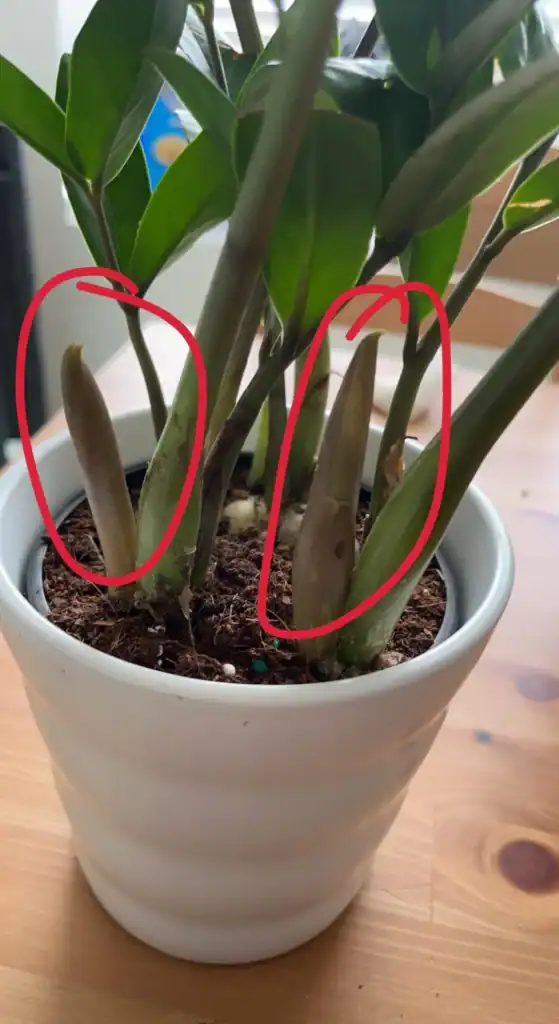
If you squeeze the stem gently, it feels soft or mushy. Healthy stems are sturdy—kind of like a thick straw. Dead ones just collapse under a little pressure.
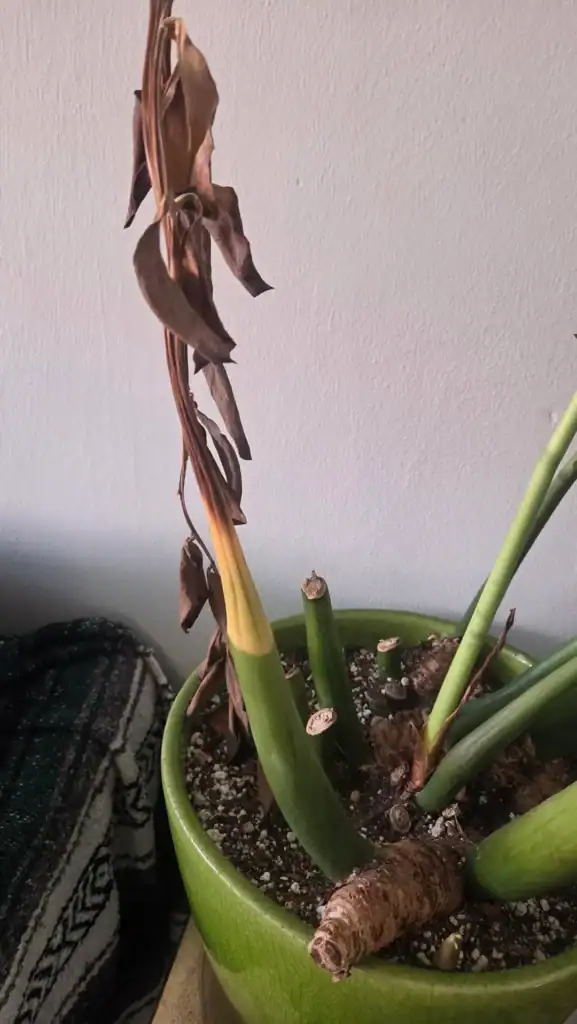
Leaves on dead stems often go yellow first, then the entire stem follows. Sometimes the leaves drop off completely, leaving just a sad, bare stalk.
The stem might get wrinkly or shriveled, almost deflated-looking. It’s not a pretty sight.
Quick Tip: If the stem comes away from the base with barely any effort, it’s definitely dead.
Differentiating Dead Versus Dormant Stems
ZZ plants sometimes go dormant in winter, which honestly throws a lot of people off. Dormant stems are still green and firm, even if they’re not growing much.
A dormant stem won’t have soft spots or weird colors. The leaves might look a bit dull, but they won’t yellow or drop off. Try pressing gently—if it’s solid, you’re probably just seeing dormancy.
Dead stems keep getting worse over time—the damage creeps upward and the color fades more. Dormant stems just stay the same for weeks or even months.
Common Causes of Stem Death
Overwatering is the main culprit for killing ZZ plant stems. These plants have underground rhizomes that store water, so they really don’t want frequent watering.
When soil stays soggy, stems start to rot from the base up. Root rot is another big cause—if the roots can’t do their job, the stems miss out on nutrients and start dying.
Physical damage, like breaking or cutting, can kill a stem, too. Cold snaps below 45°F will do it as well. Extreme neglect, like forgetting to water for months, can kill stems, but that’s actually pretty rare with ZZs.
Safely Removing Dead ZZ Plant Stems
Getting rid of dead stems is necessary if you want your ZZ plant to look good and stay healthy. It’s really not complicated once you have the right tools and know when to make the cut.
Best Time to Trim
You can remove dead ZZ plant stems any time of year—once they’re dead, the plant doesn’t care if it’s winter or summer. The timing only matters if you’re also doing some general pruning.
Spring and early summer are ideal if you’re combining dead stem removal with other pruning, since your plant is growing the fastest then. It’ll recover more quickly from any slip-ups.
Dead stems themselves aren’t dangerous, but they can attract pests or get moldy if you ignore them. It’s best to remove them as soon as you notice yellowing, browning, or mushiness.
Quick Tip: In dry climates, dead stems dry out and pull off easily. In humid places, cut them sooner before they start to get gross.
Step-by-Step Pruning Process

First, check if the stem is really dead—give it a gentle squeeze near the base. Dead stems feel soft, hollow, or just dried out compared to the healthy ones.
Grab your pruning shears and wipe the blades with rubbing alcohol to keep things clean. This helps prevent spreading any gunk to healthy parts of your plant.
Cut the dead stem as close to the soil as you can, but avoid digging into the rhizome. Try to make one smooth cut instead of sawing back and forth.
Pull the cut stem out gently. If it’s stubborn, cut it into smaller pieces and wiggle them loose. Don’t yank too hard—you could hurt the rhizome.
While you’re at it, check the other stems for any mushy spots or weird colors. Remove those too if you find them.
Quick Tip: Seriously, wear gloves—ZZ plant sap can be irritating.
Essential Tools for Pruning
You’ll want sharp pruning shears or scissors for this. Dull blades just crush the stems, which isn’t great for your plant.
Keep rubbing alcohol or a 10% bleach solution nearby for cleaning your tools. Wipe the blades before you start and between cuts if you’re removing more than one stem.
Garden gloves are a good idea to keep your hands safe from sap. ZZ plants have calcium oxalate crystals that can bother your skin.
Have a small trash bag or container ready to collect the dead stems. It keeps your space tidy and stops bits of dead plant from falling into the pot.
| Tool | Purpose |
|---|---|
| Pruning shears | Clean cuts at the base |
| Rubbing alcohol | Sterilizing blades |
| Garden gloves | Protecting hands from sap |
| Collection bag | Easy cleanup |
Proper Disposal Methods for ZZ Plant Stems
There are a few ways to get rid of dead ZZ plant stems—composting, regular trash, or even yard waste pickup. The trick is picking what works for you and avoiding rookie mistakes.
Composting Dead Plant Material

Dead ZZ stems can go in your compost, but they’re thick and waxy, so they break down slowly. Chop them into small pieces—about 1-2 inches long—to help them decompose faster.
Only compost stems that are totally dead and disease-free. If your plant had rot or fungus, skip the compost bin. Those nasties can stick around and infect other plants later.
Mix the chopped stems with “browns” like dry leaves or shredded paper. ZZ stems count as “green” material—they’ve got nitrogen. Aim for about 3 parts brown to 1 part green.
Quick Tip: Slicing stems into coin-sized bits can cut the breakdown time to 3-6 months instead of a year.
Safe Trash Disposal
For most folks, tossing dead ZZ stems in the trash is the easiest route. Wrap them in newspaper or a paper bag to keep things neat.
Healthy dead stems aren’t toxic enough to need special disposal. Just treat them like regular plant waste.
If you’ve got a lot of stems, see if your city does yard waste pickup. They usually turn dead plant stuff into mulch, which is better for the planet than dumping it in a landfill.
Quick Tip: Bundle bigger stems with twine so they don’t make a mess in your trash bin.
What to Avoid When Disposing
Never toss ZZ stems into parks, woods, or natural areas. It’s usually illegal and can mess with local ecosystems. Your plant waste doesn’t belong out there.
Don’t burn ZZ stems in a fire pit or fireplace. The smoke can be rough on your lungs and eyes, and the sap has calcium oxalate crystals that aren’t great to breathe in.
Skip composting if your stems had pests like spider mites or mealybugs. Those can survive and come back to haunt your garden. Same goes for stems with mold, mushiness, or black spots from disease.
Quick Tip: Not sure if a stem is diseased? Seal it in a plastic bag and toss it in the trash—better safe than sorry.
Caring for Your ZZ Plant After Stem Removal
After you remove dead stems, your ZZ plant could use a little extra TLC. The right watering, lighting, and a careful approach to fertilizer will help it recover and grow new healthy stems.
Supporting Plant Recovery
ZZ plants store water and nutrients in those thick underground rhizomes, so they’ve got reserves to bounce back after pruning. The plant might look a bit bare at first, but those rhizomes are already working on new growth.
For the first week, check the remaining stems daily. Watch for yellow leaves or soft spots—those could mean you accidentally damaged the rhizome.
Keep the plant somewhere stable, ideally between 65-75°F. Moving it around too much stresses it out and slows recovery.
Quick Tip: Don’t stress if you don’t see new growth for 4-6 weeks—ZZs are slow, especially after a trim.
If you pruned because of rot, keep an eye on the rest of the plant for similar problems over the next month. And don’t forget to clean your tools with rubbing alcohol between cuts.
Adjusting Watering and Light
After trimming, water less than usual—your plant has fewer leaves and needs less moisture. The rhizomes still store plenty of water, so overdoing it now could cause root rot.
Let the soil dry out completely before watering again. Stick your finger 2-3 inches in; if it’s still damp, wait a few more days. Sometimes you’ll only need to water once every 3-4 weeks, depending on humidity.
Put your ZZ in bright, indirect light to encourage new growth. About 5-10 feet from a south or west window is usually a sweet spot. Direct sun can scorch the leaves, so watch out for that.
Quick Tip: If your place gets dry in winter, the soil dries faster—check moisture weekly instead of relying on a set schedule.
Low light won’t kill a ZZ, but it’ll recover a lot slower. If new shoots look pale or stretched, move it closer to the window.
Fertilizing Post-Pruning

Hold off on fertilizing for 4-6 weeks after removing stems. The plant needs a little time to settle down, and too much fertilizer too soon can burn the roots.
Use a balanced liquid fertilizer at half strength. Mix it according to the label, then water it down a bit more. Feed your ZZ every 6-8 weeks during spring and summer—don’t overdo it.
Skip the fertilizer in fall and winter. ZZ plants don’t need extra nutrients when they’re not actively growing.
Quick Tip: If leaves go yellow after fertilizing, you probably used too much—flush the soil with water and wait a couple months before feeding again.
Watch for new shoots popping up near the base—that’s a sign your plant’s ready for nutrients and the rhizomes are back in business.
Preventing Future ZZ Plant Stem Death
Keep your ZZ plant happy by watering only when the soil is dry, using well-draining soil, and giving it the right amount of light. Get those three things right, and you’ll avoid most stem problems for years to come.
Ideal Watering Techniques
ZZ plants stash water in their chunky rhizomes, so honestly, they need way less water than most houseplants. Wait until the soil is bone dry before you even think about watering again.
Just poke your finger 2-3 inches into the soil—if it’s even a little damp, skip it for now.
When you finally water, go all in and drench the soil until water rushes out the drainage holes. Let everything drain out—don’t let your ZZ sit in a puddle.
Never leave your ZZ sitting in a saucer of water. That’s a recipe for root rot.
Quick Tip: Water every 2-3 weeks in spring and summer, but in winter, you can usually get away with once a month or even less.
Overwatering is honestly the most common way people kill their ZZs. If you see yellow or mushy stems, you’re probably watering too much.
Brown, crispy tips? That usually means you’re underwatering, but ZZs handle drought way better than soggy roots ever will.
Optimal Potting Mix and Drainage
Your ZZ really wants fast-draining soil. Regular potting mix just holds too much moisture and can lead to root rot.
Try mixing standard potting soil with perlite or coarse sand—about two parts soil to one part perlite or sand. Or just grab a cactus or succulent mix if you don’t want to fuss with ratios.
The main thing is that the soil dries out between waterings. That’s the sweet spot.
Quick Tip: Toss a layer of pebbles or orchid bark at the bottom of the pot for extra drainage. It’s a little insurance policy for your roots.
Always pick a pot with drainage holes—seriously, no exceptions here. Terracotta pots are great since they let the soil dry out faster, but plastic works too if you’re careful with watering.
Every few months, peek at the drainage holes. Roots can sneak in and block them over time, which is sneaky but happens.
Lighting Conditions for Healthy Growth
ZZ plants are pretty chill about low light, but honestly, they’ll grow best in bright, indirect light. Try putting yours near an east or north-facing window if you can swing it.
Direct sun is a no-go, especially those harsh afternoon rays from a south or west window. That’ll scorch the leaves and turn them yellow or brown in no time.
If you can’t avoid direct sun, just move your plant back a bit or throw up a sheer curtain. Easy fix.
Quick Tip: Got your ZZ in a dim corner? It’ll survive, but don’t expect much growth—and the stems might get a bit leggy or weak.
Every month or so, give your plant a quarter turn. That way all sides get some love from the light and you won’t end up with a lopsided ZZ.
They’ll even adapt to fluorescent office lights, so they’re honestly perfect for those windowless spaces that need a little green.
Creative Uses for Dead ZZ Plant Stems
Dead ZZ plant stems don’t have to be trash. There are actually some clever ways to reuse them for crafts, gardening, or even teaching.
Crafting and Decorative Projects
Dead ZZ stems have a cool, smooth look that works surprisingly well in dried arrangements. Their color and texture add something different to vases or wreaths.
If you’re feeling fancy, spray paint them gold or silver for a modern vibe. It’s a fun way to dress them up.
Try cutting the stems into smaller pieces for mini decorations. They keep their shape and don’t fall apart like some dried plants do.
They’re also handy for holiday crafts—glue them to picture frames or candle holders for a little texture. The stems are tough enough to handle some light crafting.
Quick Tip: Wipe the stems down with a damp cloth before you start, just to get rid of dust or grime.
If you’re into DIY decor, dried ZZ stems make pretty good natural plant stakes for smaller houseplants. They blend in way better than plastic ones ever could.
Using Stems in Mulch
Chop up dead ZZ stems and you’ve got yourself some mulch for your garden or potted plants. Just use pruning shears or scissors to cut them into small bits.
The stems break down slowly and add organic matter to the soil as they go. Toss them in your compost bin too—they count as “brown” material, which helps balance out all the food scraps.
You can even put small pieces right on top of outdoor beds. It helps keep moisture in and weeds down.
Because ZZ stems are thick and waxy, they’ll decompose slower than softer plant stuff, but that’s not really a bad thing.
Quick Tip: The smaller you chop them, the faster they break down—aim for 1-2 inch pieces if you’re impatient.
Educational Purposes
Dead ZZ stems are actually pretty cool for teaching plant anatomy. Slice one open and you can show kids how succulents store water.
The rhizome structure is right there—makes explaining things way easier when you’ve got a real example.
They’re handy for science projects about plant biology or decomposition too. Students can watch how long different parts take to break down in different conditions.
Honestly, you can even practice propagation cuts on dead stems. They won’t root, but it’s good for learning where to cut and how to spot nodes—no risk to your healthy plants.
Frequently Asked Questions
Dead ZZ plant stems tend to bring up a lot of questions about removal and future care. Knowing how to spot dead stems, get rid of them safely, and avoid future issues will keep your plant in good shape.
How can I tell if my ZZ plant’s stems are truly dead?
A dead ZZ stem will feel either mushy or totally dried out when you touch it. The color’s usually brown or black, not that healthy green you want.
Try the scratch test—just use your fingernail to gently scratch the outer layer near the base. If you see green, it’s still alive. If it’s brown or tan all the way through, that stem’s done for.
Dead stems won’t put out new growth, no matter how long you wait. They also won’t perk up with water like a thirsty stem might.
Quick Tip: Check the rhizome at the base—if it feels soft or rotten, the whole stem needs to go.
What’s the best way to prune dead stems from my ZZ plant?
Grab some clean, sharp scissors or pruning shears and cut the dead stem right at soil level. Wipe down your tools with rubbing alcohol first to avoid spreading anything nasty.
Try to cut as close to the base as you can without nicking the rhizome underground. Don’t leave a stub sticking up—it’ll just rot and attract bugs.
If the stem doesn’t come out easily, give it a gentle tug. Sometimes dead stems cling to the rhizome and need a little extra encouragement.
Quick Tip: Sterilize your tools between cuts if you’re taking out more than one stem—just to be safe.
Can dead ZZ plant stems cause any harm to the rest of the plant?
Dead stems can turn into a breeding ground for fungus and bacteria. These issues might spread to healthy parts if you let them linger.
Rotting stems also attract pests like fungus gnats, which love decaying plant material. Nobody wants those in the house.
Getting rid of dead stems helps your plant focus on healthy growth. Plus, it improves air flow around the remaining stems.
Quick Tip: If you spot mold or notice a bad smell, yank those dead stems right away—and check the others for trouble too.
Should I remove just the dead stem, or the whole branch?
ZZ plants don’t really have branches—each stem grows straight from the rhizome as its own thing.
If just the top of a stem is dead, you can cut back to where the green starts. But if the whole stem is toast, take it out at soil level.
Look at the base before you cut—sometimes two stems grow close together and only one’s dead. No need to remove both if one’s still healthy.
Quick Tip: When in doubt, just remove the entire stem. Your ZZ will bounce back and send up fresh shoots from the rhizome.
What care should I give my ZZ plant after removing dead stems?
Hold off on watering for a few days after you prune. This gives any cuts a chance to dry out and helps prevent rot.
Keep your plant in its usual spot with bright, indirect light. Don’t shuffle it around or change things up right after pruning—it just adds stress.
Skip the fertilizer for about a month. Let your plant recover before you push it to grow more.
Keep an eye on the remaining stems for the next few weeks. If you notice yellow leaves or soft spots, there might be a bigger issue at play.
Quick Tip: A little stress after pruning is totally normal—don’t freak out if your ZZ looks a bit droopy for a week or two.
Is there a way to prevent stems on my ZZ plant from dying off?
Only water when the soil feels completely dry a few inches down. Overwatering is honestly the main culprit when ZZ stems start dying, so it’s better to err on the side of underwatering.
Check that your pot actually has drainage holes, and stick to well-draining soil. If water just sits around the roots, it’ll cause rot—and that’s pretty much a death sentence for stems from the bottom up.
Try to keep your plant away from chilly drafts or anywhere it might get colder than 50°F. ZZ plants are tropical, so cold air can really do a number on their stems.
They like medium to bright indirect light. Not enough light, and the stems get weak; too much direct sun, and you risk scorching them. Tricky balance, isn’t it?
Quick Tip: In winter, it’s smart to water even less—sometimes just once a month, or maybe not at all, depending on how dry your place gets.
Note: Some images in the articles are sourced from Reddit and Other Platforms For Reference Purpose.