7 Tips to Fix Succulent Root Rot: Revive Your Plant Easily!
I’ve been there—looking at my sad, wilted succulent and wondering what went wrong. Root rot is a common problem for succulent lovers, and it can be pretty heartbreaking.
Luckily, I’ve got some great tips to help you fix root rot and bring your succulent back to life! 🌱
Are you worried that your succulent might be beyond help? Don’t fear! With a few simple steps, you’ll see those leaves perk up again.
Ready to save your beloved plant? Let’s do this! 🌿✨

Please note: Simplify Plants is reader-supported. As an Amazon Associate, I earn from qualifying purchases made by our readers with no extra cost added to you all! Some links in the post are affiliate links and I get a commission from purchases made through links in the post.
1) Remove Affected Roots

When my succulents start to show signs of root rot, the first thing I do is remove the affected roots. It’s like giving them a fresh start! 🌱
I always gently take the plant out of its pot and have a good look.
If you see brown or black roots that feel mushy, those are trouble.
I grab my trusty pair of clean scissors and carefully snip away these damaged bits. They’re not going to do your plant any good, and leaving them can spread the rot.
Has anyone ever felt like a plant surgeon? That’s how I feel during this process! 😅
Remember to make precise cuts and try not to harm the healthy roots.
I also make sure that my tools are clean. Before cutting, I wipe the blades with rubbing alcohol.
This prevents any nasty germs from making things worse. A little prevention goes a long way!
After removing the bad roots, I let the plant sit out for a day or so. This gives the cut ends time to dry and prevents further infection.
It can be nerve-wracking, but I remind myself that it’s all about helping my succulent thrive.
Have you ever had to prune your plant dramatically to save it? Share your stories! 😊✨
2) Use a Clean, Sharp Knife
When dealing with root rot, there’s nothing more satisfying than slicing away damaged parts with a clean, sharp knife. It’s like giving your succulent a fresh start! 🎉
I always make sure my knife is sterilized before starting. You don’t want to transfer any germs to the healthy parts of the plant.
Imagine the shock of doing surgery and realizing the tools aren’t clean! 😱
Have you ever tried using a dull knife? It’s no fun, and it can tear the plant’s delicate tissue.
Having the right tool makes all the difference. A sharp knife will ensure clean cuts that heal faster and reduce stress for your plant.
Think of it like giving your succulent a super cool haircut! ✂️ You wouldn’t want a hairstylist with dull scissors, right? The same goes for our leafy friends.
By keeping my knife in tip-top shape, I’m confident in tackling root rot.
It’s amazing how a simple tool can help bring life back into a struggling succulent. Your plant deserves the best care. Why not start with a clean slice? 🪴
3) Let Roots Dry Out

I learned the hard way that letting the roots dry out is key to saving succulents. Too much water is like giving them a swimming pool—fun at first, but it doesn’t end well! 😂
When my succulent had root rot, I gently took it out of its pot. I shook off the extra soil and could see the mushy roots. Eww! I knew it needed a time-out to dry.
I placed it on a piece of paper towel in a sunny spot. Not direct sunlight, though. A little shade is important to avoid burning the plant. 🌞
I get it—waiting can be hard! I wanted to water it right away. But patience is worth it.
I let my succulent’s roots dry for a few days until they felt dry to the touch.
Have you ever tried to dry roots? It feels like waiting for cookies to bake. They’re not tasty like cookies, though! But when the roots finally feel dry, it’s time for a fresh start. 🌿
Seeing my succulent bounce back was such a win! If your plant is struggling, try this drying trick.
Ever had a succulent in crisis mode? Let’s swap stories and tips! 🌵✨
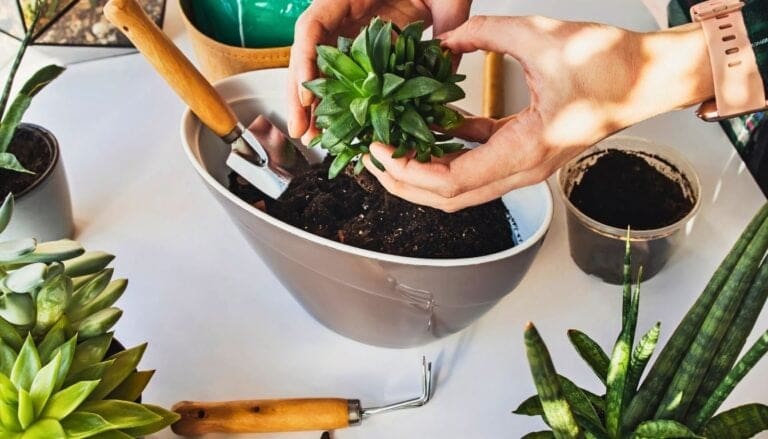
4) Repot in Fresh Soil Mixture
Repotting is a great way to halt root rot and give your succulent a fresh start. When roots are soggy, they need a new, dry environment. I find that using a fresh soil mix works wonders!
First, I gently remove the plant from its old pot. This can be a bit nerve-wracking, but remember I’m doing it for the plant’s well-being. 🪴
Once the plant is out, I take a close look at the roots. Any mushy or smelly roots should be trimmed away.
Trim carefully! It’s like giving a bad haircut you can’t wait to fix.
Now comes the fun part—choosing new soil. I go for a cactus or succulent mix, which drains well and keeps the roots from getting soggy again. Sometimes I add a bit of perlite to improve drainage even more.
When putting my plant in its new home, I make sure there’s enough room for the roots to spread out. Have you ever felt like your shoes were too tight? Plants feel that too!
After planting, I make sure the top of the soil is level with the base of the plant.
I avoid watering right away since succulent roots need time to settle in.
This whole process gives my plant a second chance! Watching it flourish is truly rewarding. How’s your repotting going? 🌿

5) Ensure Proper Drainage
I remember when I first got into succulents. I thought, “These plants are easy peasy.” 🌵 Boy, was I wrong! One big lesson I learned was how important proper drainage is for these little guys.
Without good drainage, water pools up at the bottom and can rot the roots. Not cool!
I always check that my pots have drainage holes. If they don’t, I grab a drill and make some. It’s like giving my plants tiny swimming pool lifeguards. 🏊♀️🌱
Another trick I use is adding a layer of pebbles or small stones at the bottom of the pot. This helps excess water escape, like a mini rock concert happening just for my succulents! 🎸✨
Using well-draining soil is also a must. Most stores sell special soil mix just for succulents. It keeps water from sticking around too long.
If I can’t find any, I mix regular potting soil with sand or perlite. My succulents seem to dance a little when they get the right soil mix. 💃🪴
Ever find a pot that’s too cute to resist, but it has no holes? I feel you! Sometimes I double pot.
I place the plant in a smaller pot with drainage and set it inside the pretty, hole-less one. Two pots, double fab! 🤩
How’s your succulent pot setup? Have you tried any of these tricks? Let me know!
6) Water Sparingly
Did you know that succulents don’t love water as much as we do? Weird, right? These little green gems actually prefer a bit of a dry spell.
Over-watering is a common mistake. So, I keep my watering can on a short leash! 🪴
I usually wait until the soil is completely dry before I water my succulents again. It sounds counterintuitive, but believe me, it works wonders.
You can simply stick your finger into the soil and see if it’s dry a couple of inches down.
I’ve learned that it’s better to forget to water them once in a while than to drown them. Who knew plants could be so dramatic? 😂
Too much water can rot their roots, so remember, less is more.
Do you talk to your plants too? Sometimes, I casually remind my succulents that being thirsty is totally okay.
It’s my quirky way of helping them stay happy and healthy.
When I do water them, I give them a good soak and let the excess water drain out completely.
This simulates a natural environment for them, just like a good rain followed by sun. ☀️ Does that make sense?

7) Use Fungicide for Severe Cases
If my succulent’s roots are mushy and brown, it may be time for some serious action. That’s when I reach for a fungicide! When nothing else seems to help, this can be a game-changer.
It’s like giving my plant a superhero cape! 🦸♂️
Ever wondered how to use fungicide? I start by making sure to choose one that’s safe for succulents. It’s important!
I then carefully follow the instructions on the label. Overusing it can harm the plant rather than help it. So, using it properly is key! 🗝️
Before applying, I move my succulent to a well-ventilated area.
I protect my workspace and wear gloves, just in case. Safety first!
Sometimes I need to repeat the treatment, especially if the rot has been stubborn.
If my plant starts looking healthier, I know I’m on the right track.
Have you tried fungicide for your succulents? Share your experiences with me! 🌵🌟
Understanding Succulent Root Rot
Root rot can be a real bummer for succulent lovers! If you ignore it, your plant’s health can quickly decline. Let’s explore what causes root rot and the signs you need to be on the lookout for.
Causes of Root Rot
Ever wondered why succulents might get sick? Overwatering and poor drainage are top causes of root rot.
Succulents are like me when I’m a bit lazy—they don’t like sitting in water! If water doesn’t drain well, roots start to rot.
Using the wrong type of soil can make things worse.
Succulents need a well-draining soil mix. If it’s too dense, it keeps the roots too wet and unhappy. 🪴
Do you ever let water sit in your plant’s saucer? That’s another culprit! When water pools at the base, roots remain submerged and can’t dry out properly.
Symptoms to Look For
How can you tell if your succulent is in trouble? Look for soft, mushy leaves and stems. These are red flags!
The leaves might turn brown or black, kind of like fruits past their prime. Not a great look, right? 😬
Check out the base of your plant, too. If it’s squishy or smells, your succulent might need immediate help. A foul odor is a definite “no-go” sign.
Wondering about leaf loss? Well, succulents drop affected leaves when stressed by root rot.
That’s their way of saying, “Help, I’m not feeling well!” Keep an eye on your green buddies, and they’ll thrive. 🌵
Preventing Root Rot in Succulents
Let’s talk about keeping succulents happy and healthy! 🌵 It’s all about giving them the right amount of water and the best soil. These little things can make a big difference in preventing root rot. Let’s dive into it!
Proper Watering Techniques

Watering succulents can be tricky.
Overwatering is the number one way to get root rot!
I always ensure my succulents are completely dry before I water them again.
It’s like waiting for your favorite show’s new season—isn’t the anticipation worth it?
I also love the “soak and dry” method.
This means watering until the soil is drenched and then leaving it be until dry.
Not sure when it dries? Just stick a finger in the soil. 😊
The top inch should be dry before watering again.
Avoid fancy watering gadgets that might automate the process too much.
Keep it simple and hands-on.
Have you ever noticed how connected you feel to your plants when you water them?
Appropriate Soil Choices
Choosing the right soil is like choosing the perfect pair of shoes for comfort.
I always go for a well-draining soil mix. 🌱
It’s crucial because succulents hate sitting in soggy soil.
You can grab a pre-made bag of succulent soil at the store or mix your own with sand, perlite, and potting soil.
I once used regular garden soil—big mistake!
My poor succulents looked so sad and droopy.
Since then, I’ve learned to always test the soil drainage. Pour some water and see if it drains fast.
Think about adding some gravel or pebbles to the bottom of the pot.
Ever tried this? It really helps the water to escape!
This way, you can be sure your plant’s roots stay safe and cozy.
Reviving Your Succulent After Root Rot

Bringing a succulent back to health after root rot is like getting a second chance.
With careful attention to pruning and replanting, we’ll have that green buddy thriving again in no time! 🌱 Let’s roll up our sleeves and get to work.
Pruning and Removing Affected Roots
I start by carefully pulling the succulent out of its pot.
Take a close look at the roots. The healthy ones should be white or light tan and firm.
Any roots that are brown, mushy, or slimy need to go. Snip them off with clean scissors or a knife. 🌿
When doing this, it’s important to remove all the damaged roots.
Leaving rotten roots behind can cause the rot to spread.
Once I’ve pruned away the bad parts, I might let the plant sit out for a day or two.
This allows it to dry and helps prevent future rot. Trust me, it’s worth the wait!
Replanting and Care Tips Post-Recovery
Now that my succulent is ready, I place it in fresh, well-draining soil.
A cactus mix or regular potting soil mixed with sand works great.
I always make sure the pot has drainage holes. No one likes soggy feet, right? 😅
Once replanted, I wait a few days before watering.
When the time comes, watering lightly and letting the soil dry completely between waterings is key.
I avoid giving too much water since too much can cause rot again.
I also find a cozy spot with bright, indirect sunlight.
This helps my plant strengthen and recover.
Being gentle and patient here can make a world of difference for my succulent buddy! 🌵
Frequently Asked Questions
I often get asked about fixing succulent root rot and keeping these little desert beauties happy.
Check out these useful tips, and let’s give those succulents a chance to shine! 🌵✨
How can you identify root rot in succulents?
Spotting root rot can be tricky. I look for mushy, discolored roots. Sometimes, leaves may look yellow or wilted. If you suspect something’s wrong, it’s time to check those roots.
What are the signs of an overwatered succulent?
Ever seen a succulent with squishy leaves? That’s usually a sign of overwatering. If the leaves start looking swollen or translucent, it’s time to ease up on the watering can.
How does one treat a succulent experiencing root rot?
Root rot can be scary, but don’t worry!
I cut off the affected roots with a clean, sharp knife.
Make sure to let the roots dry out before repotting them in a fresh soil mixture.
Better drainage can be a game-changer! 🌱
Can a succulent be revived after suffering from root rot?
Yes, a succulent can definitely bounce back! 😊
By trimming the bad roots and giving it the right care, it’s possible to bring them back to life’s sunny side.
What are the steps to properly dry out an overwatered succulent?
Once, when I overwatered my succulent, I took it out of the pot and let it sit out for a day or two to dry. It really helped! Then I made sure to put it back in well-draining soil.
How to propagate succulents from healthy or broken roots?
Propagating succulents can be fun and rewarding! Use healthy roots or even leaves.
Simply lay them on soil and be patient. Watch them grow little by little.
It’s like raising a cute, little family! 🌿✨
Ever had questions about these? Share your thoughts or drop me a comment below!
Let’s chat. 😉
Note: Some images in the articles are sourced from Reddit and Other Platforms For Reference Purpose.