Boston Fern Turning Brown: 11 Common Causes and Easy Fixes
Boston Ferns are gorgeous, but honestly, they’re not always the easiest to keep perfectly green.
If your fern’s going brown, you’re probably wondering, “What did I do wrong?”
Usually, it comes down to watering habits, humidity, lighting, temperature swings, nutrients, pests, drainage, pot size, or just plain old age—most of which you can fix once you figure out what’s up.
I’ve stared at those crispy brown fronds myself, feeling like I must be missing something obvious.
The upside? Brown leaves almost always point to a specific hiccup in your care routine. Once you know what to watch for, it’s not that hard to spot the issue.
So, let’s get into it. I’ll walk you through each possible cause and what you can do about it.
We’ll talk watering, humidity, light, and all the other stuff that matters.
I’ll throw in some prevention tips too—because who doesn’t want their Boston Fern lush and green all year?

Please note: Simplify Plants is reader-supported. As an Amazon Associate, I earn from qualifying purchases made by our readers with no extra cost added to you all! Some links in the post are affiliate links and I get a commission from purchases made through links in the post.
Understanding Brown Leaves on Your Boston Fern
When Boston fern leaves turn brown, it’s a sign something in the care routine needs a tweak. The browning might show up as crispy tips, whole fronds going tan, or even weird patches of dead tissue that seem to spread if left alone.
Signs of Leaf Browning
I’ve noticed Boston ferns are pretty dramatic when they’re unhappy. The classic sign? Brown, crispy tips that start at the very end of each leaflet and creep down. Sometimes you get dry patches in the middle of a frond, while the tips look fine.
Whole fronds can turn yellow first, then fade to brown before shriveling up. That’s usually a sign the problem’s been going on for a bit.
Every now and then, I’ll spot black or dark brown spots that look wet or mushy—very different from dry browning and usually a hint there’s a fungus or too much water in the mix.
Quick Tip: Always check both the top and undersides of the fronds. Some issues show up as spots or weird colors on the back before you see them on the front.
Impact on Plant Health
Brown leaves aren’t doing your fern any favors—they can’t photosynthesize, so the plant has less energy for new growth. If more than a third of the plant goes brown, things get tough.
The plant ends up wasting resources trying to keep damaged leaves alive. Plus, dead fronds are basically an open invitation for pests and fungal spores.
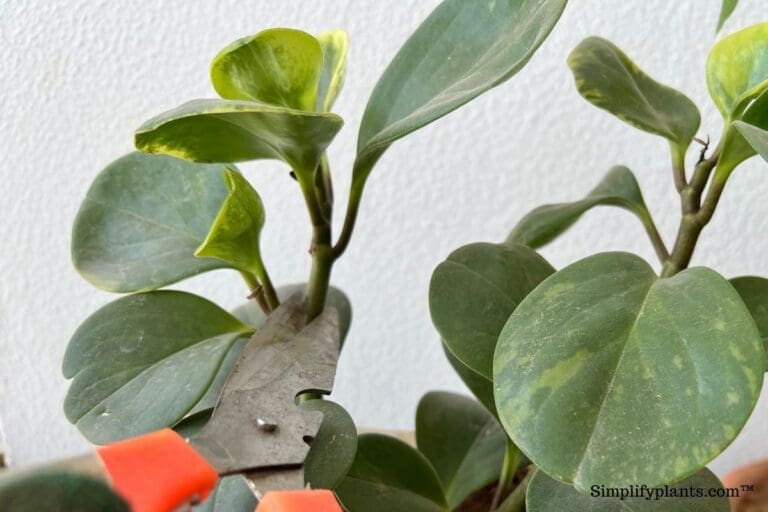
I cut off totally brown fronds at the base so my fern can focus on new growth. If it’s losing leaves faster than it can grow them back, it’ll get sparse and struggle even more.
Common Myths About Brown Tips
People love to say brown tips mean you’re underwatering, but honestly, low humidity can cause the same crispy edges—even if the soil’s damp.
I’ve heard trimming brown tips with scissors will magically stop the spread. Not true. It looks tidier, sure, but you haven’t fixed the root problem.
And no, Boston ferns don’t need direct sunlight to stay green. They actually prefer bright, indirect light. Too much sun will burn them, leaving you with bleached, brown fronds.
Quick Tip: Don’t just assume all brown leaves mean the same thing. Check the pattern and feel to get a better idea of what’s wrong.
Overwatering Issues

Overwatering is probably the fastest way to brown up your Boston fern. If roots are sitting in soggy soil, they can’t breathe, and the stress shows up as discolored fronds.
How Excess Moisture Affects Leaf Color
When I overwater (it happens!), roots start suffocating in waterlogged soil. They need air, and too much moisture just fills up all those little air pockets.
Without oxygen, roots can’t absorb nutrients right. Browning usually starts at the tips and edges and then spreads inward. Sometimes the fronds feel limp or even a bit mushy.
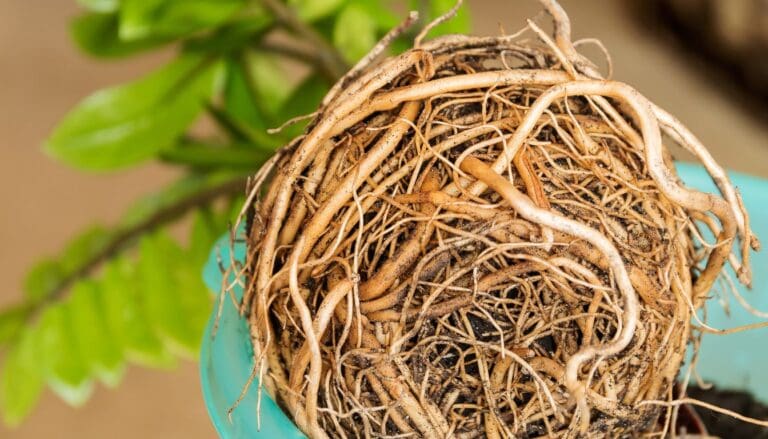
If the soil stays wet too long, root rot isn’t far behind. Damaged roots turn black or brown and smell pretty gross. At that point, the plant can’t support healthy growth, and more leaves go brown fast.
Quick Tip: Brown fronds with yellow lower leaves? That’s usually overwatering, not underwatering.
Identifying Soggy Soil
I just stick my finger about two inches into the soil. If it’s wet or feels like mud, there’s too much water.
Sometimes the pot feels weirdly heavy. Water pooling on top or draining super slow is another clue.
Check those drainage holes. If water keeps dripping out or the soil looks dark and swampy, that’s not good. A sour or musty smell means root rot’s already started.
Remedies for Overwatering
First thing I do is stop watering—just let the soil dry out a bit.
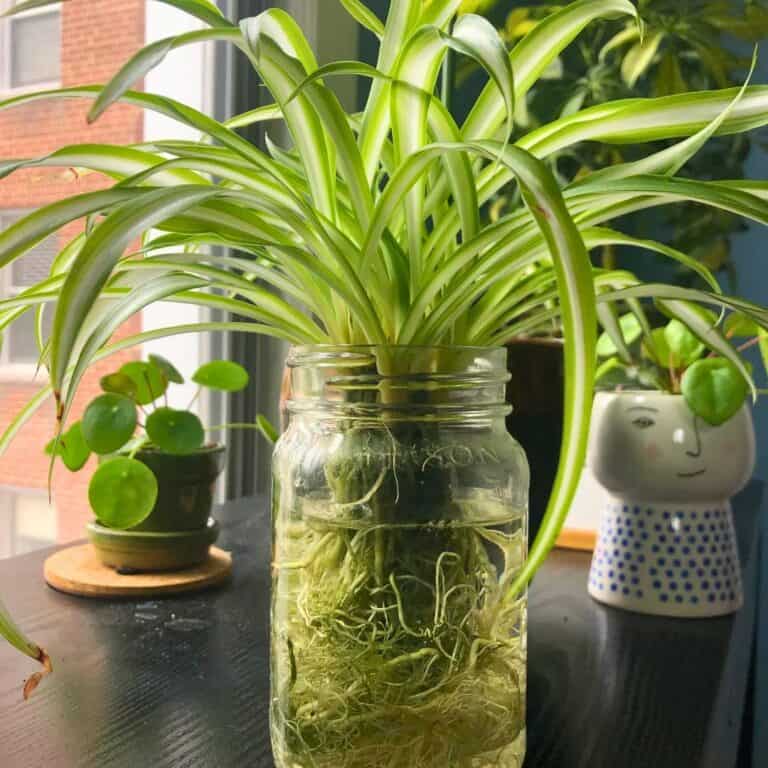
If it’s really soggy, I’ll pull the plant out and check the roots. Healthy ones are white or tan and firm. Anything black, brown, or mushy gets trimmed off with clean scissors.
After trimming, I repot in fresh, well-draining mix. Gotta have drainage holes, and I never let the pot sit in a saucer of water.
From then on, I only water when the top inch of soil is dry. During winter or in low light, my fern wants even less water than usual.
Underwatering and Dehydration

Boston ferns need steady moisture to keep those fronds looking good. If they dry out, you’ll see brown, crispy tips almost right away.
Symptoms of Dryness
First thing I notice is brown, crunchy tips. They feel papery and snap if you touch them.
Browning usually starts at the edges and creeps toward the base. Wait too long, and whole fronds turn tan or brown and drop off.
Dry soil is a dead giveaway. If I poke my finger in and the soil feels hard or pulls away from the pot, it’s too dry.
The pot feels super light, too—no water weight left.
Quick Tip: If the fronds crunch when you squeeze them, your fern’s really thirsty.
Proper Watering Techniques
I water when the top inch of soil feels dry. Just poke a finger in every few days to check.
When I water, I pour slowly until I see water draining from the bottom. That way, the whole root ball gets a drink.
Room temperature water is best—cold water can shock the roots. I empty the drainage tray after about 15 minutes so the roots aren’t sitting in a puddle.
In summer, I might water every couple of days. In winter, maybe once a week—growth slows down a lot.
Quick Tip: Water in the morning so the fronds dry out during the day. That helps keep fungus away.
Preventing Drought Stress
I keep my fern somewhere I’ll see it every day. Makes it way easier to remember to check the soil before it gets bone dry.
Humidity helps slow down water loss. I’ll run a humidifier or set the pot on a pebble tray with water.
Plastic pots hold moisture longer than terracotta. Pot size matters, too—a big pot stays wet longer, a small one dries out fast.
I avoid putting my fern near heaters or drafty windows. Those spots dry things out in no time.
Humidity Requirements for Boston Ferns
Boston ferns need humidity between 50-80% to look their best. Most homes are more like 30-40%, which is why you get those brown, crispy fronds.
Why Humidity Matters
Boston ferns come from super humid places. When the air’s too dry, the fronds lose water faster than the roots can keep up. Tips go brown first, then it spreads.
I always notice dry air is roughest in winter with the heat running. The fronds get brittle, and sometimes the edges curl before they brown out.
Quick Tip: If new growth is stunted or the fronds are crispy, it’s probably dry air.
Central AC in summer can be just as tough—both systems suck moisture from the air and leave your fern struggling.
Increasing Indoor Humidity
I group my ferns with other plants to create a little humid zone. Plants release moisture, and clustering them traps some of that humidity.
Pebble trays are handy, too. Fill a tray with stones, add water so it almost covers the pebbles, and set the pot on top. Water evaporates and helps the plant, but the roots stay dry.
Quick Tip: Misting only helps for about half an hour. It’s not a long-term fix.
A humidifier is by far the easiest way to keep levels up. I keep one running nearby and aim for 50-60%. A cheap hygrometer helps track what’s actually going on.
Bathrooms are naturally more humid, but make sure there’s enough light before moving your fern in there. Kitchens can work too, especially if you cook a lot and have a good window.
Lighting Mistakes That Cause Browning
Boston ferns need just the right light. Too much direct sun? The leaves scorch. Too little? The fronds get weak and brown anyway.
Effects of Too Much Sun
Direct sunlight is brutal for Boston ferns. They’re used to shady forest floors, so strong rays just fry those delicate fronds.
When I put my fern in direct sun, the tips brown first, then it spreads until whole fronds go crispy. Sometimes it happens within hours if the sun’s strong enough.
Quick Tip: Bleached or yellow spots before browning? That’s sunburn starting.
South and west windows are usually too harsh in spring and summer. I’ve lost a few fronds to sunburn before learning my lesson. Once they’re brown, there’s no saving them—you just have to cut them off.
Problems Caused by Insufficient Light
Too little light is sneakier. The fern won’t burn, but it starts fading over weeks.
In low light, fronds get pale and leggy. Browning starts from the bottom up, and new growth is thin and sparse.
If it’s too dark, the plant can’t photosynthesize enough to keep all its fronds healthy. It’ll drop the older, lower leaves first—they turn brown and fall off.
Quick Tip: If your fern’s more than six feet from a window, it probably needs more light.
Choosing the Right Spot
Bright, indirect light is perfect. East-facing windows are great—gentle morning sun, no harsh afternoons. North windows work if the room’s bright enough.
I keep mine about 3-5 feet from a window with a sheer curtain. It filters the light just enough. If you only have south or west windows, pull the fern back or use a curtain.
Pay attention to how the light changes with the seasons. What’s safe in winter might be too much in summer. I move my ferns around a bit as the sun shifts, just to keep them in that sweet spot.
Temperature Stress and Environmental Changes

Boston ferns do best with steady temps between 60-75°F. Sudden swings, or blasts of hot or cold air, will brown those fronds in no time.
Damage from Cold Drafts
I’ve watched Boston ferns turn brown basically overnight if they’re too close to drafty windows or air conditioning vents. Being tropical, they really hate anything under 55°F—cold air just shocks them, and you’ll see those frond tips and edges dry out and go brown.
Take a walk around your fern and see if there are cold spots nearby. Old windows in winter let in chilly air, and doors that open a lot can cause sudden temperature drops.
Even ceiling fans can push cold air right onto your plant. It’s sneaky, but it happens.
Move your fern at least three feet away from windows during the colder months. I actually keep mine away from exterior walls when it gets really cold out.
If you’re noticing browning on just one side, odds are a draft is hitting that part of the plant.
Quick Tip: Try putting your hand near the fern at different times of day—you might feel a cold current you didn’t notice before.
Heat Exposure Risks
Direct heat sources can dry out Boston ferns in no time. I’ve seen fronds turn crispy brown when they’re too close to radiators, heating vents, or fireplaces. That hot air just sucks the moisture out of the leaves faster than the roots can keep up.
South-facing windows get that intense afternoon sun, which really bumps up the temperature. It’s like a double whammy—heat and too much light for these shade-loving plants.
If you see browning that starts at the tips and moves inward, that’s usually heat damage. The fronds might feel papery or brittle instead of soft and lush.
Keep your fern at least four feet away from any heat source. I move mine to cooler rooms in the summer if my house creeps above 80°F. An east-facing window is usually perfect—just gentle morning sun, no harsh afternoon heat.
Nutrient Deficiencies and Fertilizer Problems

Your Boston fern really needs the right amount of nutrients to stay green and happy. Not enough fertilizer and it’s starving, but too much? You’ll burn those delicate roots and fronds.
Signs of Malnutrition
When my Boston fern isn’t getting what it needs, the older fronds at the bottom start turning yellow or brown first. The whole plant just looks tired and stops pushing out new growth.
Iron deficiency shows up as yellowing between the veins on younger fronds, while nitrogen deficiency makes everything look pale and washed out. Sometimes the fronds just feel thin and papery, and growth is stunted.
Quick Tip: Peek under the fronds—if they’re browning from the base up and you can’t remember the last time you fertilized, your fern is probably hungry.
I keep an eye out for these signs in spring and summer, since that’s when ferns want more food. In winter, they slow down and don’t need much.
Fertilizer Burn
Too much fertilizer is honestly worse than none. I’ve seen Boston ferns with crispy brown edges from overfeeding.
Fertilizer salts build up in the soil and burn the roots. First, you’ll see brown or black tips, then entire fronds start dying. Sometimes there’s even a white crust on top of the soil.
This usually happens if you fertilize too often or don’t dilute the plant food enough. Boston ferns have sensitive roots and just can’t handle heavy feeding.
Quick Tip: If you think you’ve overdone it, flush the soil with room-temp water for a few minutes to wash out those extra salts.
Correct Feeding Schedule
I feed my Boston fern about every 4-6 weeks in spring and summer with a balanced liquid fertilizer—always diluted to half strength. Once fall hits, I just stop fertilizing until spring since the plant goes dormant.
Look for a fertilizer with equal parts nitrogen, phosphorus, and potassium (like 10-10-10 or 20-20-20). Always dilute it to half what the package says, just to be safe.
Water the fern before you fertilize so you don’t shock dry roots. Pour the diluted fertilizer onto damp soil and make sure it drains through the pot.
Quick Tip: Mark your calendar after feeding—it’s easy to forget and end up fertilizing too often.
Pest Infestations and Diseases
Bugs and diseases can creep up on your Boston fern, turning fronds brown before you know it. Spider mites, scale insects, and fungal issues are the biggest headaches I’ve seen with indoor ferns.
Common Pests on Boston Ferns
Spider mites are these tiny pests that suck sap from the leaves. You’ll spot fine webbing between fronds and little yellow or brown dots. They love dry air, so when humidity drops below 50%, they’re all over it.
I spray my ferns with water every few days just to keep mites away. If you’ve already got them, wipe the fronds with a damp cloth or use insecticidal soap. Neem oil works too, but don’t use it in direct sun or you’ll scorch the leaves.
Quick Tip: Always check the undersides of fronds—that’s where spider mites hide before you even notice the damage.
Scale insects look like tiny brown or white bumps stuck to the stems and fronds. They suck sap too and leave behind sticky honeydew. I’ve found them hiding where fronds attach to the main stem.
Pick them off with a cotton swab dipped in rubbing alcohol. For heavy infestations, try horticultural oil or insecticidal soap every week or so until they’re gone.
Fungal and Bacterial Diseases
Root rot is a real killer if the soil stays wet too long. Roots turn mushy and brown, and fronds start browning from the base. Honestly, I’ve lost more ferns to overwatering than anything else.
Check the roots by sliding the plant out of its pot. Healthy roots are white or tan and firm; rotted roots are dark, slimy, and smell awful. Cut away the bad roots and repot in fresh, well-draining soil.
Quick Tip: Always use pots with drainage holes and let the top inch of soil dry out before watering again.
Leaf spot diseases show up as brown or black spots with yellow halos. These infections spread fast in humid, stuffy conditions. If you see it, remove infected fronds right away and toss them in the trash.
Increase airflow around your fern and avoid wetting the leaves when you water. If the problem keeps spreading, use a copper-based fungicide as directed.
Potting Soil and Drainage Factors

The soil you use for your Boston fern really matters. If it’s too dense or drains poorly, brown fronds show up fast.
Poor Soil Quality Issues
Boston ferns want soil that’s moist but never soggy. Regular potting soil is often too heavy and compacts over time, squeezing out those crucial air pockets.
I’ve had the best luck with lightweight mixes—look for soil labeled for African violets or ferns, which usually has peat moss, perlite, and pine bark. That keeps things loose and fluffy.
Old soil breaks down and compacts, making it harder for water to drain. If you haven’t repotted in a couple years, the soil could be worn out. You’ll notice it stays wet too long or water just pools on top.
Quick Tip: Grab a handful of soil—if it clumps into a hard ball, it’s too dense for your fern.
Improving Drainage
Check your pot’s drainage holes. If they’re blocked, water gets trapped and root rot follows, leading to brown fronds. I always make sure my pots have at least three or four holes.
Try adding a layer of perlite or small pebbles at the bottom before the soil. That gives excess water somewhere to go. Mixing extra perlite into the soil—about one part perlite to three parts soil—works too.
If your pot sits in a saucer, empty it within half an hour after watering. Standing water gets sucked back up and keeps roots soggy. Some folks skip saucers altogether for this reason.
Quick Tip: Water should drain out of the pot in seconds—if it’s taking minutes, your drainage needs a fix.
Rootbound Ferns and Pot Size Problems
When Boston ferns get rootbound, their roots circle the pot and can’t take up water or nutrients properly. The result? Brown fronds and stunted growth.
Signs Your Fern Needs Repotting
I look for roots poking out of the drainage holes—usually the first sign my fern needs more space.
When I pull the plant out, a rootbound fern will have a dense, tangled mass of roots with barely any soil left. Water just runs straight through because there’s no room for absorption.
Quick Tip: Press on the soil surface—if it’s hard and you see roots right at the top, it’s time to repot.
Growth slows way down when the plant is rootbound. New fronds come in smaller, and the oldest ones brown quickly. I also notice the plant dries out much faster after watering.
Selecting the Right Container
Go up only one pot size—about two inches wider—when repotting. If the pot is too big, it holds too much moisture and can lead to rot.
Drainage holes are non-negotiable. I learned the hard way—no holes means trapped water and crispy brown fronds in no time.
Quick Tip: Use a pot with a saucer, but always empty it within 30 minutes of watering.
Plastic pots keep moisture longer, which is great if you’re in a dry climate. In humid places, terracotta is better since it breathes and helps prevent soggy soil.
Natural Aging and Seasonal Changes

Boston ferns shed old fronds as they age, and their growth shifts with the seasons. It’s totally normal to see some brown leaves now and then.
Normal Leaf Shedding
Boston ferns drop their oldest fronds just like trees lose leaves. The outer fronds brown first since they’ve been feeding the plant the longest. It doesn’t mean you’ve messed up.
Usually, I see two or three fronds browning at a time on a healthy plant. They’re almost always on the outer edges or bottom. If the rest of the fern looks good, it’s just making space for new growth.
Quick Tip: Snip off brown fronds at the base with clean scissors to keep things tidy and help the plant focus on new leaves.
The trick is noticing the pattern—natural shedding is slow and only affects a few fronds. If a bunch turn brown fast or new growth looks rough, that’s something else.
Adjusting Care Across Seasons
My Boston ferns definitely need different care in winter than summer. They slow down when it’s cold and dark, so I water less and skip fertilizer from late fall through winter.
During winter, the soil stays moist way longer, so I check it less often. Overwatering is a bigger risk now. I also hold off on fertilizer until I see spring growth.
In summer, growth speeds up and the plant drinks more, so I water more often and go back to monthly feeding with diluted fertilizer. Humidity drops in winter with indoor heating, so I mist more or use a pebble tray.
Quick Tip: Move your fern a bit closer to a window in winter for more light, but keep it away from cold drafts.
Solutions for Reviving a Browning Boston Fern
Bringing your Boston fern back to its green, lush self takes some patience, steady moisture, and the right humidity. Stick with it—new growth cycles can surprise you.
Step-by-Step Recovery Tips
First, I check the soil by poking my finger in about an inch. If it feels dry, I water deeply—enough so it seeps out the bottom. Boston ferns really need steady moisture, but they absolutely hate sitting in soggy soil.
Then, I grab some clean scissors and snip off any brown fronds at the base. I cut right where the frond meets the soil. Honestly, there’s no use in keeping dead leaves around. The plant can use that energy for fresh growth instead.
Quick Tip: Brown fronds won’t turn green again, so just get rid of them for a healthier, better-looking plant.
I try to bump up humidity by misting the fern every day or setting it on a pebble tray with water. The pot shouldn’t actually sit in the water, though. In winter, I move my fern away from heating vents since they dry the air out way too much.
Indirect light is best, so I avoid putting the plant in direct sun. That just fries the fronds. Bathrooms with a window are honestly perfect—showers keep things nice and humid.
Long-Term Care Strategies
During spring and summer, I water my Boston fern every 2-3 days, always checking the soil first. In the colder months, I cut back to once or twice a week, since the plant doesn’t grow as quickly.
Feeding comes into play too. I use a balanced liquid fertilizer at half strength every couple of weeks in the growing season. I skip it in fall and winter when things slow down.
Quick Tip: Too much fertilizer leads to brown tips and salt buildup. Less is more.
Every year or two, I repot my fern in spring with new potting mix. I only move up one pot size since Boston ferns like being a bit rootbound. Drainage holes are a must to avoid root rot and browning.
Keeping the temperature steady helps a lot. I aim for 60-75°F and keep the plant away from drafts or blasts of hot air. In places with harsh winters, I put my fern near an east-facing window for soft morning light.
How to Prevent Browning in the Future

Keeping your Boston fern green mostly comes down to sticking with a few habits and catching problems early. A little attention goes a long way.
Routine Maintenance Tips
Every few days, I poke my finger into the soil about an inch deep. If it’s dry, I water until it drains out the bottom. Letting the soil dry out completely is a no-go—these ferns hate it.
Humidity is honestly huge. I keep my fern in the bathroom or kitchen if I can, just because there’s more moisture. If my house feels dry, I use a humidifier or set the pot on a pebble tray with water.
Quick Tip: I mist the fronds every other day in winter since indoor heat zaps moisture from the air.
I snip off brown fronds at the base with clean scissors. It just looks tidier, and the plant doesn’t waste energy on dying leaves.
My ferns get bright, indirect light—never direct sun. A few feet from an east or north window works best. Too much sun just scorches the fronds.
Monitoring for Early Signs
Whenever I water, I check for pale tips or yellowing fronds. They’re usually the first signs that something’s off with watering or humidity.
Crispy brown edges? That usually means the air’s too dry or I’ve slacked on watering. If fronds go yellow first, I’ve probably overwatered or the pot isn’t draining right.
Quick Tip: Browning on just one side? Try rotating the pot—it could be getting uneven light or sitting near a heat vent.
I also keep an eye out for a white crust on the soil, which means salt buildup from fertilizer or tap water. Once a month, I flush the soil with distilled water to keep things in check.
Conclusion
Dealing with a browning Boston fern can be a pain, but honestly, most problems are fixable. Once you sort out what’s wrong, a few tweaks to your care routine can really turn things around.
Usually, it’s watering, humidity, or too much sun that’s to blame. For me, watching moisture levels and misting regularly made a huge difference. Boston ferns can be a little dramatic, but they’re not impossible to please.
Quick Tip: Instead of following a strict schedule, check your fern every few days—its needs change with the seasons.
If you see brown fronds, don’t freak out. Trim them off, adjust your care, and move forward. These plants are tougher than they look and bounce back with a bit of patience.
Brown tips or fronds are just your plant’s way of saying something needs to shift. Tweak your routine, pay attention, and you’ll get the hang of reading your fern’s signals over time.
Frequently Asked Questions
Boston ferns can be a handful, and people ask me about brown leaves all the time. The usual suspects? Watering habits, light, humidity, and sometimes missing nutrients.
What could be causing the tips of my Boston Fern’s leaves to turn brown?
Brown tips pretty much always mean the air’s too dry. Boston ferns really crave high humidity to keep their fronds lush and green.
Dry air zaps moisture from the leaf tips, so that’s usually the main issue. Tap water with lots of salt or fluoride can also do it—minerals build up in the soil and hurt the roots over time.
Quick Tip: Mist daily or use a pebble tray with water to keep the air around your fern nice and humid.
How often should I be watering my Boston Fern to prevent browning?
I water when the top inch of soil feels a bit dry. For me, that’s every 2-3 days in warmer months.
The goal is moist, never soggy soil. If it dries out all the way, you’ll see crispy brown fronds fast. In winter, I cut back to once or twice a week since the plant isn’t growing much. Overwatering in cold weather can cause root rot and brown leaves, so I watch out for that.
Quick Tip: Just poke your finger in up to the first knuckle—if it’s dry, time to water.
Could improper lighting be a reason for my Boston Fern turning brown?
Absolutely. Too much direct sunlight will scorch the leaves and turn them brown in no time.
I keep my Boston fern in bright, indirect light—north-facing windows or a few feet from an east window work well. Too little light makes the plant pale and weak, and while it might not brown right away, it’ll get stressed and more vulnerable.
Quick Tip: Seeing brown, crispy spots? Move your fern out of direct sun right away.
Are there specific nutrients missing in the soil that can lead to a Boston Fern browning?
Lack of nitrogen is the most common issue—older fronds go yellow-brown and drop off. Potassium deficiency can show up as brown tips and edges, usually starting at the margins.
I feed my fern with a balanced liquid fertilizer, half strength, once a month during spring and summer. Too much fertilizer can burn the roots and cause browning, so I go easy.
Quick Tip: Look for a 20-20-20 fertilizer or something similar, but always dilute it more than the label says.
What is the correct humidity level for a Boston Fern to prevent its leaves from browning?
Boston ferns need humidity between 50-80% to really thrive. Most homes are only around 30-40%, which is just too low.
I aim for at least 50% humidity. You can grab a cheap humidity meter at a garden shop to check. Bathrooms and kitchens are great, and clustering plants together helps boost humidity too.
Quick Tip: Run a humidifier near your fern in winter when heating dries the air out.
Can pests or diseases contribute to my Boston Fern’s leaves browning and how can I treat it?
Spider mites are honestly the main pest I’ve run into with Boston Ferns. They suck the sap from leaves, which leads to brown spots and that frustrating overall browning.
Take a close look at the undersides of the fronds for tiny webs or little moving dots. These mites seem to love dry air, so if your humidity’s low, they’re probably lurking around.
When I spot them, I usually spray the whole plant down with water first to knock them off. After that, I go in with insecticidal soap—just make sure to repeat every 5-7 days for about three weeks.
Root rot from fungal disease can be another culprit. It tends to happen if the soil’s been soggy for too long, and you’ll notice the roots get mushy and brown, then the fronds start to brown too.
If you think it’s root rot, gently take the plant out of its pot and trim off any brown, squishy roots. Repot with fresh soil and, honestly, try to water less often going forward.
Quick Tip: Spritz your fern with neem oil every couple of weeks—it’s a pretty solid way to keep pests at bay.
Note: Some images in the articles are sourced from Reddit and Other Platforms For Reference Purpose.